



Iyengar yoga poses at home can look deceptively simple until you try to line up your heels, ribs, and shoulders at the same time. That’s the charm of the method. It asks for attention, not speed, and it has a way of making even the plainest pose feel surprisingly exact.
A mat is not enough. A wall helps, a block helps, a strap helps, and a folded blanket can save your neck, your knees, and your mood on the same afternoon. That is one reason Iyengar yoga works so well in a home setting: you do not need a fancy studio to practice it well. You need a little patience and a willingness to use support instead of treating support like cheating.
The poses below move from standing work to floor work and finish with real rest. That order matters. So does the way you enter each shape. In Iyengar yoga, the pose is not a race to the end position. The pose is the work of arriving there with enough alignment that your breath stays steady and your joints do not revolt halfway through.
1. Iyengar Yoga Mountain Pose (Tadasana)
Mountain Pose is the one people underestimate most. It looks like standing, and that is precisely why it matters. In Iyengar yoga, Tadasana teaches you how to place the feet, lift the kneecaps without locking the knees, and stack the ribs over the pelvis without puffing the chest like a statue.
How to Stand It Up at the Wall
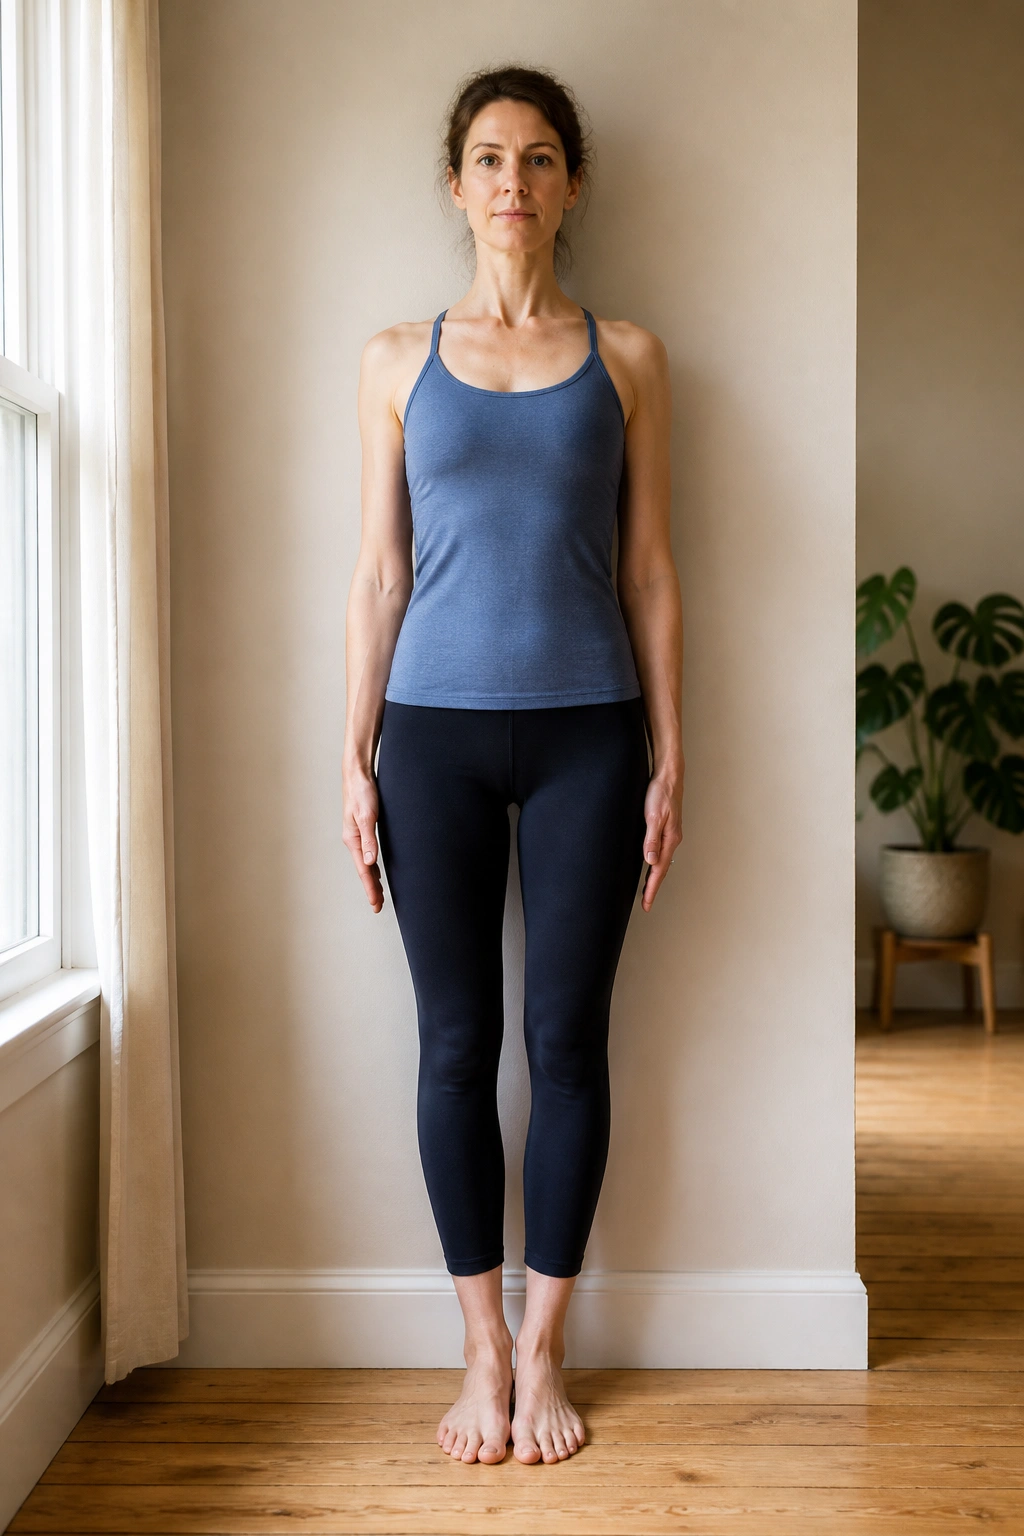
Stand with your heels either together or hip-width apart if balance feels shaky. Press the base of each big toe, the base of each little toe, and both heels into the mat. Then lift the kneecaps just enough to wake up the thighs. The legs should feel firm, not rigid.
A wall behind you helps more than most people expect. Lightly touch the back of your pelvis, upper back, and the back of your head to the wall if your body can do that without strain. If your lower back arches hard, bring the ribs down a little and lengthen the tailbone toward the floor. That tiny adjustment does a lot.
- Keep the toes spread and relaxed.
- Soften the face and jaw.
- Let the shoulders slide away from the ears.
- Breathe for 5 to 8 slow rounds before moving on.
One useful cue: if you feel “pulled up” but also tight in the neck, you’ve gone too far. Aim for tall, not braced.
2. Cat-Cow on the Mat (Marjaryasana-Bitilasana)
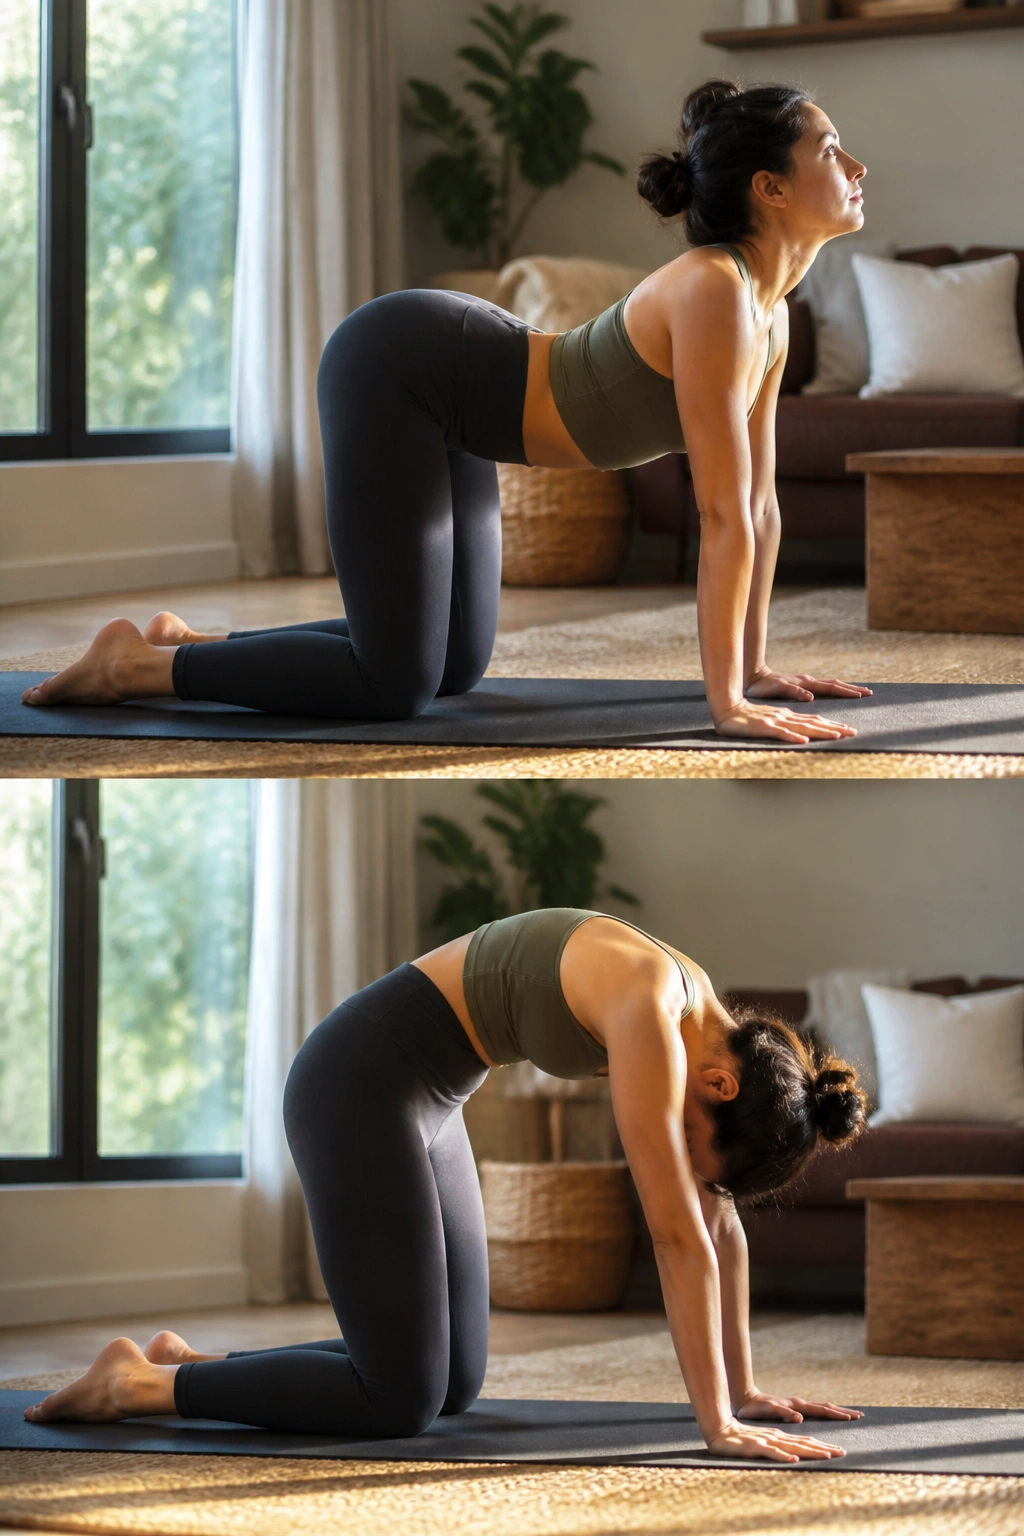
Cat-Cow is the easiest way to tell whether your spine is actually awake. That matters more than fancy flexibility. A stiff back can fake its way through standing poses for a while, but on hands and knees, the truth shows up fast.
Start with your wrists under your shoulders and your knees under your hips. On an inhale, let the belly soften and the chest move forward. On the exhale, round the spine and draw the navel in. Keep the movement slow enough that you can feel each part of the back taking its turn.
A folded blanket under the knees makes this kinder. If your wrists complain, place your hands on blocks or make fists for a few rounds. The goal is not a huge arch or a dramatic round back. The goal is smooth movement through the whole spine, from tailbone to upper back.
Do 6 to 8 rounds before the standing poses. That usually feels right. More than that and the body starts treating it like exercise instead of preparation, which is not the point here.
3. Downward-Facing Dog (Adho Mukha Svanasana)
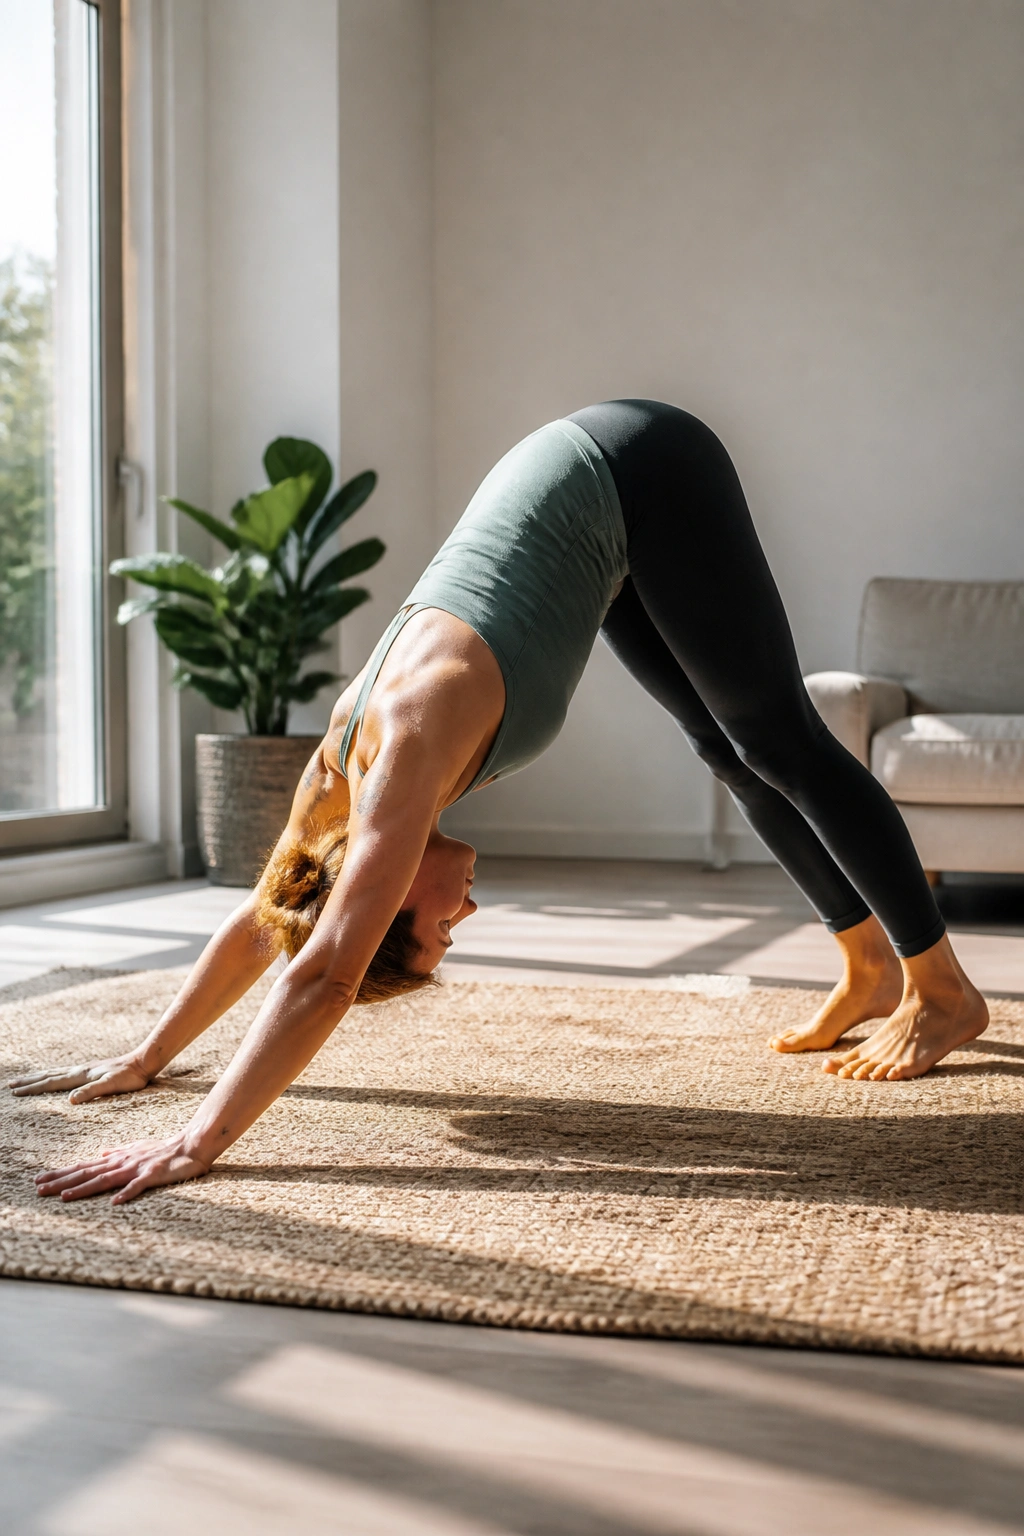
Can a pose that looks like rest work your whole body at once? Yes, and Downward-Facing Dog does exactly that. It lengthens the back, wakes up the hamstrings, and asks the shoulders to stop collapsing into the ears. No pose exposes lazy habits faster.
How to Use the Wall
If full Downward Dog feels like a fight, put your hands on a chair seat or a pair of blocks and walk your feet back. The spine should feel long before the heels worry about the floor. Bend the knees as much as needed. Straight legs are not the prize.
Press the hands evenly, especially the base of the index finger and thumb. That small detail protects the wrists and keeps the elbows from splaying out. Then draw the shoulders away from the ears and imagine the tailbone reaching up and back.
- Hold for 3 to 5 breaths at first.
- Keep the neck free; don’t jam the chin.
- Let the heels hover if the hamstrings are tight.
- Step out before the wrists feel irritated.
What to Watch For
If the front of the shoulders feels pinched, come out and reset your hands. Better a shorter, cleaner dog than a long, sloppy one. That is one of those annoying truths that turns into good yoga once you stop arguing with it.
4. Standing Forward Fold (Uttanasana)
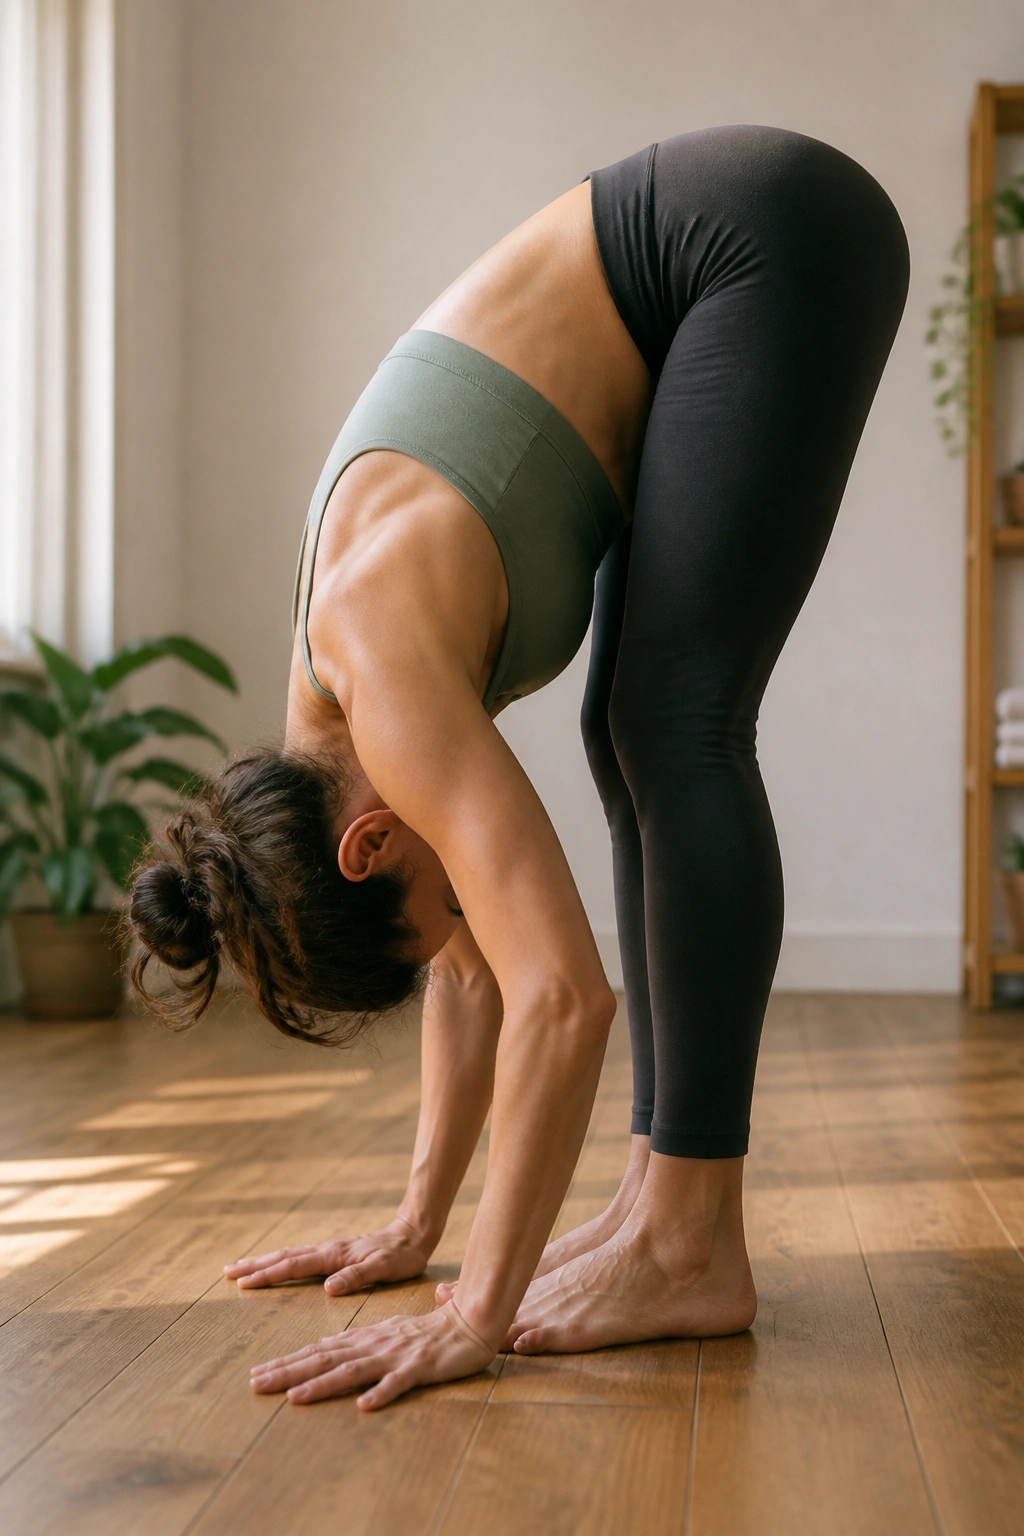
If you sit at a desk all day, Uttanasana can feel like mercy. Or punishment. Sometimes both. The trick is to make it a lengthening pose instead of a collapse, because a rounded fold with a yanked hamstring is not much of a fold at all.
Stand with feet hip-width apart. Hinge from the hips, not the waist, and let the knees bend as much as they need to. If your hands do not reach the floor without rounding the back, place blocks under them or rest the palms on a chair seat. That keeps the front of the torso long.
A quick checklist helps here:
- Weight should stay even across both feet.
- Knees can stay bent. Really.
- The belly should drape, not crunch.
- The neck should hang without effort.
A common mistake: people try to touch the floor at the cost of the spine. Skip that. If your back stays broad and your breath stays easy, the stretch will go deeper over time anyway.
5. Iyengar Triangle Pose (Trikonasana)
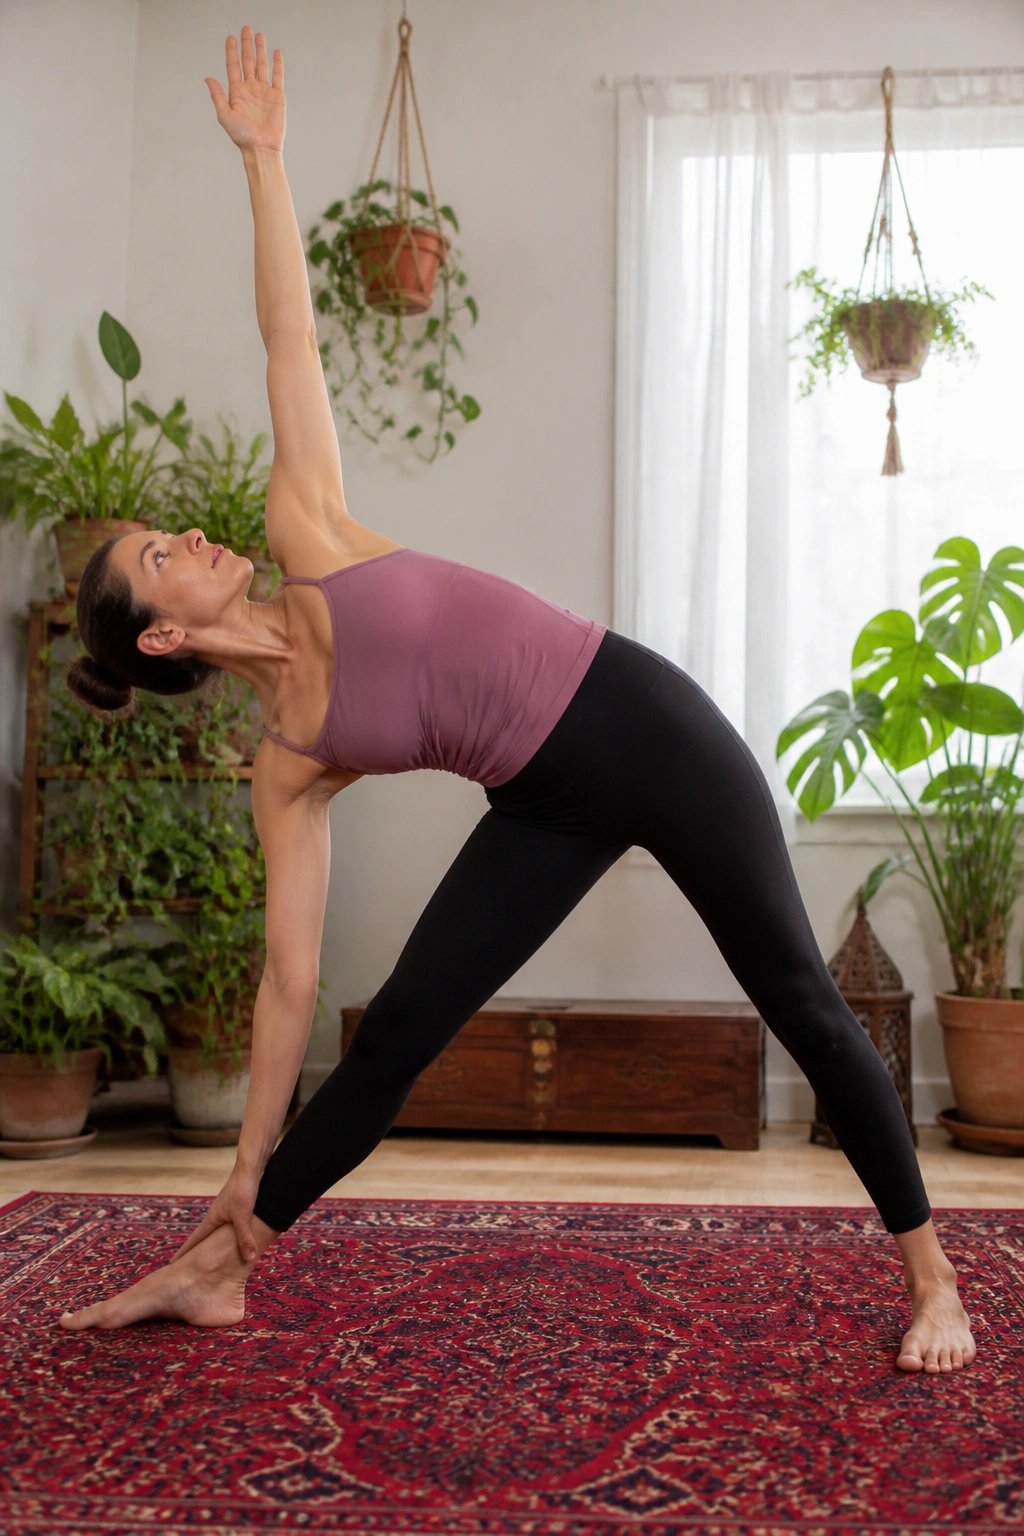
Triangle Pose is one of those shapes that looks neat until you actually do it. Then you realize how much is happening at once: the feet have to root, the legs have to wake up, the torso has to stay long, and the top shoulder has to keep from sneaking forward like a nosy neighbor.
Step the feet wide, turn the right foot out, and angle the left foot in slightly. Reach the right arm forward and let the torso tip from the right hip, not from the waist. A block outside the front shin or ankle is worth using unless your hamstrings are unusually generous. Most people need it, and they need it earlier than they think.
The front knee can soften a little if the hamstring pull is strong. That is not failure. It is intelligent geometry. Keep both sides of the waist long, and let the chest rotate open only as far as the back of the neck can stay easy. If the top hand reaches to the ceiling and the ribs flare hard, you have gone too far.
Triangle is one of my favorite examples of why Iyengar yoga works at home. It teaches restraint. It also teaches honesty. A pose that looks neat in a photo can be a mess in a body, and this is where the block, the wall, and a little patience earn their keep.
6. Warrior II (Virabhadrasana II)
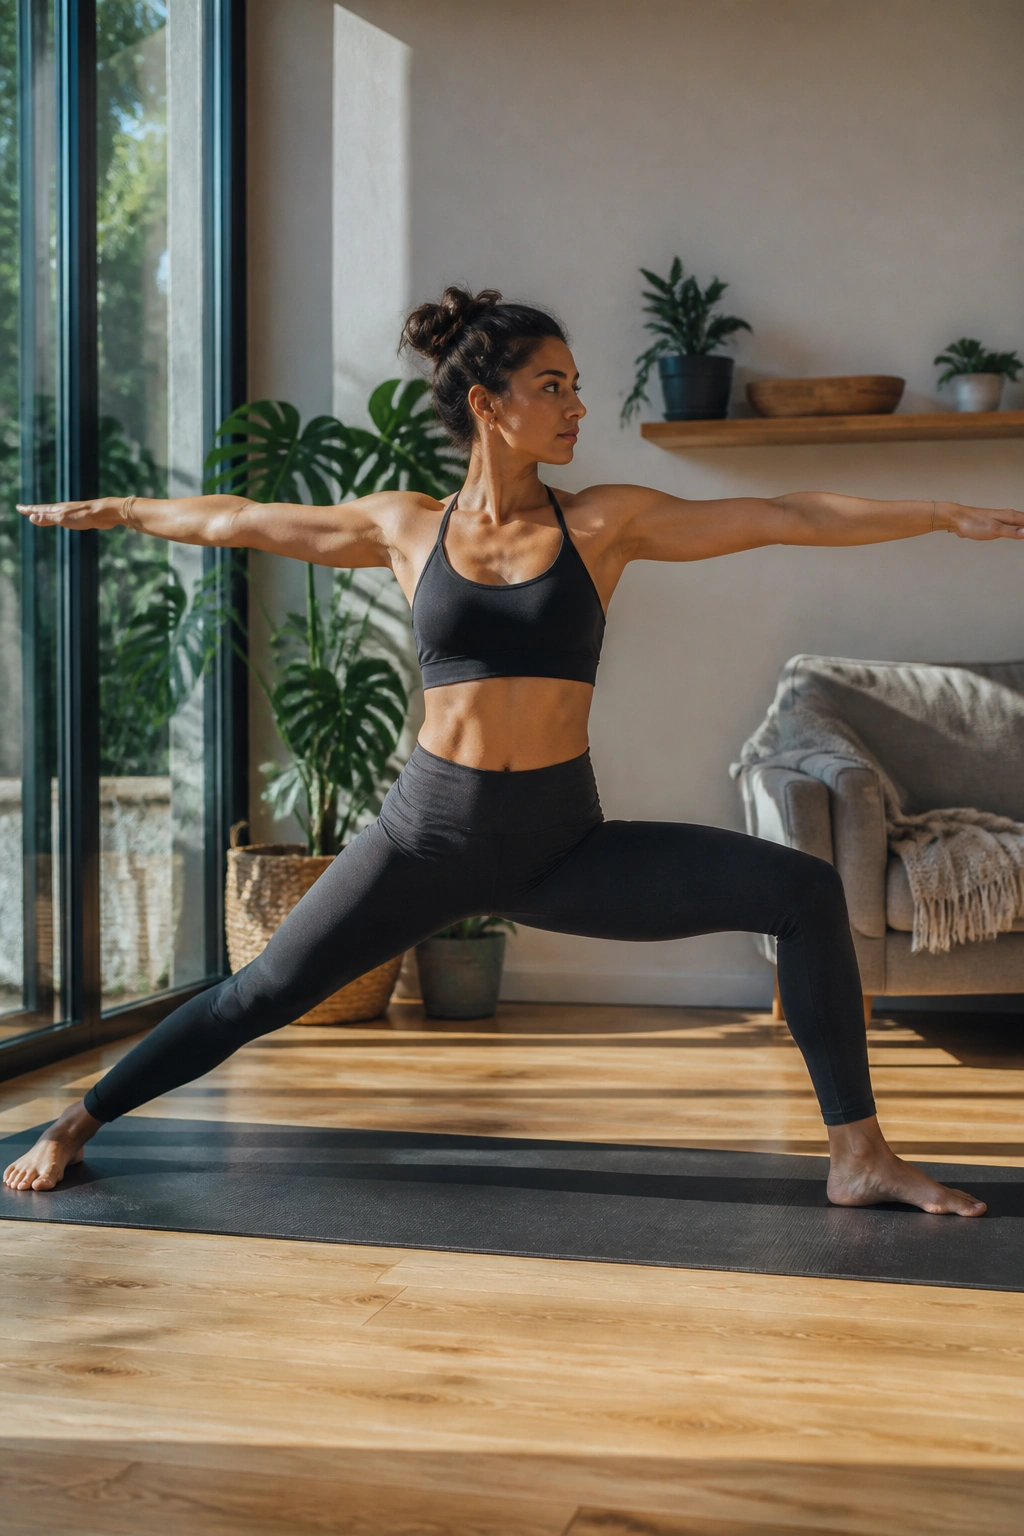
Warrior II is not about lunging and hoping for the best. It is side-on strength with a steady gaze. Compared with Warrior I, this version asks less of the low back and more of your legs, which is why many home practitioners feel more stable in it.
Turn the front foot out and bend the front knee until it lines up roughly over the ankle. The back foot stays grounded, with the outer edge pressing down. Reach the arms long in opposite directions, but keep the shoulders soft enough that the neck does not turn into a hitch.
The hardest part is usually the front thigh. It wants to drift inward or collapse. Resist that by pressing the front knee gently toward the little-toe side of the foot. Then keep the torso upright without leaning forward. Small details. Big difference.
Best use? Standing strength, hip opening, and confidence when you feel wobbly in your practice. Hold 5 breaths per side if that is enough. Longer if your legs are up for it, shorter if they start shaking like overcooked noodles.
7. Extended Side Angle (Utthita Parsvakonasana)
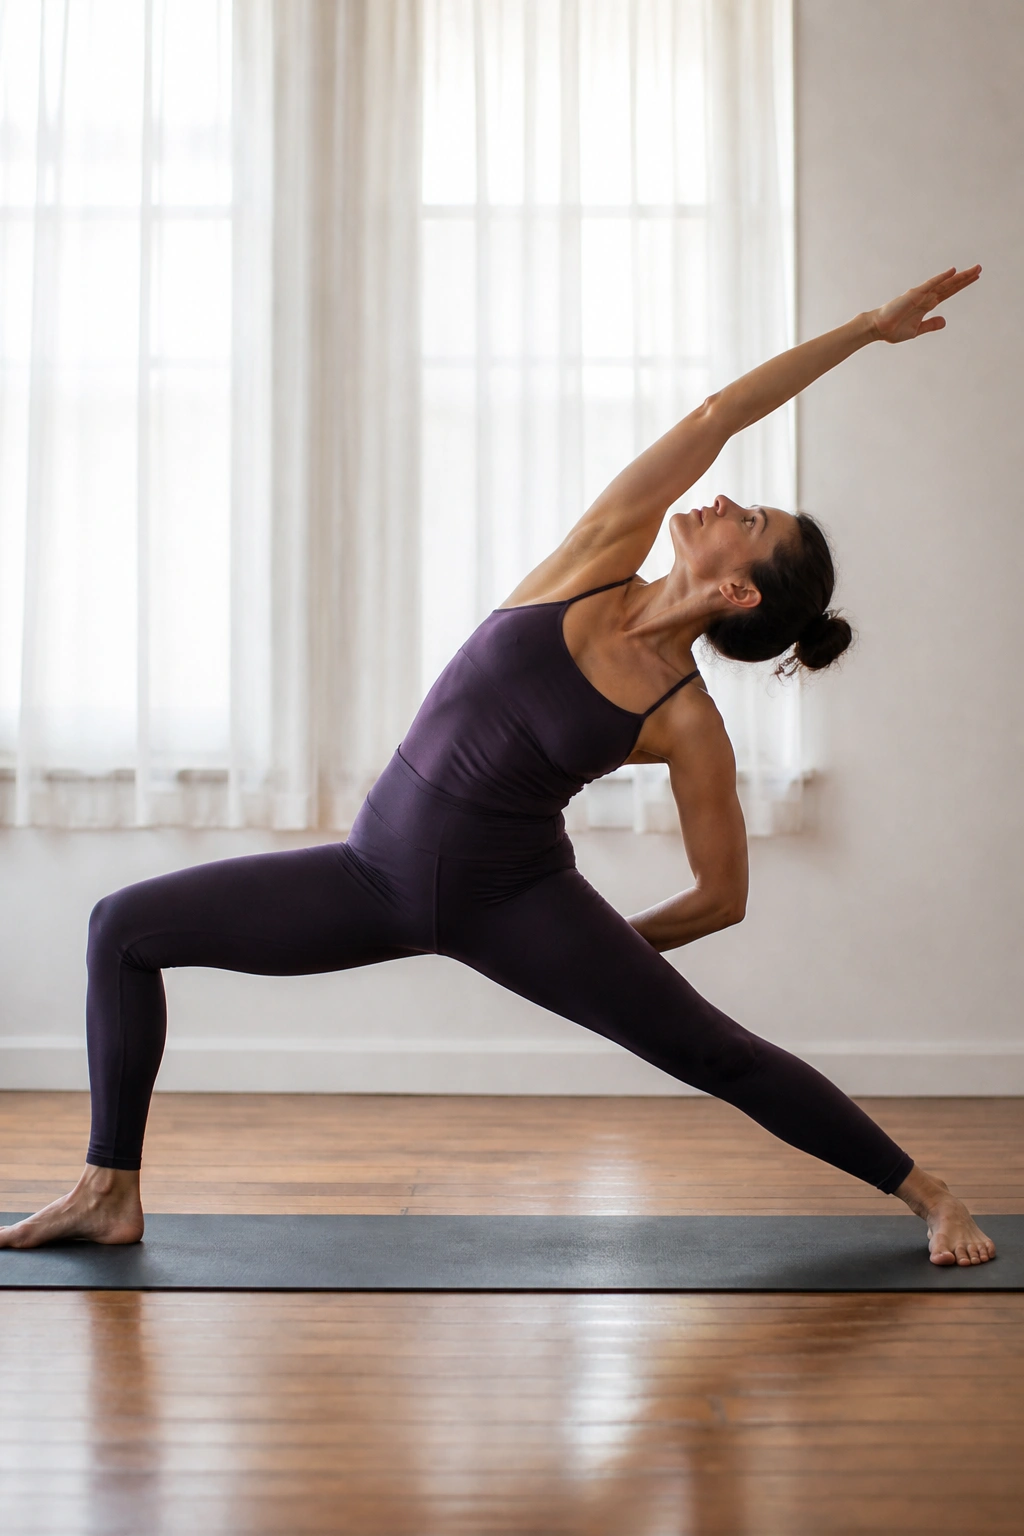
Extended Side Angle is where the standing practice starts to feel a little more interesting. The shape is longer, lower, and messier than Warrior II, which is part of the appeal. You have to work for the line of the body instead of settling into a neat rectangle.
The Block Matters Here
Set up the same wide stance you used in Warrior II. Bend the front knee, then bring the forearm to the thigh or the hand to a block on the inside or outside of the front foot. I prefer the block outside the front foot for most home bodies, because it gives the ribs room to lengthen instead of folding inward.
Keep the back leg active and the outer edge of the back foot planted. Reach the top arm over the ear only if the side body stays long. If the torso caves, leave the arm on the hip or keep it reaching straight up.
- Front knee tracks over the second toe.
- Back heel stays heavy.
- Lower ribs stay lifted, not compressed.
- The neck can look down if overhead reaching feels strained.
Best cue: think “length first, depth second.” That order saves a lot of wobble.
8. Tree Pose (Vrksasana)
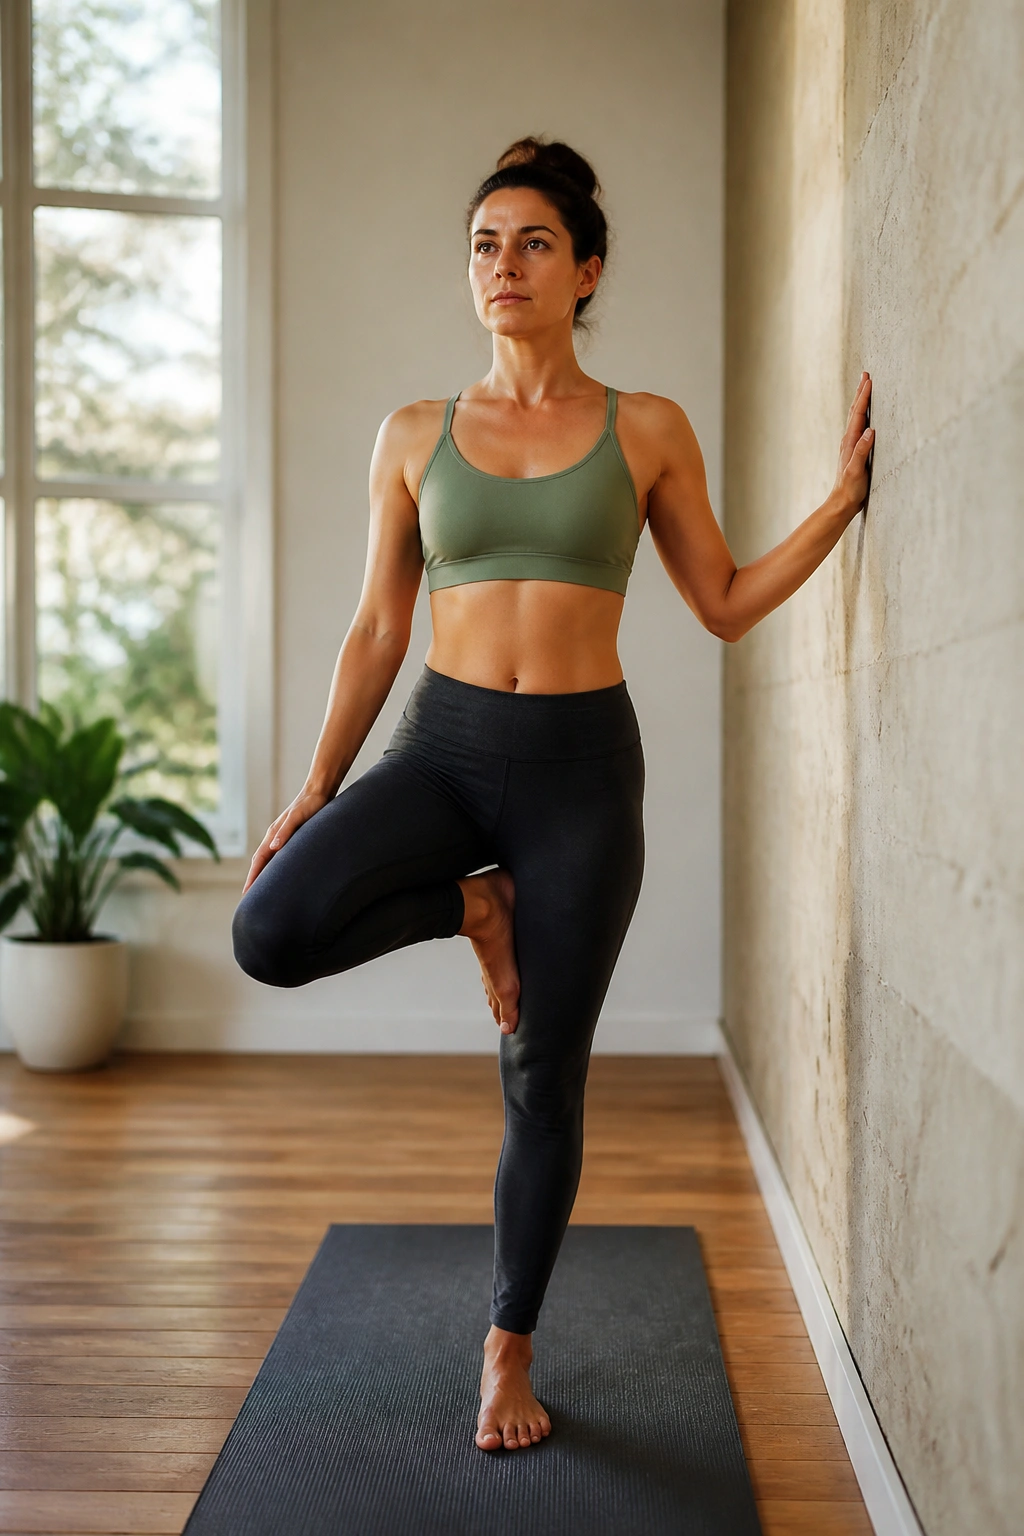
Tree Pose punishes rushing. If you throw the foot up too high too soon, the standing hip starts fighting back, and the whole thing turns into a balancing act with bad manners. Start lower than your ego wants.
Place one foot against the inner ankle, calf, or upper inner thigh, but never on the knee joint. That part matters. The standing leg should feel rooted through the tripod of the foot, while the lifted leg presses gently into the standing side. Use a wall with one fingertips if balance is still in the training phase. Most people need that longer than they admit.
The gaze can stay fixed on one point in front of you. Not on the floor, not wandering around the room. A still gaze settles the body faster than frantic core engagement ever will. Hands can stay at the hips, at the heart, or overhead if the ribs remain calm.
Tree is a useful reminder that balance is not stiff. It is responsive. The foot makes tiny corrections, the ankle moves, and the breath stays quiet enough to keep the wobble from taking over.
9. Supported Child’s Pose (Adho Mukha Virasana)
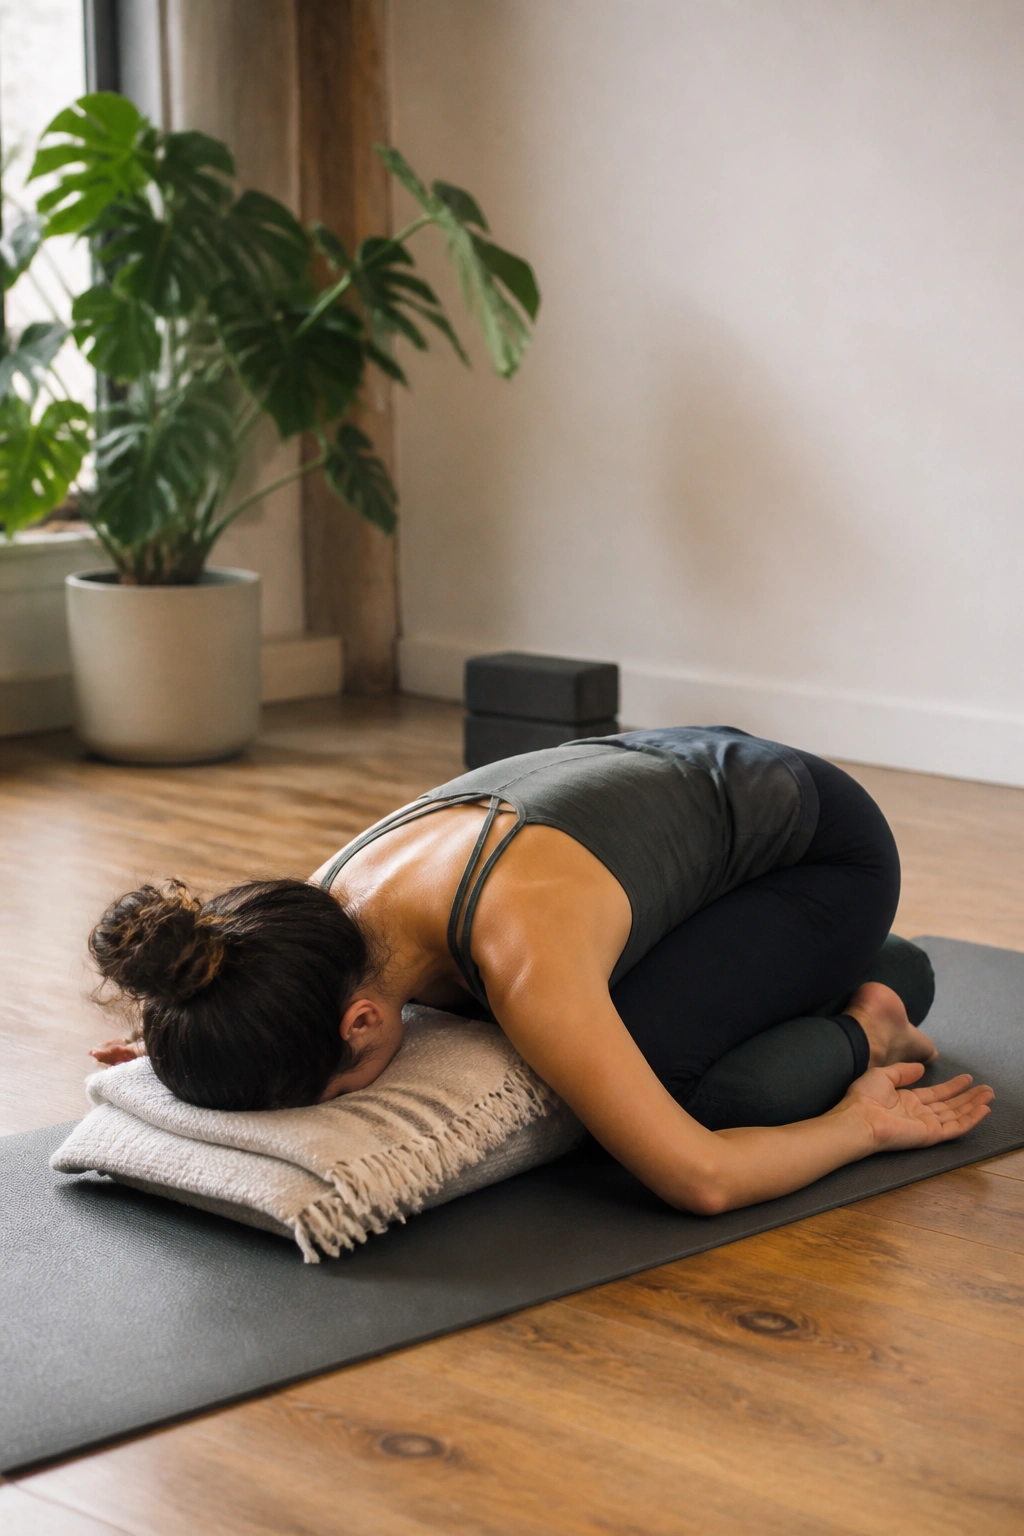
Why does Child’s Pose feel so good when your back has had enough? Because it gives the spine a chance to unhook. The hips can rest back toward the heels, the forehead can drop, and the breath stops having to compete with effort.
If the knees are sensitive, place a folded blanket behind the knees or keep a bolster between the thighs and calves. You can also widen the knees and rest the torso between them. The version matters less than the feeling of support. This is not a pose for proving anything.
Hold the arms forward if the shoulders need space, or let them rest alongside the body if that feels more settling. The forehead touching the floor or a blanket can make a surprising difference to the neck. Tiny support. Big payoff.
I like this pose near the middle of a home practice, not only at the end. It resets the breath. It also gives the nervous system a small break before the floor poses get more demanding.
10. Cobra Pose (Bhujangasana)
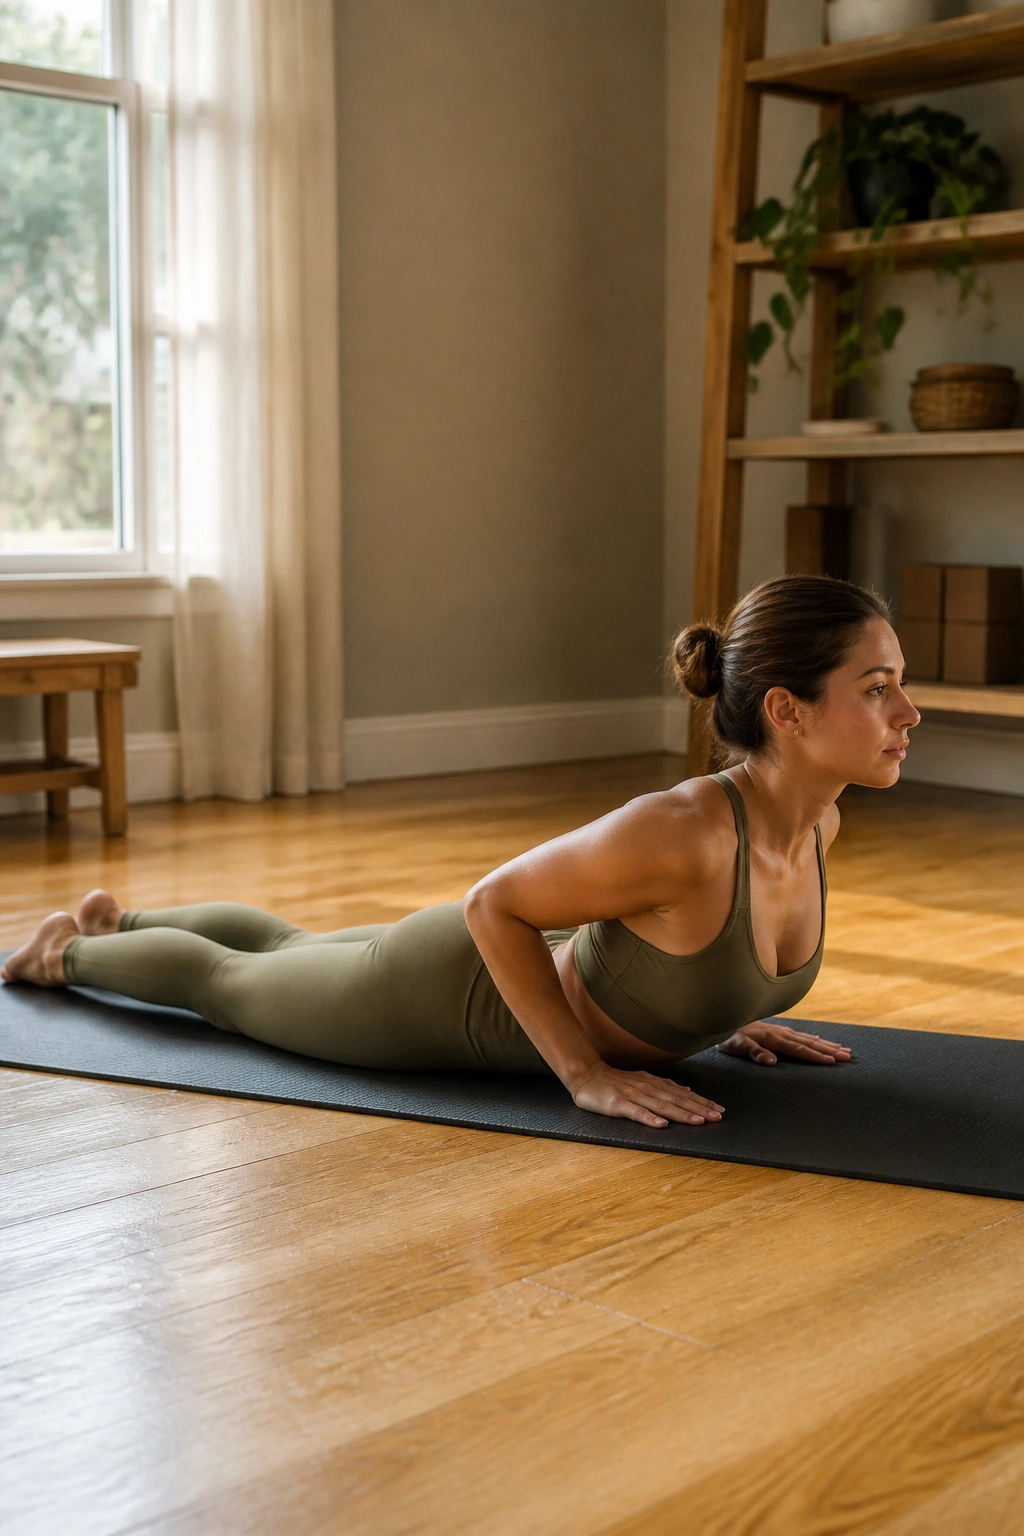
Most people make Cobra bigger than it should be. That usually goes wrong fast. The low back pinches, the shoulders creep up, and the chest lifts before the spine is ready. Small Cobra is better. Every time.
Lie face down with the legs long and the tops of the feet on the mat. Place the hands under the shoulders and press the pubic bone down. On an inhale, lift the chest only as high as you can without clenching the glutes or jamming the neck. The elbows stay bent and close to the ribs.
What Makes It Work
The lift should come from the upper back first, not from a hard push in the hands. If the hands are doing all the work, the pose gets noisy. If the lower ribs stay heavy, the spine opens more cleanly.
A few practical details:
- Keep the shoulders away from the ears.
- Look slightly forward or down.
- Press the tops of the feet into the mat.
- Stop the lift the moment the low back feels crowded.
Good Cobra feels long. If it feels crunched, lower down and make it smaller.
11. Iyengar Yoga Locust Pose (Salabhasana)
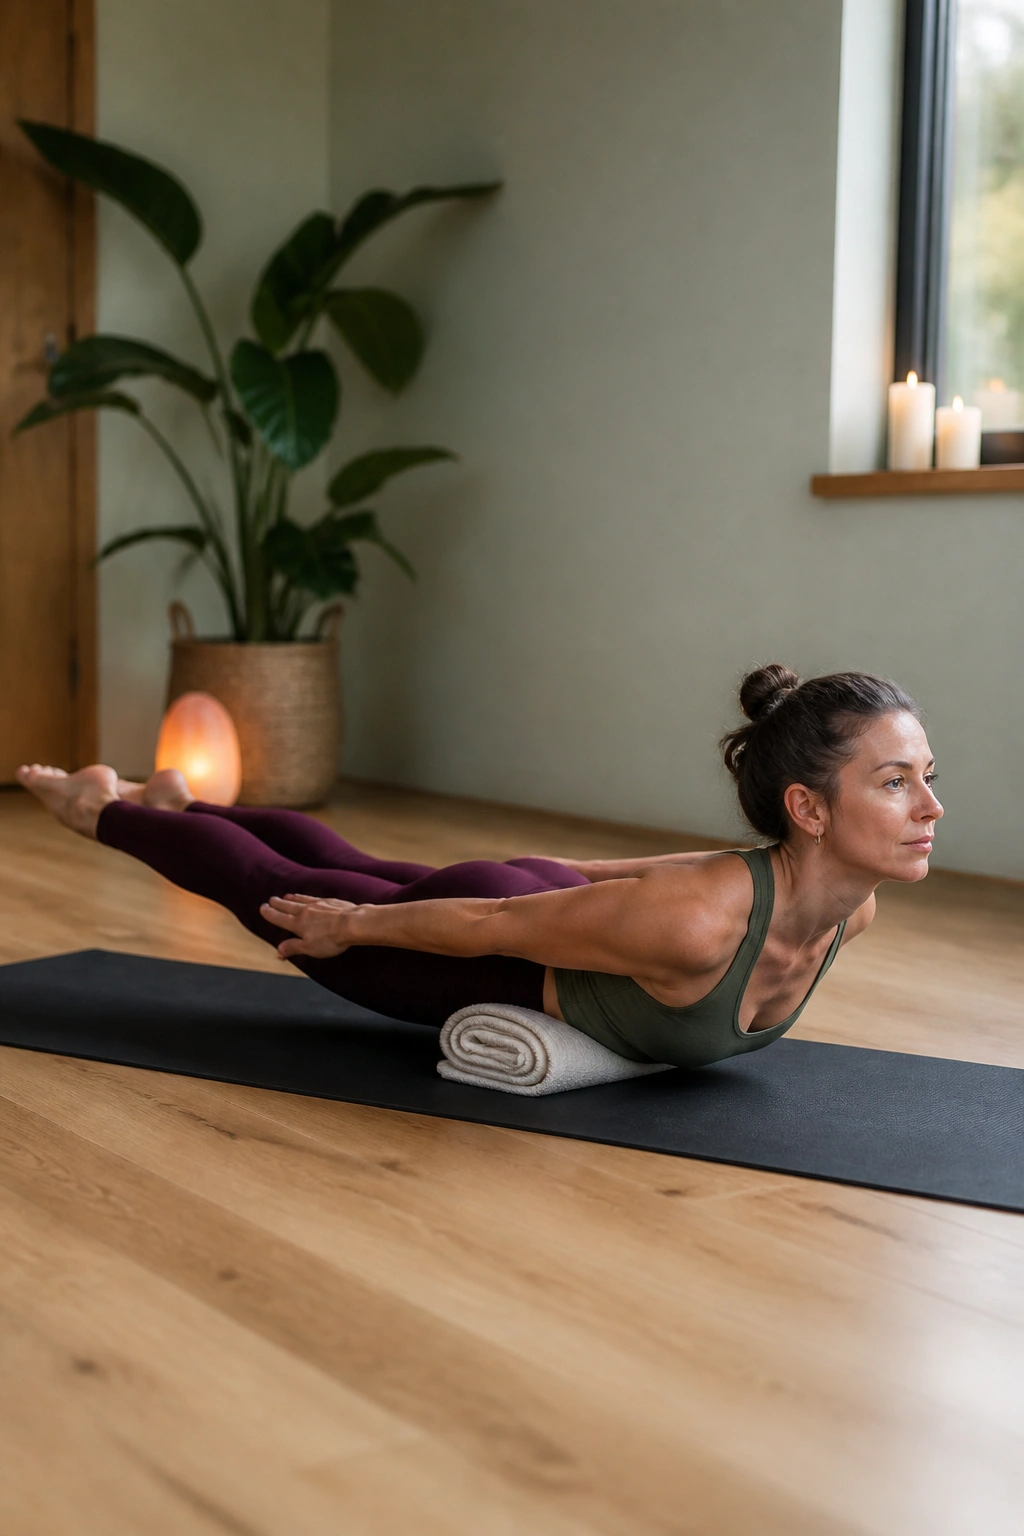
Locust Pose is honest in a way people do not always enjoy. There is no hiding here. The back body has to do the lifting, and the front of the body stays quiet enough to let that happen. In Iyengar yoga, that makes Salabhasana a serious little test.
Lie on the belly with the arms by the sides or stretched back alongside the body. Press the pubic bone and lower belly into the mat, then lift the chest, legs, or both depending on your strength. Start with a small lift. If you yank everything up at once, the neck and low back tend to complain.
A rolled blanket under the lower ribs can help if the sternum feels glued down. It gives the chest a place to move into without cramming the lumbar spine. That tiny prop changes the whole shape.
This pose is especially useful if you spend too much time hunched over a desk. It builds the back line without asking for a huge range of motion. Hold for 3 to 5 breaths, lower with control, then rest one cheek on the mat before taking another round.
12. Staff Pose (Dandasana)
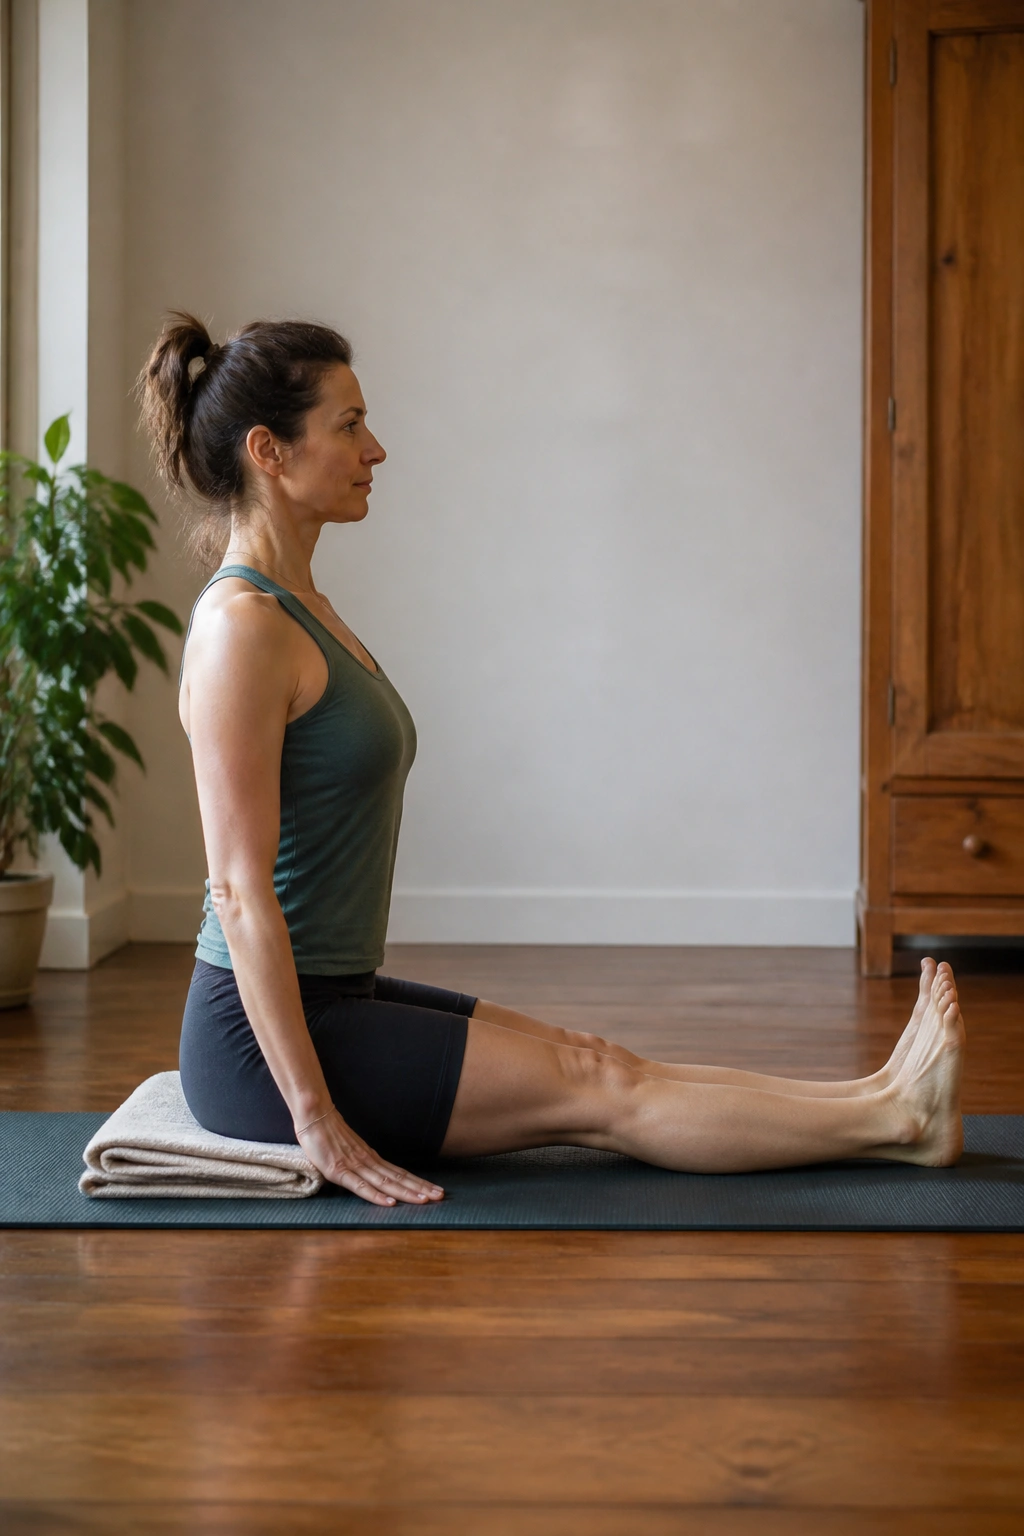
Dandasana looks quiet, almost boring. It is not. It tells the truth about your pelvis. If your hamstrings are tight or your lower back tends to round, Staff Pose shows it immediately.
Sit with your legs extended in front of you and place a folded blanket under the hips if the pelvis tucks backward. Flex the feet, press the backs of the thighs down, and keep the spine tall without arching the low back. The hands can press lightly into the floor beside the hips to help lengthen the torso.
Unlike sitting on a chair, Dandasana asks the hamstrings to wake up while the chest stays open. That makes it a useful reset before seated forward bends. It also stops the whole practice from sliding into slouching without you noticing.
If the knees wobble outward, bring the inner thighs a little closer together. If the shoulders round, lift the sternum without throwing the ribs forward. Five steady breaths can be enough. Ten if you are using it as a quiet anchor between stronger poses.
13. Seated Forward Bend (Paschimottanasana)
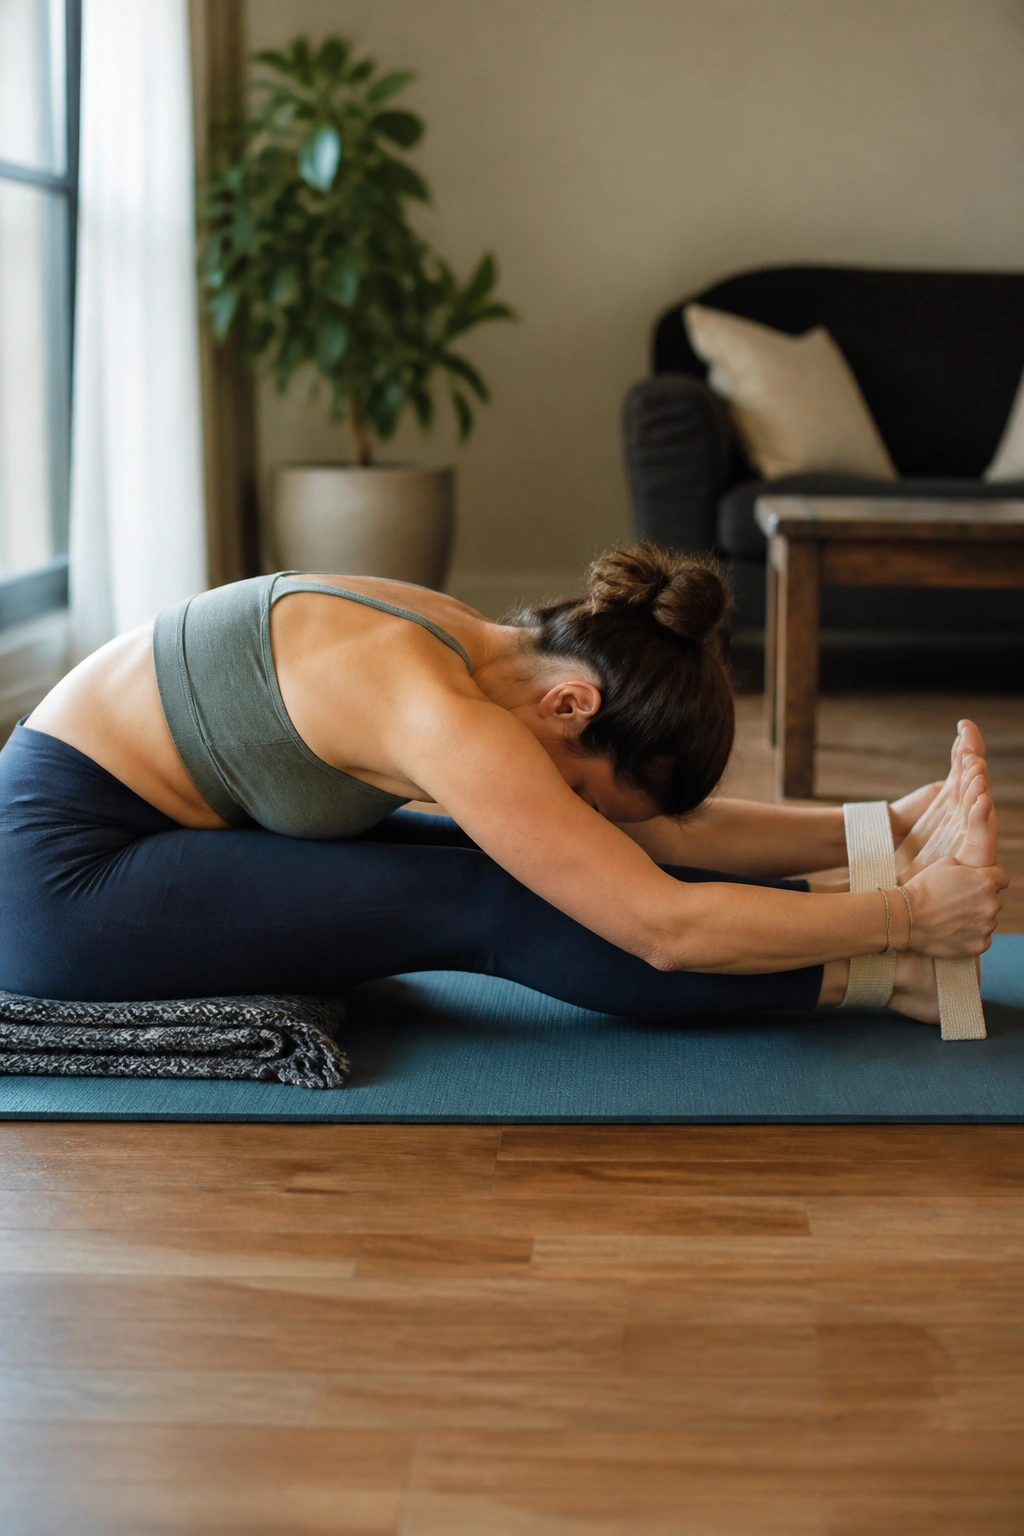
Seated Forward Bend is where a lot of people start bargaining with their hamstrings. Don’t. Use a strap, a blanket, or a bolster and let the pose become a long line instead of a tug-of-war.
How to Fold Without Collapsing
Sit in Dandasana first. That setup matters more than the fold. If the pelvis already tips back, place a folded blanket under it. Loop a strap around the balls of the feet, hold the ends, and inhale to lengthen the torso before you fold forward from the hip creases.
The back should stay broad while the belly moves toward the thighs. If the spine rounds hard, ease up and come back a little. The point is not to reach the toes. The point is to lengthen the front body while the back body softens.
- Keep the feet flexed.
- Bend the knees if needed.
- Rest the head on a bolster if the low back is tight.
- Use the strap to avoid yanking.
Rule of thumb: stretch sensation, not strain. Those are different things.
14. Bound Angle Pose (Baddha Konasana)
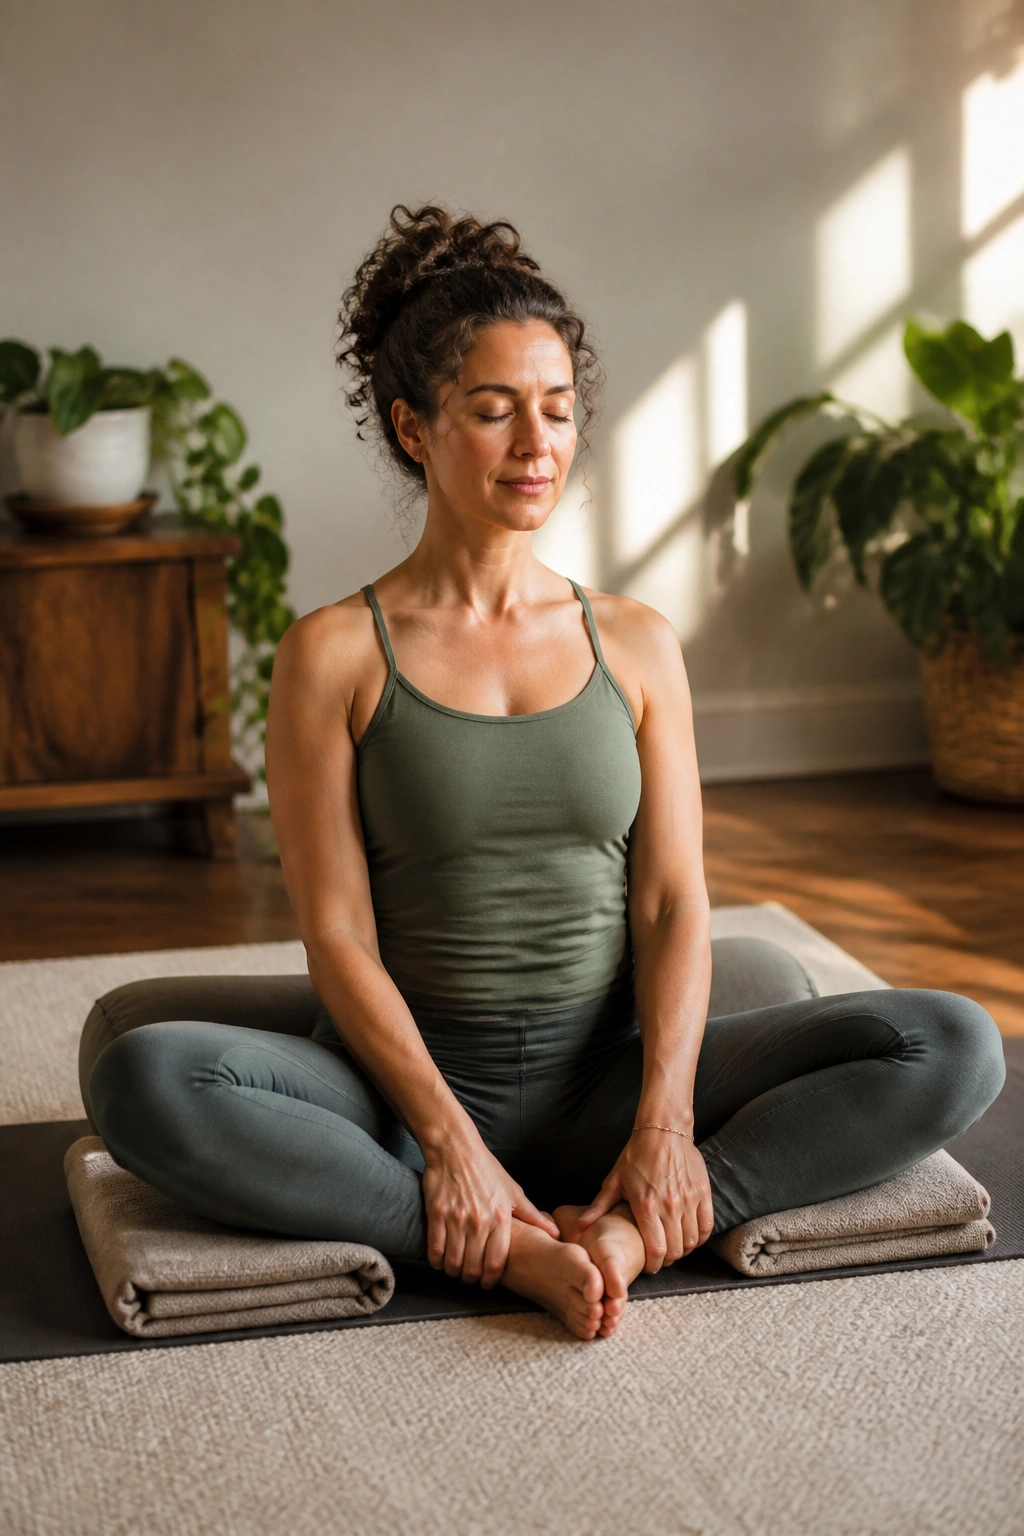
Bound Angle Pose can feel like a gift or a groin complaint, depending on how you set it up. The difference is usually the support. A bolster or folded blankets can turn the pose from a sink into a lift.
Sit with the soles of the feet together and let the knees open out to the sides. If the hips tilt backward, sit on a folded blanket. If the knees hover high and the inner thighs grab, place blocks or blankets under the outer thighs so the legs can release without force.
You can hold the ankles, place the hands on the feet, or rest the fingertips on the floor behind the hips if you want a more upright version. The spine stays long. The chest stays quiet. No pushing the knees down with the elbows, please. That habit has ruined more groins than it has helped.
This is a good pose after standing work because it lets the legs soften while the pelvis stays awake. Hold for 1 to 3 minutes if it feels pleasant. Shorter if the hips start to complain.
15. Reclined Hand-to-Big-Toe Pose (Supta Padangusthasana)
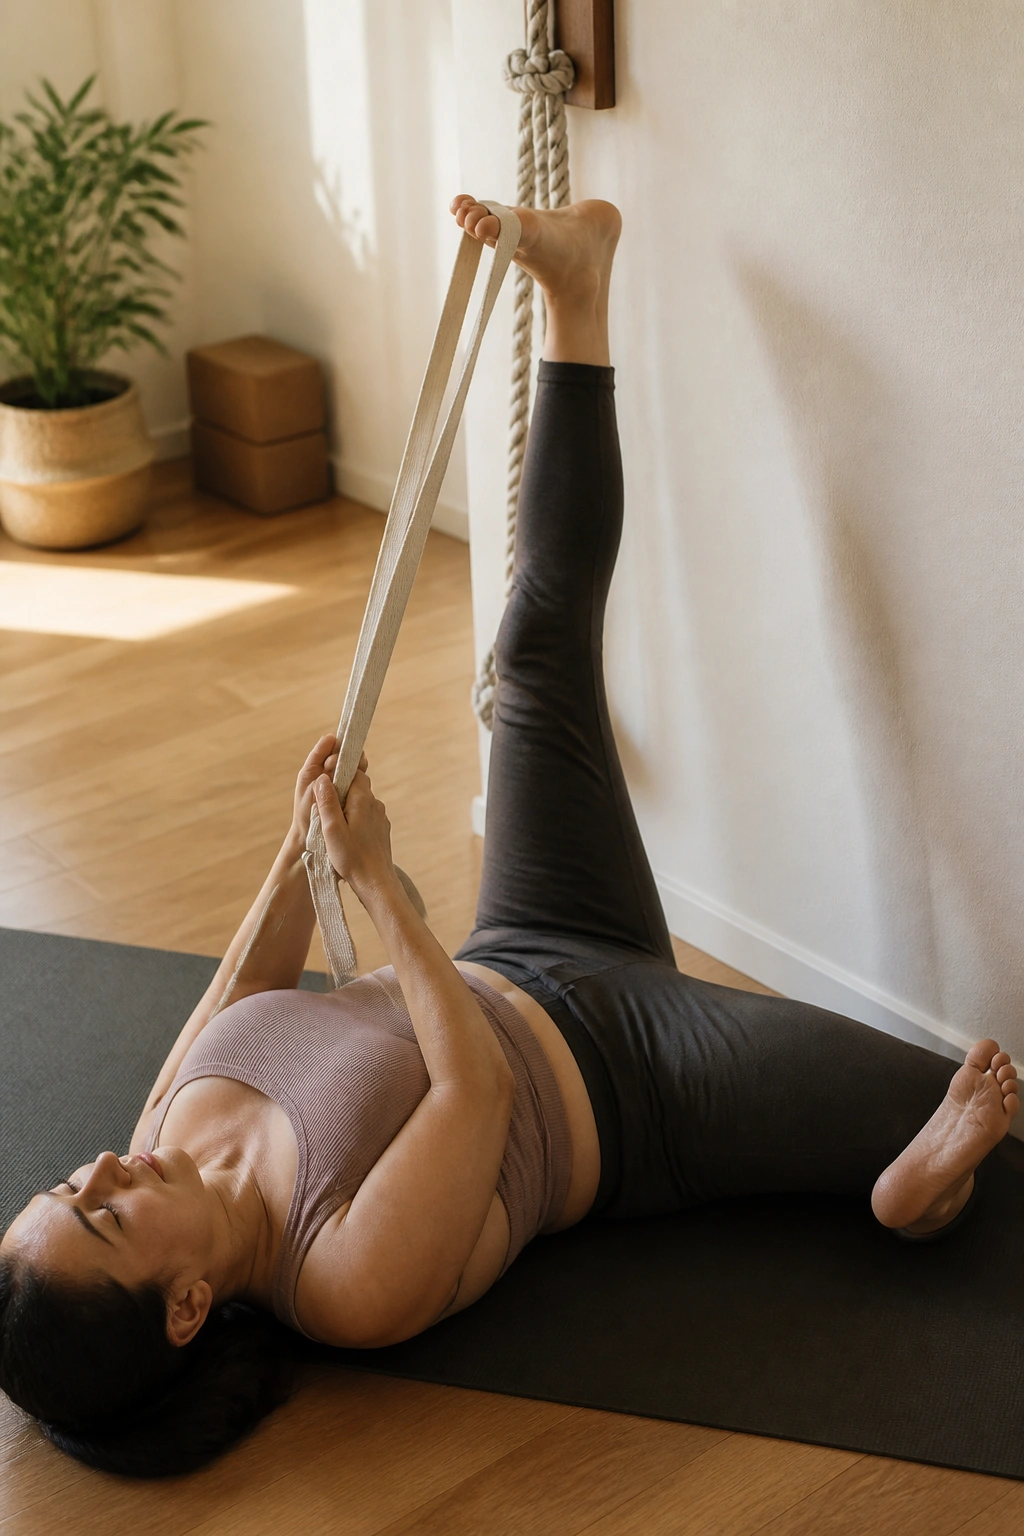
Why do people love this pose? Because it gives a hamstring stretch without the usual standing drama. You lie down, one leg stays grounded, and the lifted leg can work through a strap instead of a desperate grip on the foot.
Strap or Wall?
If the hamstrings are tight, loop a strap around the ball of the lifted foot and keep the other leg bent or flat on the floor. The lifted leg does not need to straighten fully. Keep a micro-bend in the knee if that helps the back stay quiet.
A wall can help too. Lie close enough that one leg can extend up the wall while the other stays on the mat. That version gives a cleaner line and less strain in the shoulders. It is especially handy after a lot of standing work.
- Keep both hips heavy.
- Square the pelvis as much as you can.
- Flex the lifted foot.
- Hold each side for 5 to 8 breaths, then switch.
Do not yank the strap. That never helps. A slow, steady pull tells the hamstrings to soften without provoking them.
16. Bridge Pose (Setu Bandha Sarvangasana)
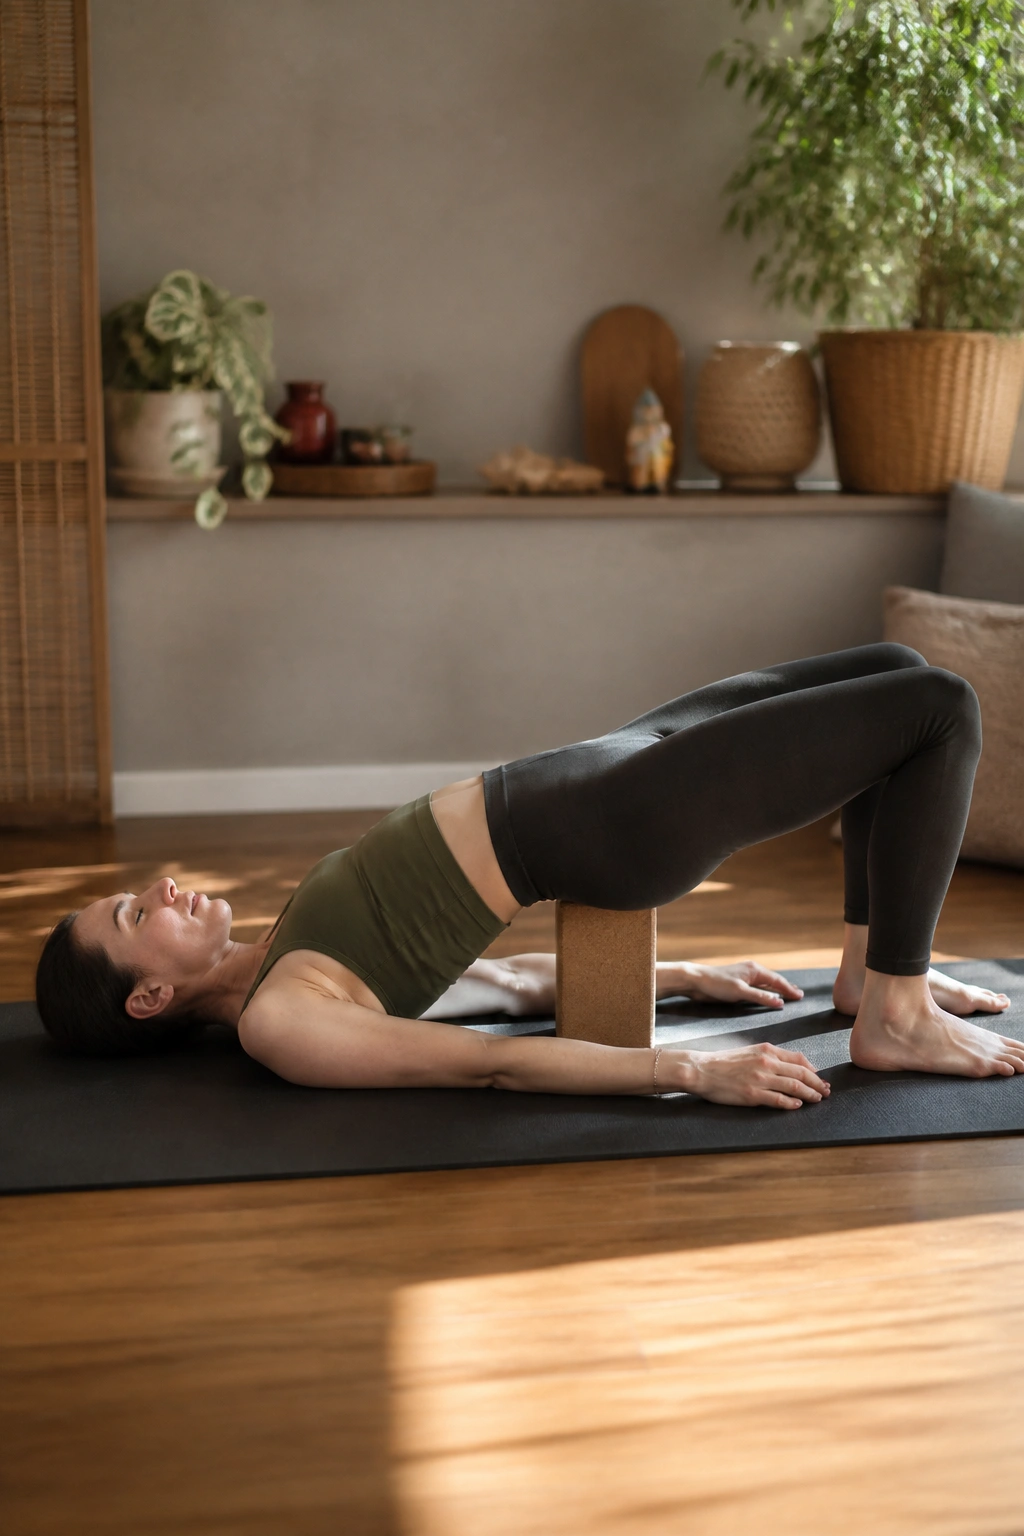
Bridge Pose is one of those shapes that looks simple and then wakes up everything from the glutes to the upper back. If you’ve spent a day slumped over a screen, the first lift can feel almost rude. In a good way.
Lie on your back with the knees bent and the feet hip-width apart. Press the feet down and lift the pelvis on an inhale. Keep the knees tracking forward, not flaring out. The chest should stay broad, and the neck should stay long. If the shoulders bunch up, come down and reset.
A block under the sacrum turns Bridge into a restorative version. That is worth trying. The supported shape gives the lower back a break while still opening the front of the hips. It is especially useful if your back muscles are tired but not yet ready for full effort.
Some people feel the front thighs more than the glutes. That is normal. Some feel almost nothing at first. Also normal. Hold the lifted version for 3 to 5 breaths, or stay longer in the supported version if it feels calming.
17. Iyengar Supported Shoulderstand (Sarvangasana)
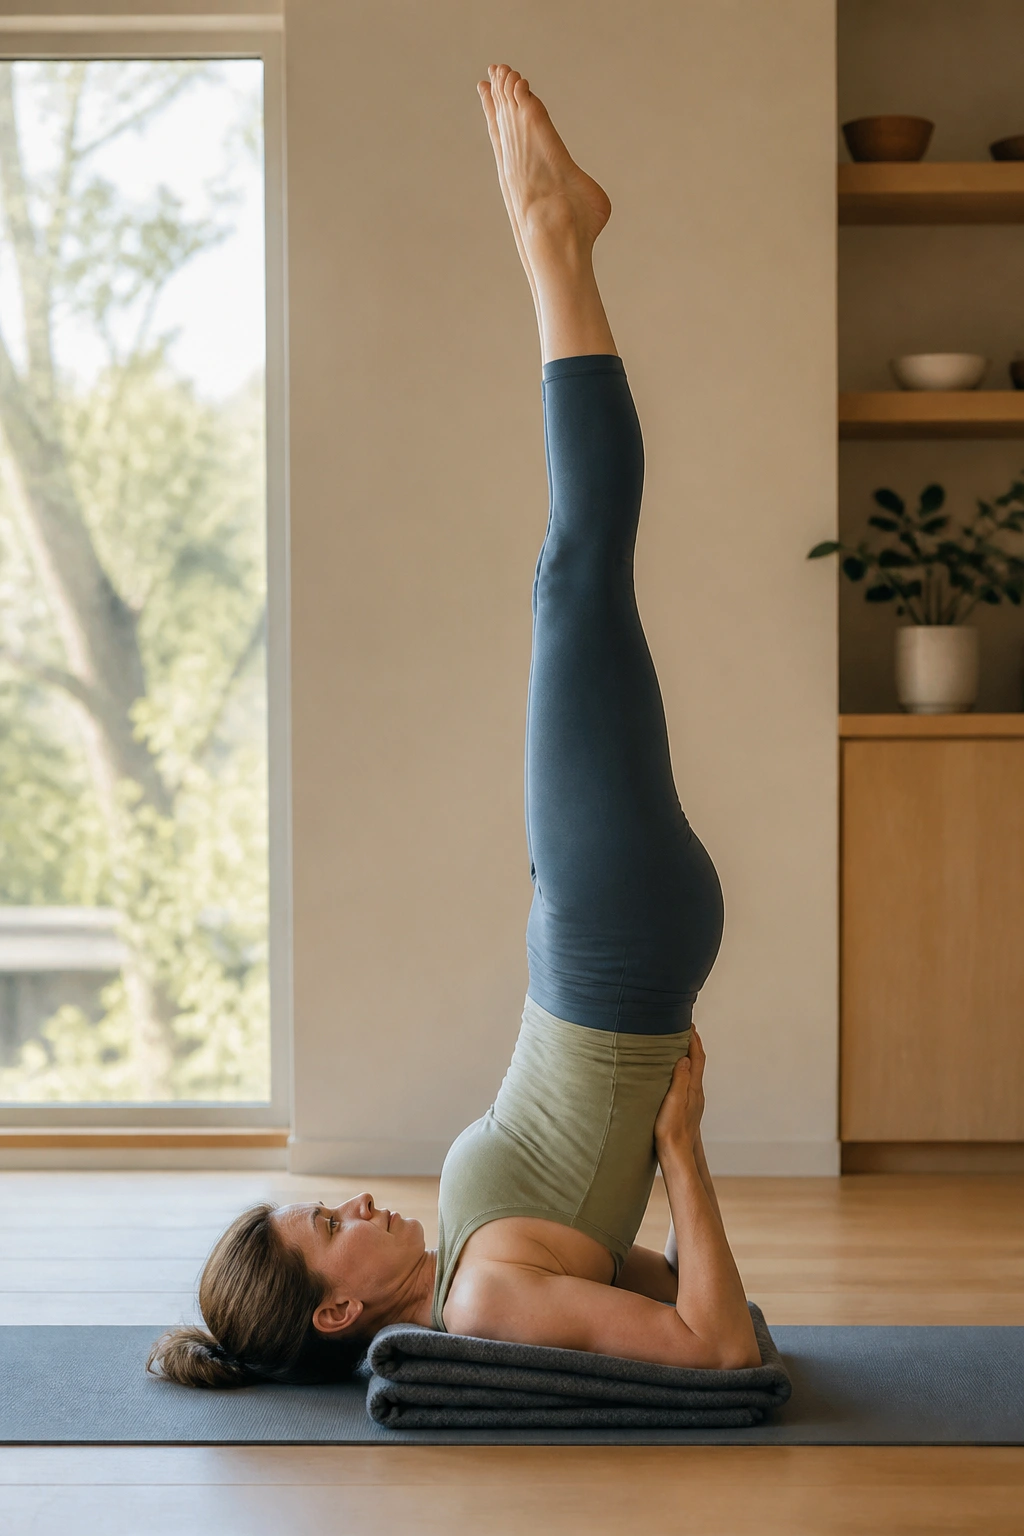
Shoulderstand has a reputation for a reason. Done well, it feels steady and clean. Done badly, it can be a nuisance for the neck and shoulders. That is why Iyengar-style support matters so much here.
Set two to four folded blankets on the floor and lie with the shoulders on the blankets while the head rests on the floor. The neck should feel free, not crushed. From there, lift the legs up with care, keeping the elbows tucked and the chest moving toward the chin without forcing the neck into a hard bend.
If you have neck pain, uncontrolled high blood pressure, glaucoma, or any reason to avoid inversions, skip this pose and stay with Bridge or Legs-Up-the-Wall. That is the sensible choice. A home practice should make you steadier, not more stubborn.
For everyone else, keep the shape small at first. The legs do not need to go perfectly vertical on day one, and the breath should remain even. If the weight shifts into the head, come down. No prize for hanging out in a bad setup.
18. Savasana With Support
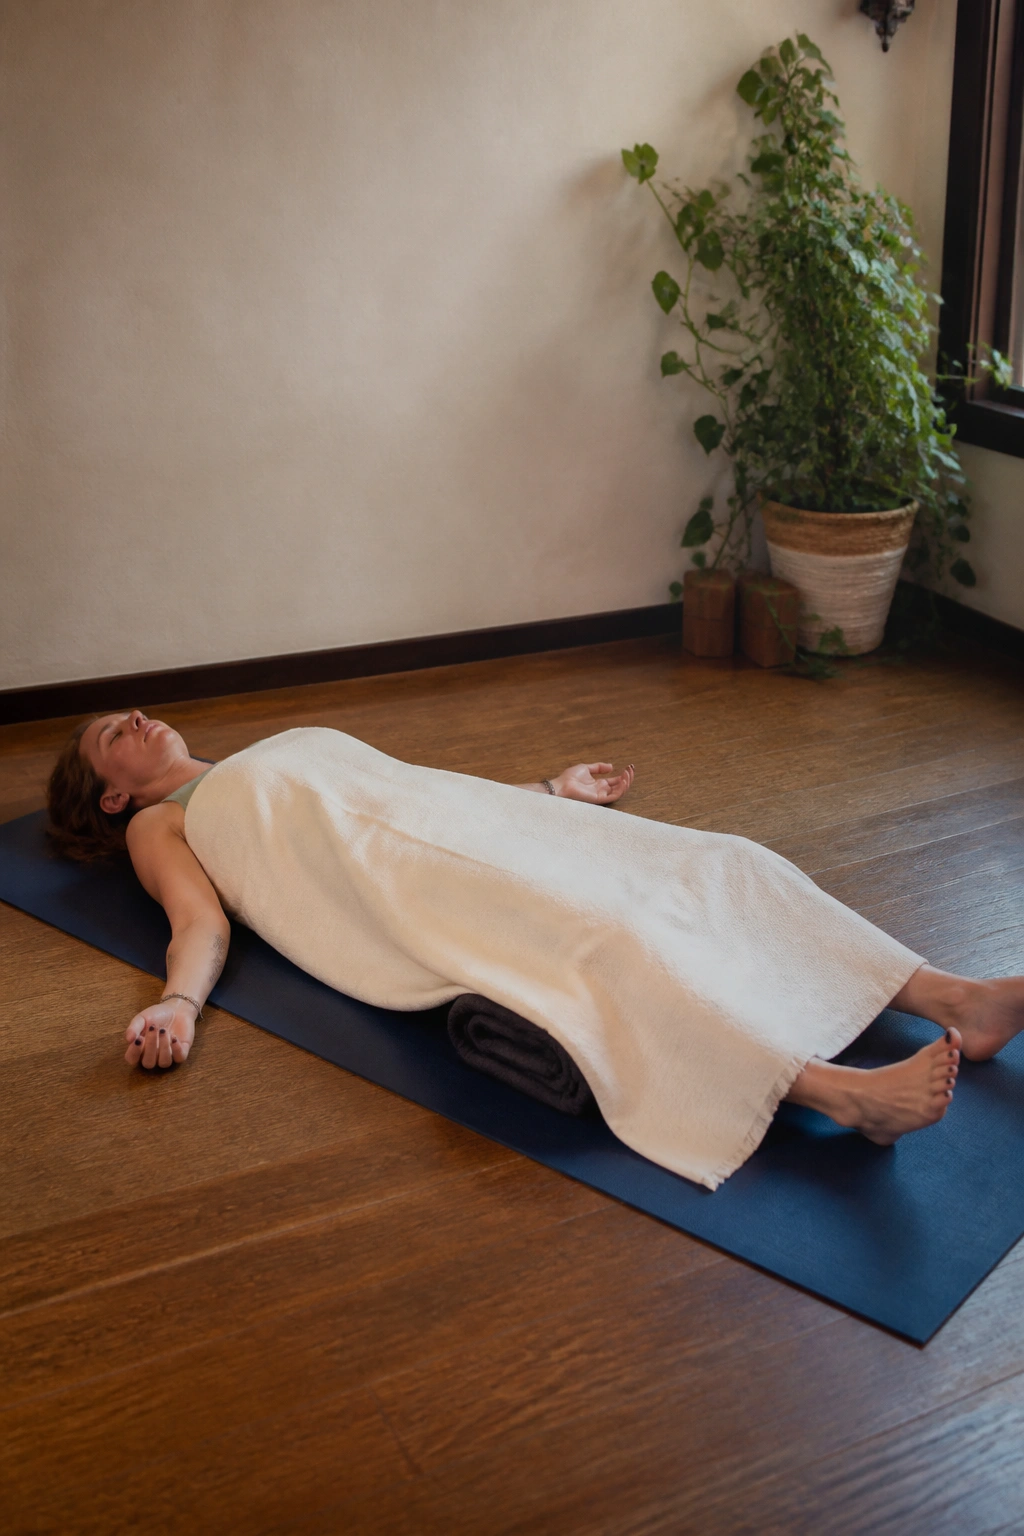
Savasana is not an afterthought. It is where the practice settles into your body. Without it, the earlier work can feel unfinished. With it, the nervous system has enough time to absorb what just happened.
Lie on your back with a folded blanket under the knees if the low back arches. Another blanket over the body can help the muscles release faster, especially if the room is cool. Some people like a rolled towel under the neck; others hate it. Try both. The goal is ease, not decoration.
Give yourself at least 5 minutes if the schedule allows. Longer is even better. The breath should become quiet and shallow, and the jaw should loosen. If thoughts keep racing, that is fine. Let them keep racing and return to the feeling of the floor under the back of the body.
This is the pose that makes the whole home practice feel complete. It is also the easiest one to rush through, which is exactly why it deserves more time than people usually give it.
Final Thoughts
A good home practice does not need to be huge. It needs to be repeatable. Three standing poses, a couple of floor poses, and a real Savasana will do more for your body than a frantic hour of random shapes.
Props are not a sign that you are doing yoga wrong. They are the reason Iyengar yoga works so well in a living room, bedroom, or any spare patch of floor you can claim for 20 minutes. Use the wall. Use the block. Use the blanket. Then pay attention to what changes.
If you keep coming back to these poses, you start noticing the small things first: a steadier breath, a less cranky lower back, a neck that does not feel jammed up by noon. That is the good stuff.
