



Stiff hips have a way of announcing themselves at the worst moments. Getting out of a low car seat, stepping off a curb, or standing up from a soft couch can feel like your hips need to negotiate first.
For women over 50, hip work is not about chasing tiny muscles for their own sake. Stronger hips help with walking speed, balance, stair climbing, and that nagging low-back tightness that shows up when the glutes go quiet. The right hip exercises for women over 50 mix strength, mobility, and a little balance work, because the joint never cares about just one job at a time.
I like exercises that are honest. A bridge you can feel in your glutes. A side step that makes the outer hip burn after 10 steps. A stretch that opens the front of the hip without dumping into the low back. The good ones are usually simple, but they’re specific, and they punish sloppy form fast.
If your hips feel rusty, start with a few floor moves, then build toward standing work and single-leg control. Small range is fine. Slow is better. And if one side feels wildly different from the other, that’s useful information, not a failure.
1. Glute Bridges That Wake Up the Back of the Hips
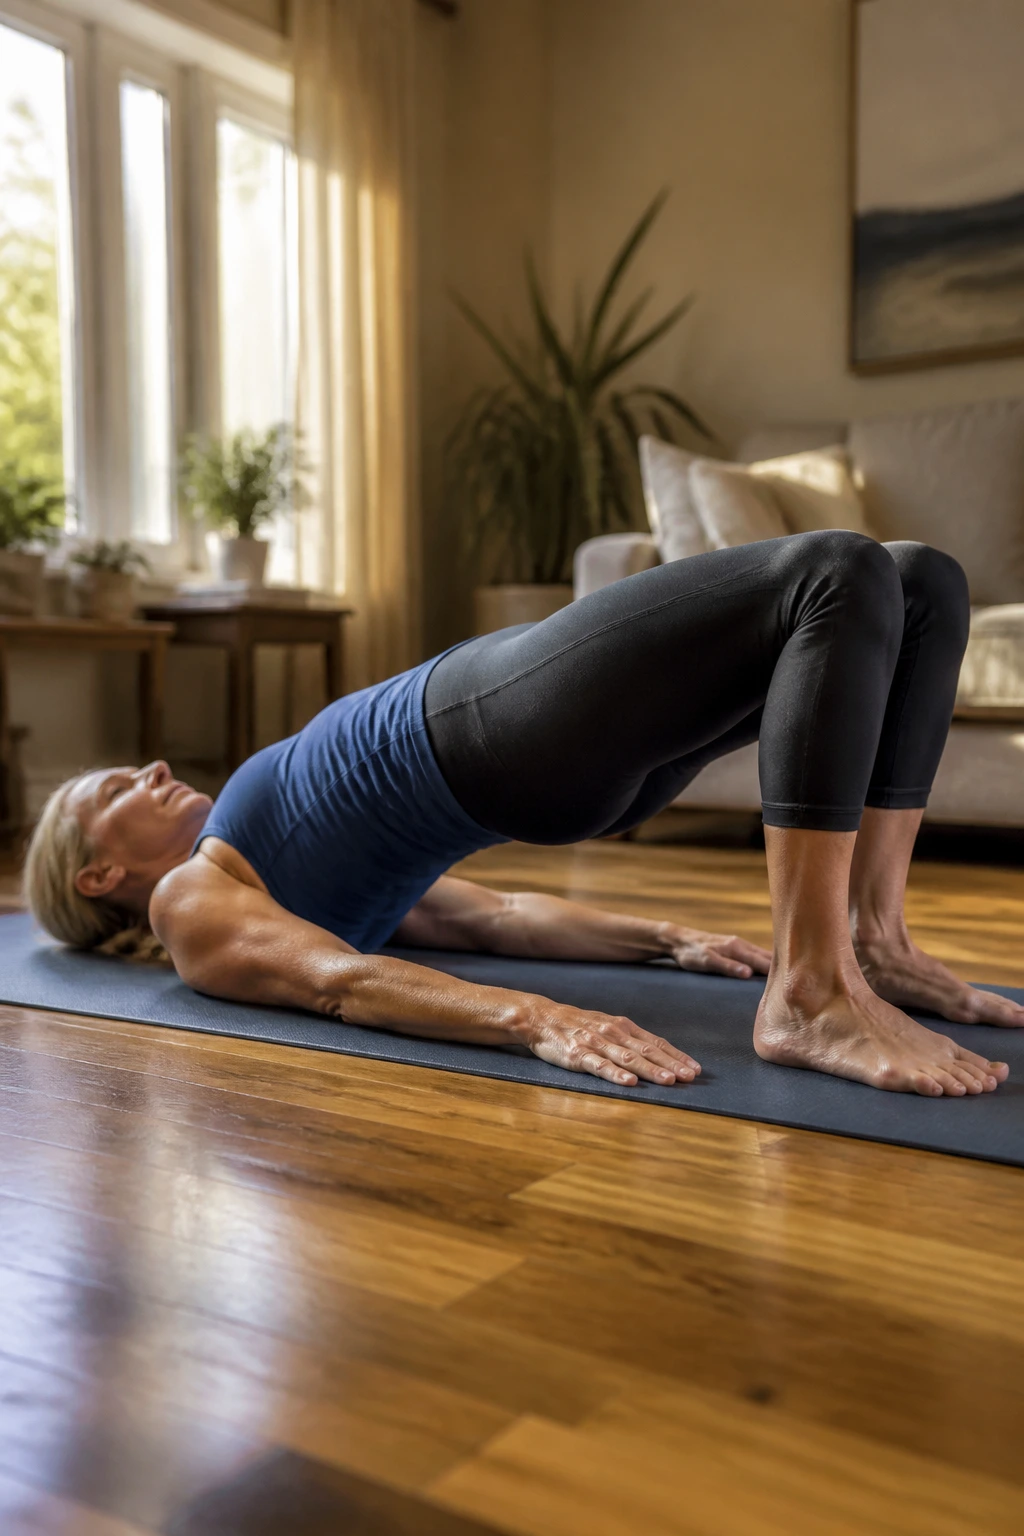
Glute bridges are one of those exercises that look almost too easy until you do them properly. Then the back of the hips starts talking.
Why they earn a spot
The bridge teaches hip extension, which is a fancy way of saying it helps you stand up, walk, and climb stairs with more help from the glutes and less from the low back. That matters a lot when sitting has become a bigger part of the day.
How to do it well
- Lie on your back with your knees bent and feet flat.
- Place your feet about hip-width apart, roughly 6 to 8 inches from your glutes.
- Press through your heels and lift your hips until your body forms a straight line from shoulders to knees.
- Pause for 1 to 2 seconds at the top.
- Lower slowly.
Do not arch your lower back to get higher. If the ribs flare up and the waistband area feels jammed, the bridge is too big. Keep it smaller and cleaner.
A good bridge feels like the glutes, not the hamstrings, are doing the heavy lifting. If you want a little more work, add a mini band above the knees and keep the knees gently pressing out. 8 to 12 reps for 2 or 3 sets is a solid place to start.
2. Side-Lying Clamshells for the Glute Medius
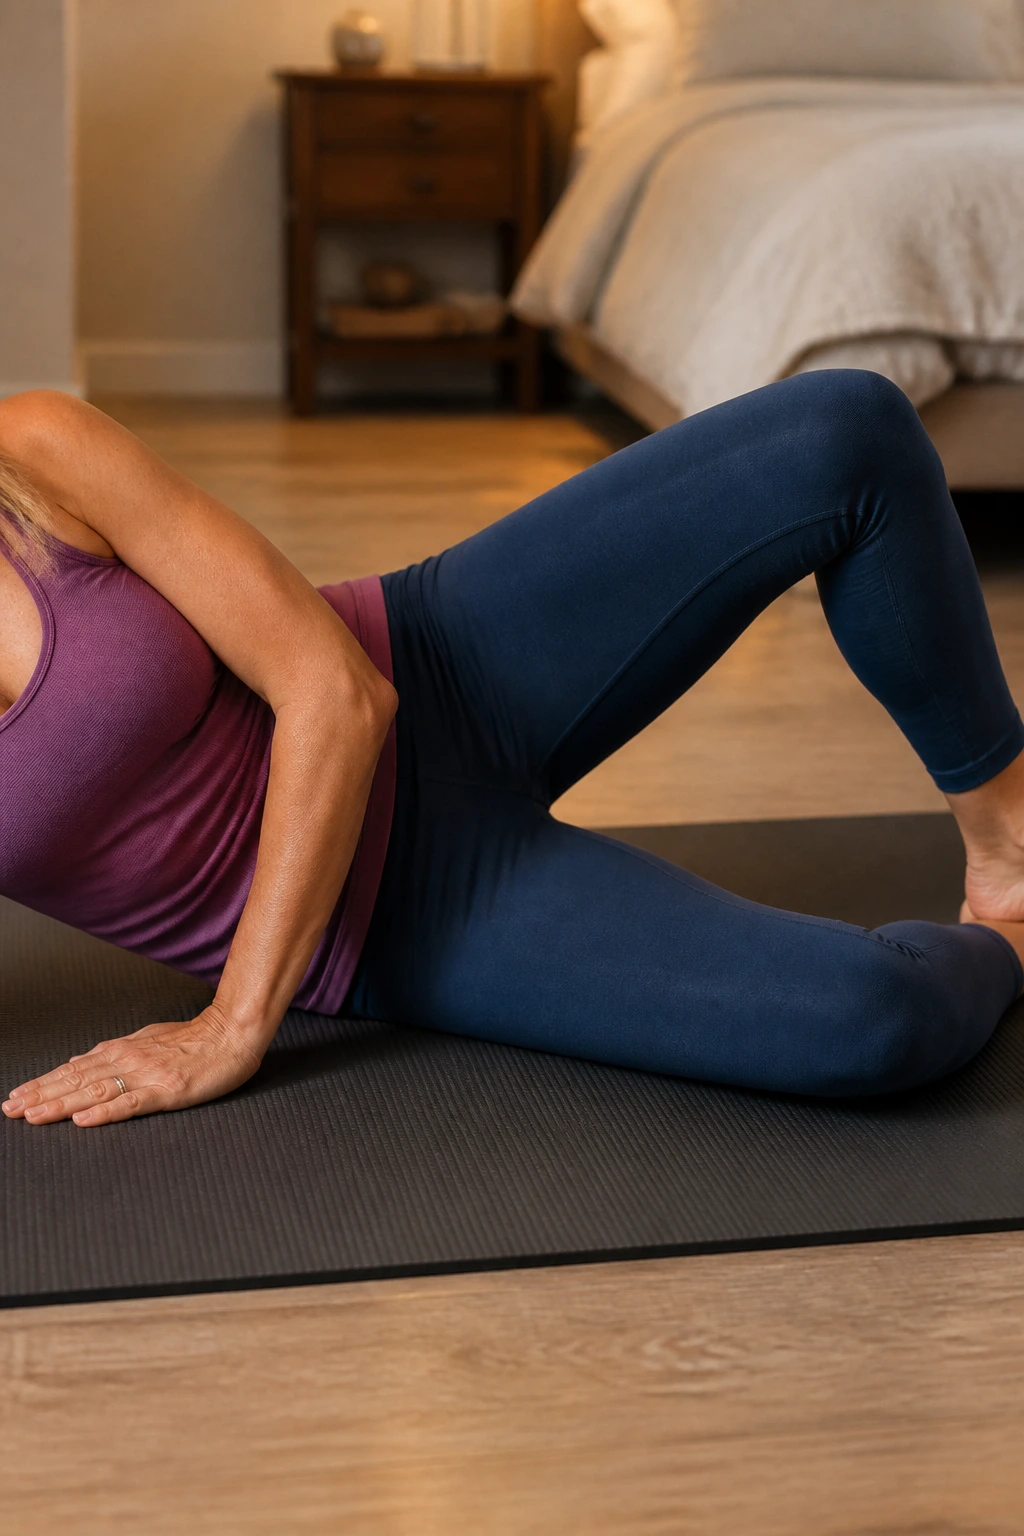
Why does a tiny movement on the floor matter so much? Because the glute medius is the muscle that helps keep your pelvis from dropping when you walk.
Lie on your side with your knees bent and your feet stacked. Keep your hips stacked too — that part matters more than people think — and open the top knee like a clam shell without rolling backward. The movement is small. Good. Small is the point.
What to feel
You should feel the side of the butt and upper outer hip working. If you feel it mostly in the front of the hip, your foot position is probably too far forward. If your low back starts helping, you’ve gone too far.
- Keep the heels together.
- Open only until the pelvis stays quiet.
- Lower with control.
- Try 10 to 15 reps per side.
A mini band above the knees adds resistance, but don’t rush to load this one. First make it honest. Then make it harder.
3. Standing Hip Abductions at the Counter
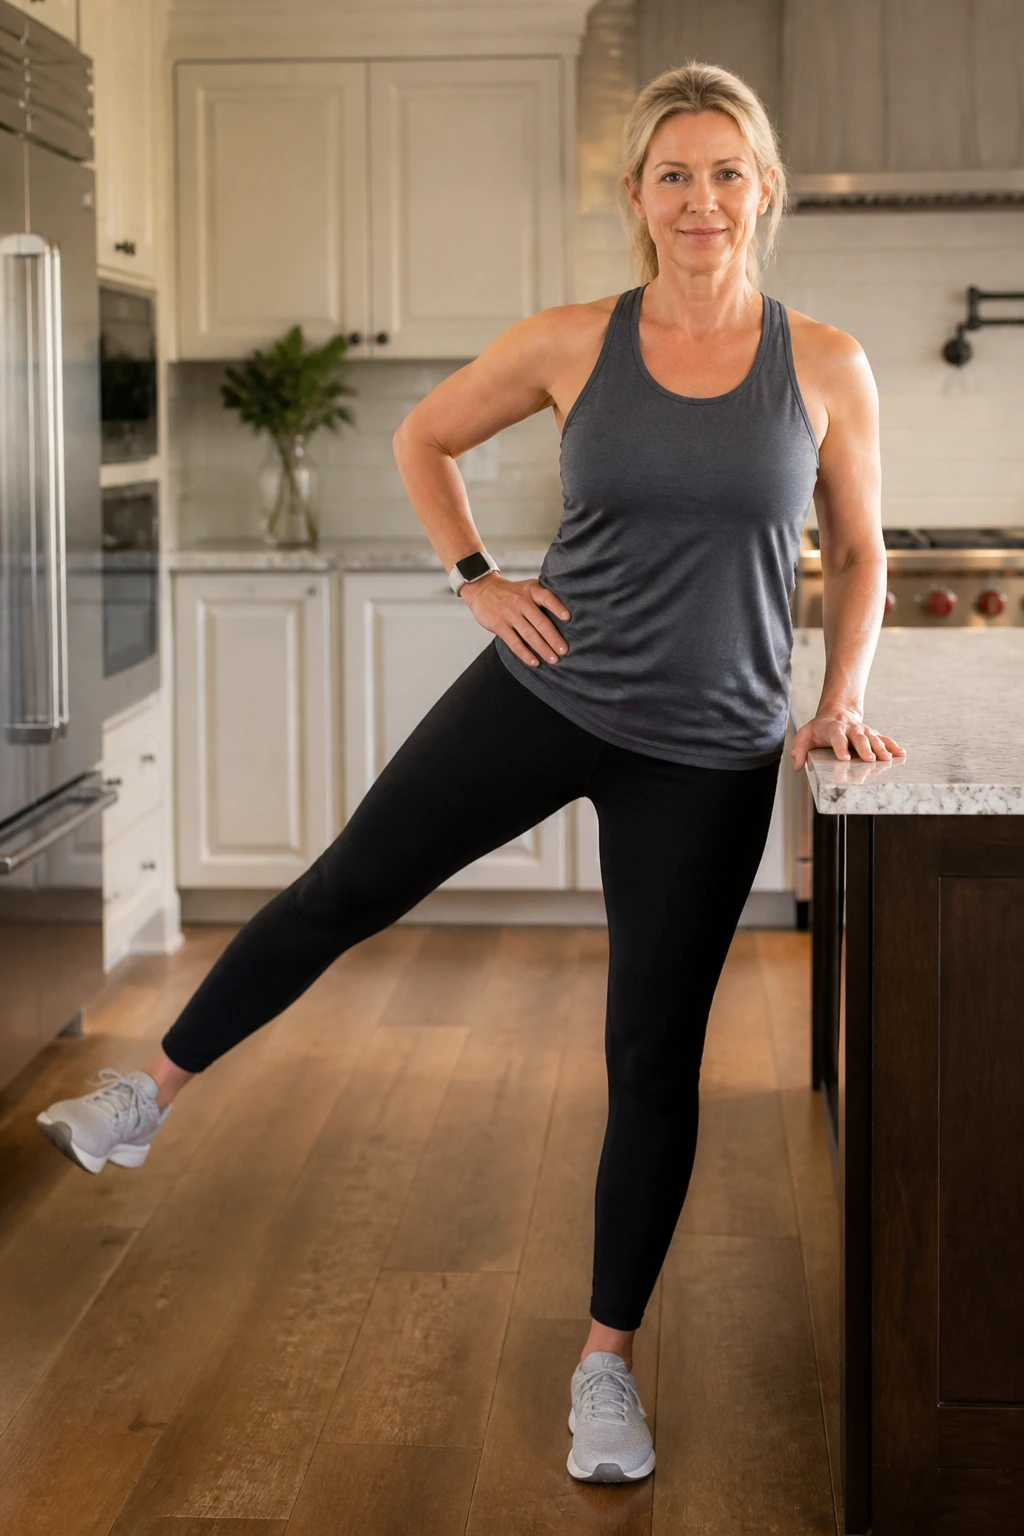
Standing hip abductions are useful when floor work feels annoying or when you want to train balance at the same time. One hand on a counter. Tall spine. Easy win.
Lift one leg straight out to the side without leaning your torso. The standing leg does more work than you’d expect because it has to keep you from wobbling. That’s part of the magic. It’s not only a side-hip exercise; it’s also a control drill.
A lot of people swing the leg and call it a rep. Nope. That turns the move into a momentum contest.
- Stand near a wall or countertop for support.
- Keep the working toes facing forward or slightly down.
- Raise the leg 6 to 12 inches.
- Pause for a second at the top.
- Lower slowly.
Do 8 to 12 reps per side. If the movement gets sloppy, reduce the height before you reduce the control.
4. Standing Hip Extensions with a Soft Knee
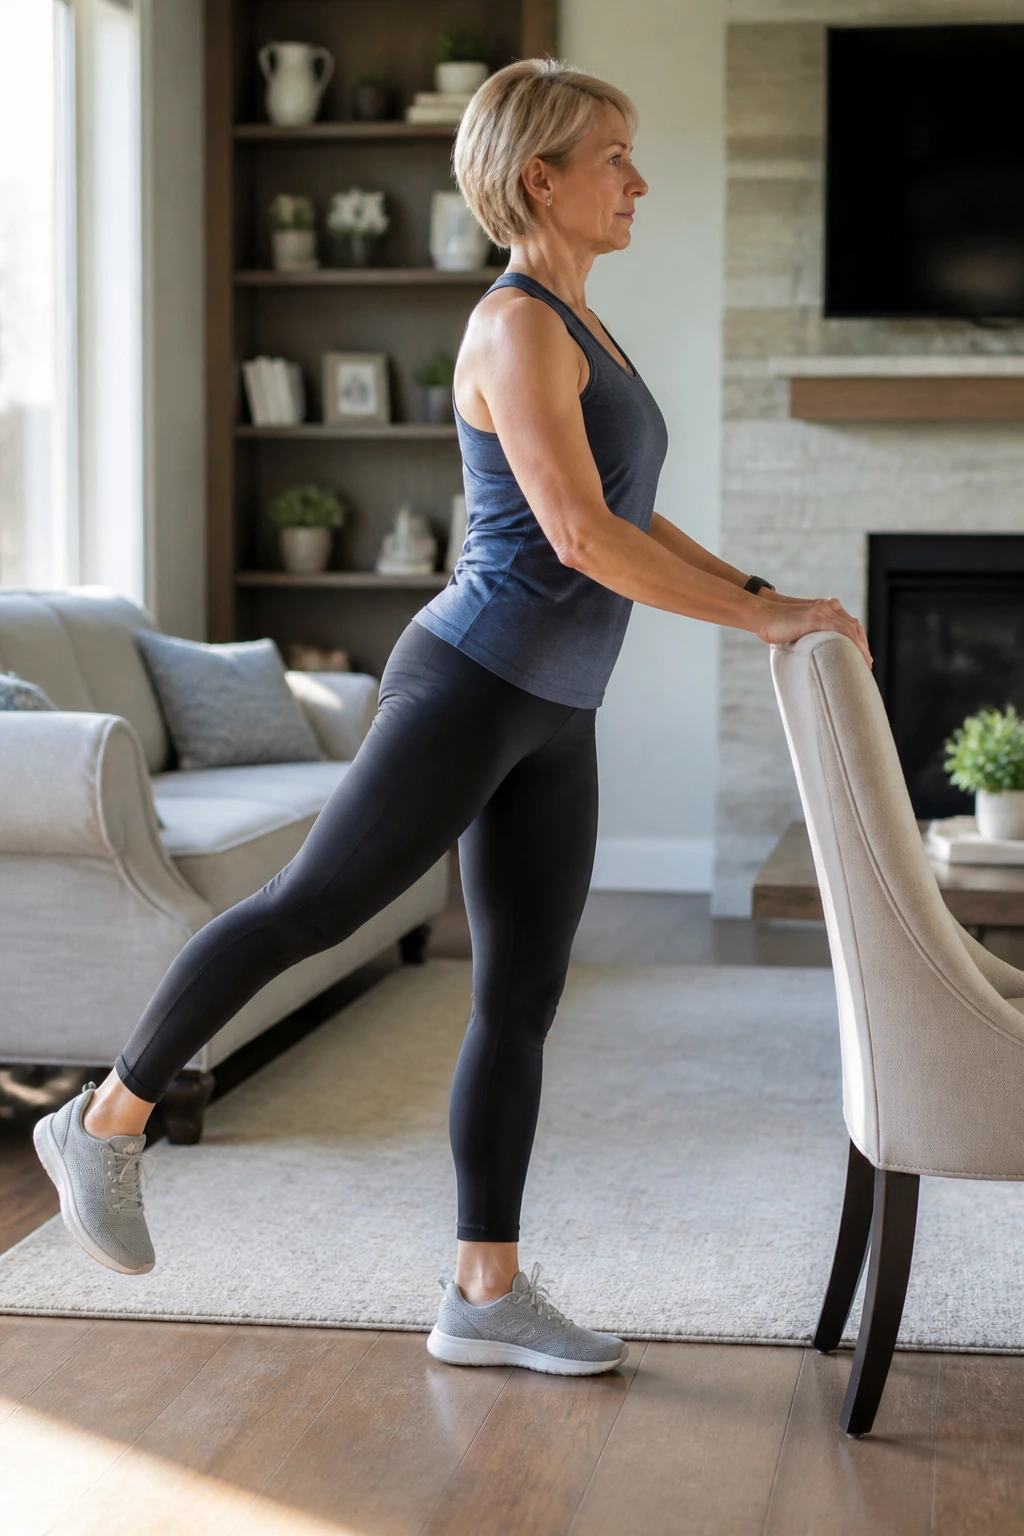
Standing hip extensions are the upright cousin of donkey kicks. They train the back of the hip while asking your torso to stay quiet, which is useful for daily movement and posture.
Unlike floor kickbacks, this version makes you deal with your balance at the same time. That can be annoying. It can also be exactly what your hips need.
Stand tall, hold a chair or wall, and slide one leg back without arching your lower back. Keep the working knee soft, not locked, and think about squeezing the glute instead of flinging the leg behind you. The motion should feel smooth, almost boring.
A few cues matter here:
- Keep your ribs stacked over your pelvis.
- Point the toes down or slightly forward.
- Move the leg back only until the glute starts to work.
- Use 10 to 12 slow reps per side.
If you feel the low back grabbing, shorten the range. That is not failure. That is feedback.
5. Lateral Band Walks That Light Up the Outer Hips
A mini band makes this move look harmless. It is not harmless. It’s sneaky.
Place the band above the knees if you want an easier version, or around the ankles if you want more work. Sink into a small athletic stance, knees soft, chest lifted, and step sideways with control. The trick is to keep tension in the band the whole time. No clicking together of the feet. No standing up between steps.
Quick setup
- Take 8 to 10 steps one way.
- Keep the toes pointing mostly forward.
- Don’t sway the torso from side to side.
- Stay low enough that the outer hips stay awake.
I like this drill because it tends to expose weak spots fast. One side drags. One knee caves. One hip gives up after four steps. Good. That gives you something real to work on.
Do 2 to 3 passes each direction and stop before your form gets ragged. The burn should live in the outer hips, not in the knees.
6. Sit-to-Stand Squats from a Chair
A chair is a gift. Use it.
Sit-to-stand squats train the hips in the same pattern you use dozens of times a day: getting up from a seat. For women over 50, that daily strength matters more than fancy gym moves nobody can do under pressure.
Start with a chair that feels stable and not too low. Lean forward a little, press through the whole foot, and stand without flinging yourself upward. Then lower back down under control. If you need your hands on the chair arms at first, that’s fine. Use them. The goal is to make the rep cleaner, not to impress anyone.
One small detail changes everything: keep your weight a little farther back toward the heels and mid-foot, not jammed into the toes. That helps the hips do their share of the work.
A solid starting target is 6 to 10 reps for 2 sets. If that feels easy, slow the lowering phase to 3 seconds. Boring trick. Works every time.
7. Step-Ups That Teach the Hips to Push
Step-ups are one of the best ways to train the hips for stairs, curbs, and getting into the car without feeling wobbly. They also reveal whether one side is doing more than the other, which is useful and a little humbling.
Use a step that starts low — 4 to 6 inches is plenty if you’re new to this. Place the whole foot on the step, press through the standing leg, and bring the other foot up with control. Then step down slowly. Don’t bounce off the back leg. That turns the move into cheating.
A hand on the railing or wall is not a flaw. It’s smart. Balance is part of the exercise, and you do not need to wrestle with it on day one.
Try 6 to 8 reps per side. If your hips are cooperating, increase the step height before you start piling on speed. Taller does not automatically mean better. It just means taller.
8. Bird Dogs with a Pause
Bird dogs look calm. They are not as easy as they look.
What to keep still
The whole point is to move one arm and the opposite leg while the torso stays quiet. If the lower back sways, the exercise turns into a balancing act instead of a hip drill.
- Start on hands and knees.
- Brace the belly lightly, like you’re zipping up a snug pair of jeans.
- Reach one leg straight back and the opposite arm forward.
- Hold for 2 to 3 seconds.
- Return with control.
That pause matters. It gives the standing side hip a reason to work.
If you want to bias the hips a little more, keep the leg lift low and think about reaching long rather than high. The back does not need to arch. The lifted foot does not need to point to the ceiling. Clean lines beat big range.
6 to 8 reps per side is enough for most people. Slow, steady, and a little strict. That’s the sweet spot.
9. Donkey Kicks for the Glutes
Why do donkey kicks show up in so many hip routines? Because they target hip extension without asking you to stand, balance, or think too hard about gravity.
Kneel on all fours, keep one knee bent at roughly 90 degrees, and lift the sole of the foot toward the ceiling. Stop when the glute engages and the low back stays neutral. If the rib cage flares or the back arches, the lift is too big.
This move is best when it feels small and controlled. A lot of people swing the leg because they want a bigger range. That usually just hands the work to the spine.
Good cues
- Keep the hips level.
- Lift from the glute, not the lower back.
- Squeeze at the top for 1 second.
- Lower until the knee is just above the floor.
You can do 10 to 12 reps per side. Add a small ankle weight only after the bodyweight version feels clean. Faster isn’t better here. It just makes the form noisy.
10. Fire Hydrants for Side Hip Strength
Fire hydrants are one of the clearest ways to wake up the side of the hip. If you ever notice one hip dipping when you walk or stand on one leg, this drill deserves a slot in your week.
Come onto hands and knees, keep the working knee bent, and lift it out to the side like a dog at a fence post. The movement is short. Don’t chase height. Once the pelvis starts to twist, you’re no longer training the right thing.
What makes this exercise useful is the combination of hip abduction and pelvis control. Your standing shoulder and opposite hip have to stay steady while one leg moves. That’s real-world strength, not just gym strength.
- Keep the hands under the shoulders.
- Hold the torso still.
- Lift only until the side hip starts working.
- Lower slowly.
- Aim for 8 to 12 reps per side.
If the wrists or knees dislike the floor, place a folded towel under the knees. Simple fix. No drama.
11. Supported Split Squats That Build Real-World Leg Strength
A split squat is basically a lunge with less chaos. That’s why I like it for women over 50. You get the hip and leg work without the weird forward-and-back stepping that can make lunges feel slippery.
Set one foot forward and one foot back, keep a chair or countertop nearby, and lower straight down a few inches. You do not need to go deep. The front heel stays down, the torso stays fairly tall, and the back knee bends toward the floor without crashing into it.
This one is especially good if your hips feel weak on one side. The front leg has to carry the load. The back leg helps, but not enough to steal the show.
A few details make a difference:
- Shorten the stance if the front knee complains.
- Keep pressure through the front foot’s heel and big toe.
- Use a support until the balance feels boring.
- Try 5 to 8 reps per side.
If you want a little more challenge, slow the lowering phase to 3 seconds. That usually exposes weak hips fast.
12. Single-Leg Romanian Deadlifts with Hand Support
This is one of the best hip-hinge drills around, and it also happens to be one of the most humbling. Good. That means it’s doing something.
Stand on one leg with the other leg reaching back like a counterweight. Keep a hand on the wall or the back of a chair if you need it. Hinge at the hips, not the waist, and let the back leg rise as the chest tips forward. The spine stays long. The standing hip does the work.
You’ll feel this in the glute and the back of the thigh, but the real prize is control. Can you stay steady while the body leans? Can you keep the pelvis from spinning open? That matters for walking, stair work, and any movement where one leg does the job by itself.
A light dumbbell in the opposite hand can add load later, but bodyweight is enough at first. 5 to 8 reps per side is plenty. If your hamstrings cramp, bend the standing knee a touch more and shorten the hinge.
13. 90/90 Hip Switches
90/90 hip switches look awkward the first time. That’s normal. Your hips may not be thrilled about rotating in both directions, and that is exactly why the drill helps.
Sit on the floor with both knees bent at about 90 degrees, one leg in front and one leg to the side. Then rotate the knees together and switch to the other side without using your hands too much. A little hand support is fine. In fact, most people need it at first.
What makes them useful
The hip joint doesn’t only move forward and back. It also rotates. When that rotation gets ignored for too long, getting up from the floor, turning in bed, or stepping sideways can feel stiff and clunky.
- Keep the torso as tall as you can.
- Move slowly through the transition.
- Use your hands to help if needed.
- Work in a pain-free range.
Try 5 to 8 switches each way. If the knees complain, sit on a folded towel or yoga block to raise the hips a little. That tiny change often makes the whole drill smoother.
14. Half-Kneeling Hip Flexor Stretch
Sitting pulls on the front of the hips. A lot. If the front of your hip feels tight or pinchy when you stand up, the hip flexors may be hanging on too tightly.
Half-kneeling is one of the cleanest ways to stretch them because it puts the pelvis in a more honest position. One knee is down, the other foot is in front. Tuck the pelvis slightly, squeeze the glute of the back leg, and shift forward until you feel a stretch at the front of the hip. Not in the low back. Front of the hip.
That last part matters. If your lower back arches hard, the stretch is fake. It may feel dramatic, but it’s not doing the job.
Hold for 20 to 30 seconds, breathe slowly, then switch sides. If you want a little more, reach the same-side arm overhead and lean a touch away from the back leg. Small. Not a side bend contest.
15. Adductor Rock-Backs
Adductor rock-backs are one of those drills that sounds obscure until you try it and realize your inner thighs have opinions.
Start on hands and knees, then slide one leg out to the side with the foot flat and the knee straight or slightly bent. Rock your hips back toward the heel of the bent knee, then come forward again. The long leg should feel the stretch along the inner thigh and groin area.
This is a gentle way to free up the inside line of the hip without forcing a deep stretch. That makes it useful on stiff mornings or after long walks.
Keep these cues in mind:
- Keep the spine long.
- Don’t collapse the chest.
- Rock back only as far as the stretch stays mild.
- Use 8 to 10 slow reps per side.
If the floor feels too low, put your hands on yoga blocks or books. Raising the upper body a little often makes the movement cleaner.
16. Seated Figure-Four Stretch
Sometimes the simplest version is the one people actually keep doing.
Cross one ankle over the opposite knee while seated in a chair, then sit tall and hinge forward slightly until the outer hip starts to open. That’s the seated figure-four stretch. It’s easier to use than the floor version, and for a lot of women over 50, the chair version is the one that actually gets done after a workout or a long day.
Why I like the chair version
You can control the angle without getting down on the floor. You can also back off instantly if one knee dislikes the position. That makes it practical, not just pretty.
- Keep the crossed foot flexed if it feels better.
- Stop if the knee feels sharp or cranky.
- Hold for 20 to 30 seconds.
- Breathe into the side of the hip instead of forcing the stretch.
If you feel the stretch more in the low back than the hip, sit taller and lean less. More angle is not the goal.
17. Standing Hip Circles with a Light Touch
A lot of people swing their leg around and call it mobility. That’s not the same thing. Standing hip circles ask for control.
Hold a wall with one hand and make small, slow circles with one knee or foot. Keep the pelvis steady. The motion should come from the hip socket, not from a flailing torso. Use a tiny range at first. People always want the circle bigger than it should be.
How to keep it useful
- Make 5 slow circles in each direction.
- Keep the standing leg soft but stable.
- Don’t let the low back twist.
- Pause at the tightest point and breathe.
This drill is especially handy before a walk or a strength session because it wakes up the joint without tiring it out. If one direction feels rough, do not force it. Shrink the circle and work there for a week or two. The body usually catches up.
18. Wall March Holds for Balance and Hip Control
Can marching in place actually help your hips? Yes — if you do it with enough control to matter.
Stand tall near a wall and lift one knee to about hip height, or as high as feels clean. Hold for 2 to 3 seconds before lowering the foot slowly. Then switch sides. The standing hip has to keep the pelvis level while the lifted hip flexes. That’s a useful skill for walking, climbing, and turning.
What makes this drill better than fast marching is the pause. The pause exposes wobble. It also gives the glutes and side hips something to stabilize against.
- Keep the rib cage over the pelvis.
- Avoid leaning away from the lifted leg.
- Move the standing foot only if you need to reset your balance.
- Try 8 to 10 reps per side.
If standing on one leg feels sketchy, keep one fingertip on the wall. Light support is still support. Nothing wrong with that.
19. Side Lunges to a Chair
Side-to-side strength matters more than people think. We spend so much time moving forward that the hips can get lazy in the lateral plane, and that shows up in balance and groin tightness.
A side lunge to a chair gives you a safer target. Step out to the side, bend the knee on that leg, and sit the hips back toward the chair while the other leg stays straighter. You do not need a big range. You need control and a clean shift of weight.
This move hits the inner thigh, outer hip, and glute in one go. It also helps if one hip feels like it has a dead spot when you move sideways.
- Keep the stepping foot flat.
- Sit back, not straight down.
- Use the chair as a depth guide.
- Start with 5 to 6 reps per side.
If the knees object, shorten the distance and make the movement smaller. There’s no prize for depth.
20. Standing Knee Lifts with a Slow Lower
If you want one low-stress hip drill for days when everything feels stiff, this is a good place to land.
Stand near a counter or wall, lift one knee toward your chest, then lower it slowly over 3 full seconds. That slow lowering phase is the part that matters. It forces the front of the hip to control the leg instead of letting gravity do all the work. The standing leg gets a stability workout too.
This is useful for walking mechanics, stair work, and getting the hips to cooperate after a long stretch of sitting. It’s also easy to scale. Lift the knee lower if needed. Hold the wall if balance feels off. Keep the motion small if the hip pinches.
A few simple cues help:
- Stand tall without leaning back.
- Keep the lifted foot relaxed.
- Lower with control.
- Do 8 reps per side.
When the hips feel rusty, this is the kind of movement that wakes them up without picking a fight.
