



The first time you hold a wall chair for longer than 20 seconds, your thighs start negotiating. Your calves wake up, your hips tighten, and that plain wall in front of you starts acting like a cheap little torture device with excellent manners.
Wall Pilates workouts for toned legs work because they make you slow down. No jumping. No flinging your legs around. No hiding behind momentum. You press, hold, lift, pulse, and control the movement enough that your quads, glutes, hamstrings, inner thighs, and calves have to do the actual work.
That matters more than people think. A lot of leg work looks busy but doesn’t ask much of the muscles once you strip away the speed. Wall-based Pilates flips that around. The wall gives you feedback, not a shortcut, so small shifts in foot placement, pelvis angle, and breathing become the whole story.
If you want leaner-looking legs, stronger thighs, steadier knees, and less wobble when you climb stairs or stand up from the floor, these are the moves that earn their keep. Start with the one that feels hardest to fake. That’s usually the one doing the most good.
1. Wall Chair Hold With Heel Lift
A wall chair is never “just” a wall chair.
The second you add a heel lift, the move stops being a basic thigh burner and starts working your calves, ankles, and the tiny stabilizers around your knees. That’s a nice trade, because a lot of people forget that toned legs aren’t only about the front of the thigh. The lower leg counts too.
Why the Heel Lift Changes Everything
Set your feet about 12 to 18 inches from the wall, slide down until your knees sit close to a 90-degree angle, then hold. Once that feels steady, lift both heels an inch or two off the floor and keep the balls of your feet grounded.
The lift is small. Don’t make it a ballet performance. What you want is that deep, stubborn burn that arrives in the calves after 15 to 30 seconds and makes the quads work harder to keep you still.
Quick Form Cues
- Keep your lower back long and gently pressed toward the wall.
- Hold for 20 to 40 seconds before adding the heel lift.
- Lift the heels for 8 to 12 slow pulses, or hold them up for 10 to 15 seconds.
- Stop if your knees cave inward; press them slightly apart instead.
Pro tip: If your thighs shake right away, your stance is probably too low. Raise your seat by 2 to 3 inches and keep the quality clean.
2. Wall Bridge March
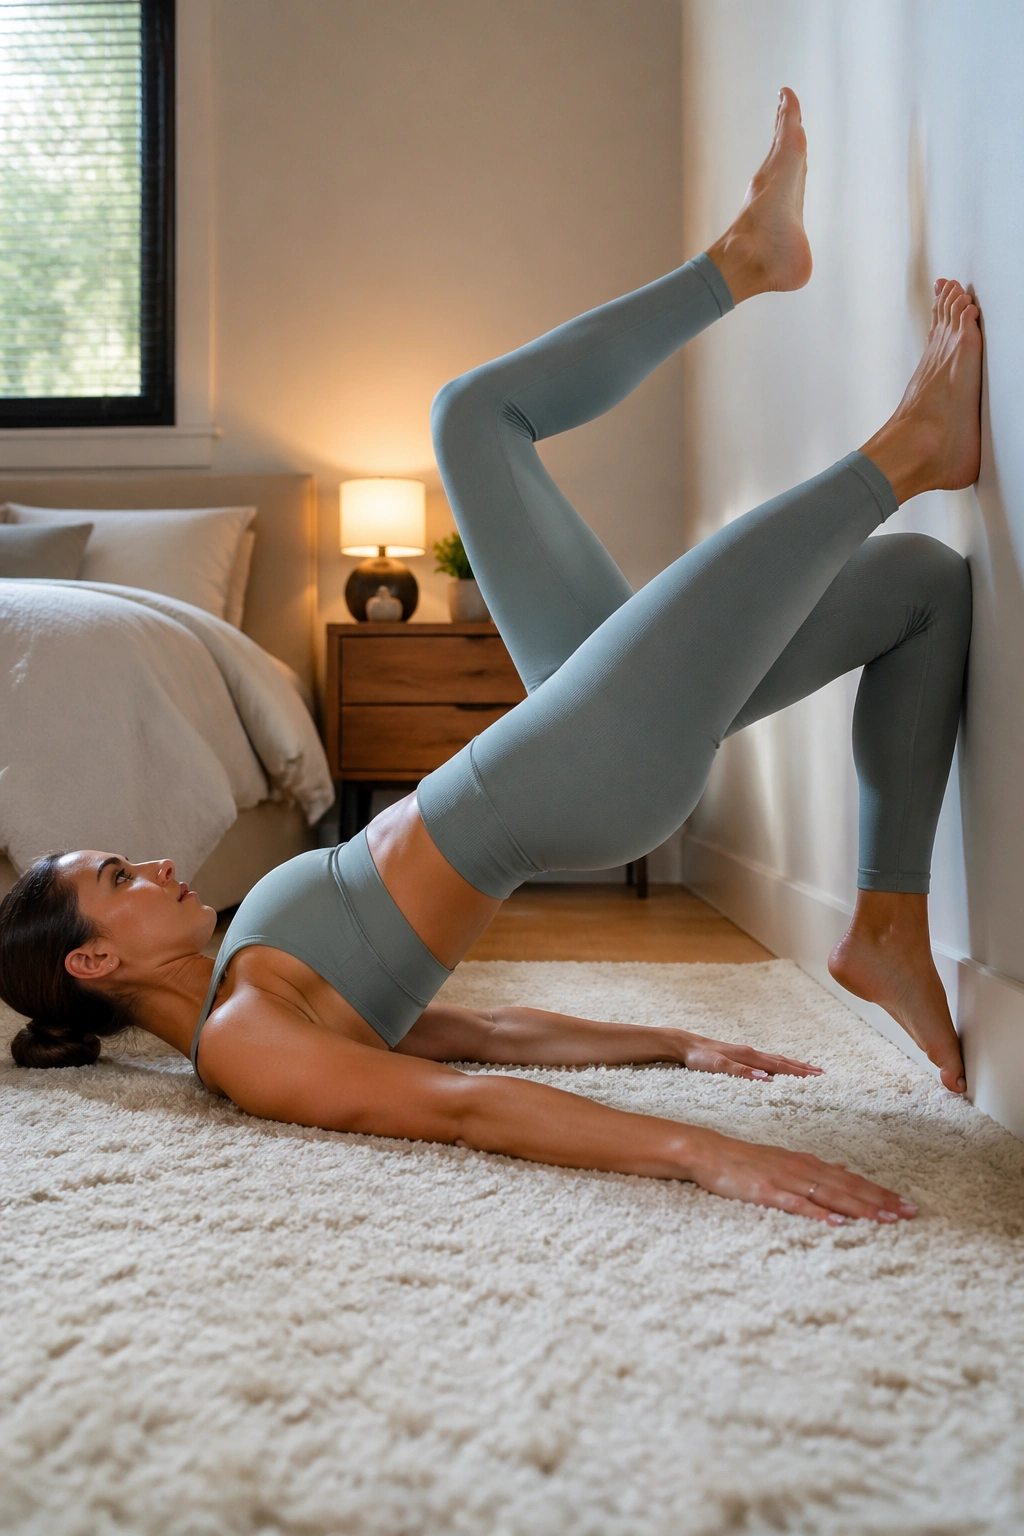
A bridge on the floor is good. A bridge with your feet on the wall is sneakier.
This version puts your hamstrings on notice almost immediately, because the wall gives you a fixed target and removes a lot of the wiggle that usually lets people rush through glute work. The march adds one more layer: one leg stays honest while the other lifts, and your pelvis has to stay level instead of twisting around to help out.
Lie on your back with your feet on the wall, knees bent, and heels roughly in line with your sitting bones. Press through your heels, lift your hips, and find a long line from shoulders to knees. Then, without letting the hips drop, lift one foot just enough to unweight it, place it back, and switch sides.
Do 8 to 10 marches per side. Slow is the point. If the movement turns into a wobble-fest, bring your feet a little lower on the wall and shorten the range.
Your glutes should feel like they’re holding a very stubborn conversation with your hamstrings. Good. That tension is the work.
3. Side-Lying Wall Leg Press
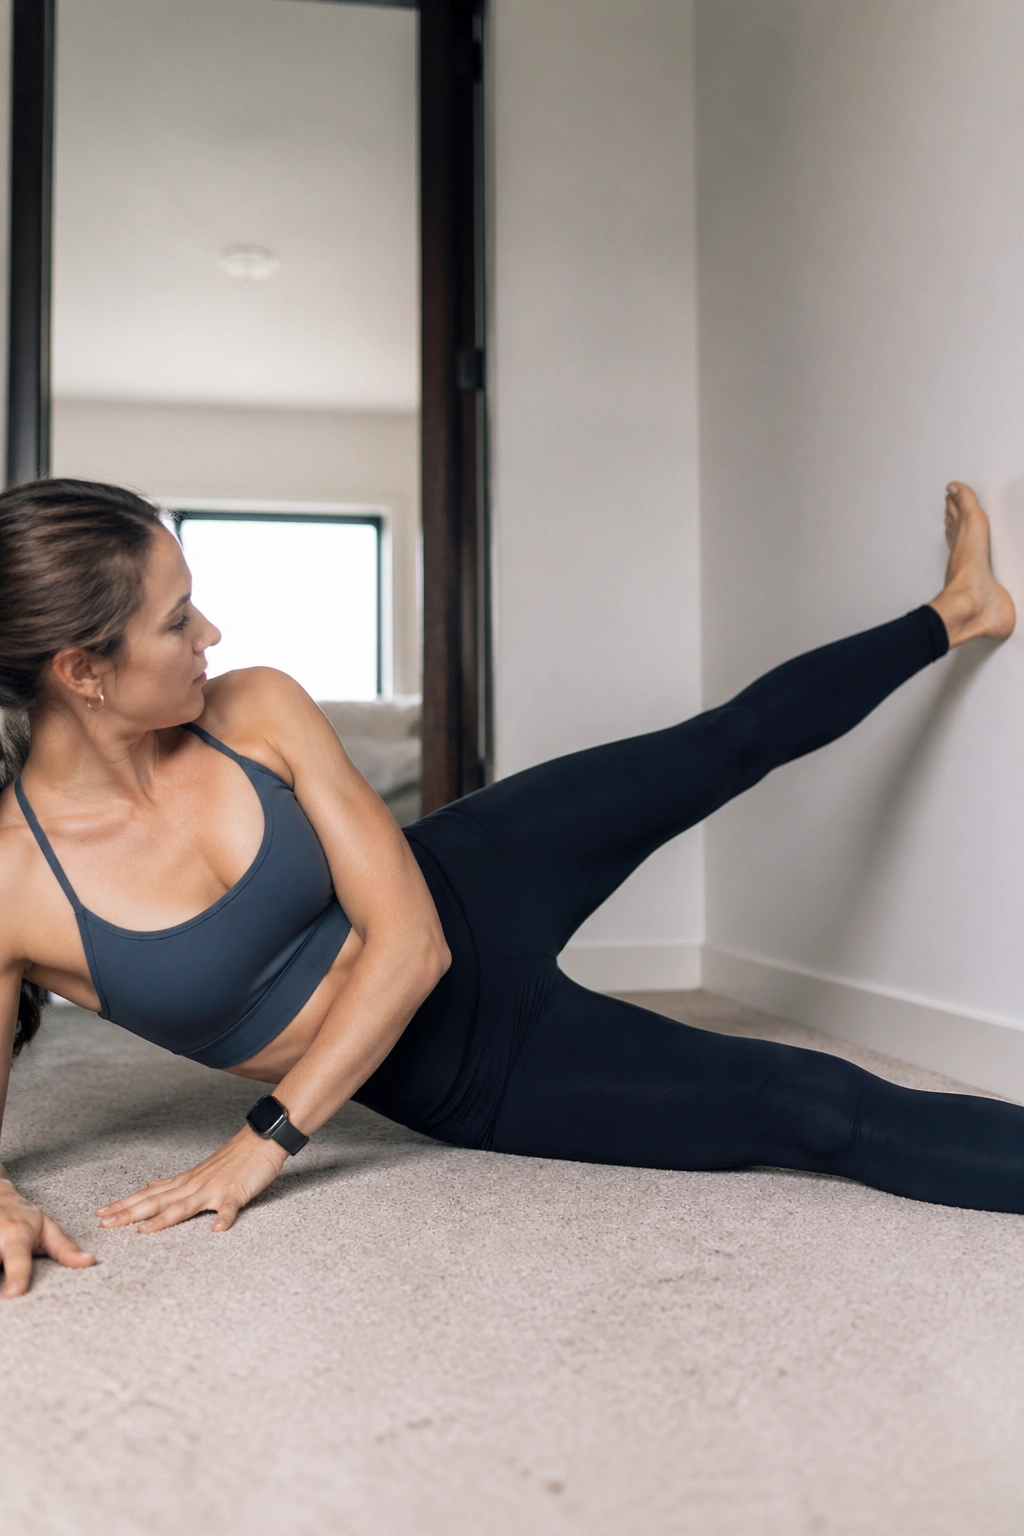
Why use the wall if you’re already on the floor?
Because the wall gives your top leg something solid to press into, and that changes the whole feel of the movement. A side-lying leg press targets the outer hip and upper thigh while forcing the core to stay quiet. It looks small. It isn’t.
How to Use It
Lie on your side with your back close to the wall and your top foot flat against it. Keep the bottom leg long on the mat. Bend the top knee slightly, then press the foot into the wall as if you’re trying to slide it upward without actually moving it much.
That tiny press wakes up the outer hip and the side of the thigh. If you push too hard, your waist will start to grip and your neck may tense up. Back off a little. The best range is the one where you can feel the work without turning it into a full-body brace.
What to Watch For
- Keep the top hip stacked over the bottom hip.
- Press for 10 seconds, then release for 3 seconds.
- Repeat 6 to 8 times per side.
- Keep the foot flat and the ankle relaxed.
A move like this is gold for leg tone because it hits the side body stuff that standing exercises often miss. That little missing piece matters.
4. Narrow-Stance Wall Squat Pulse
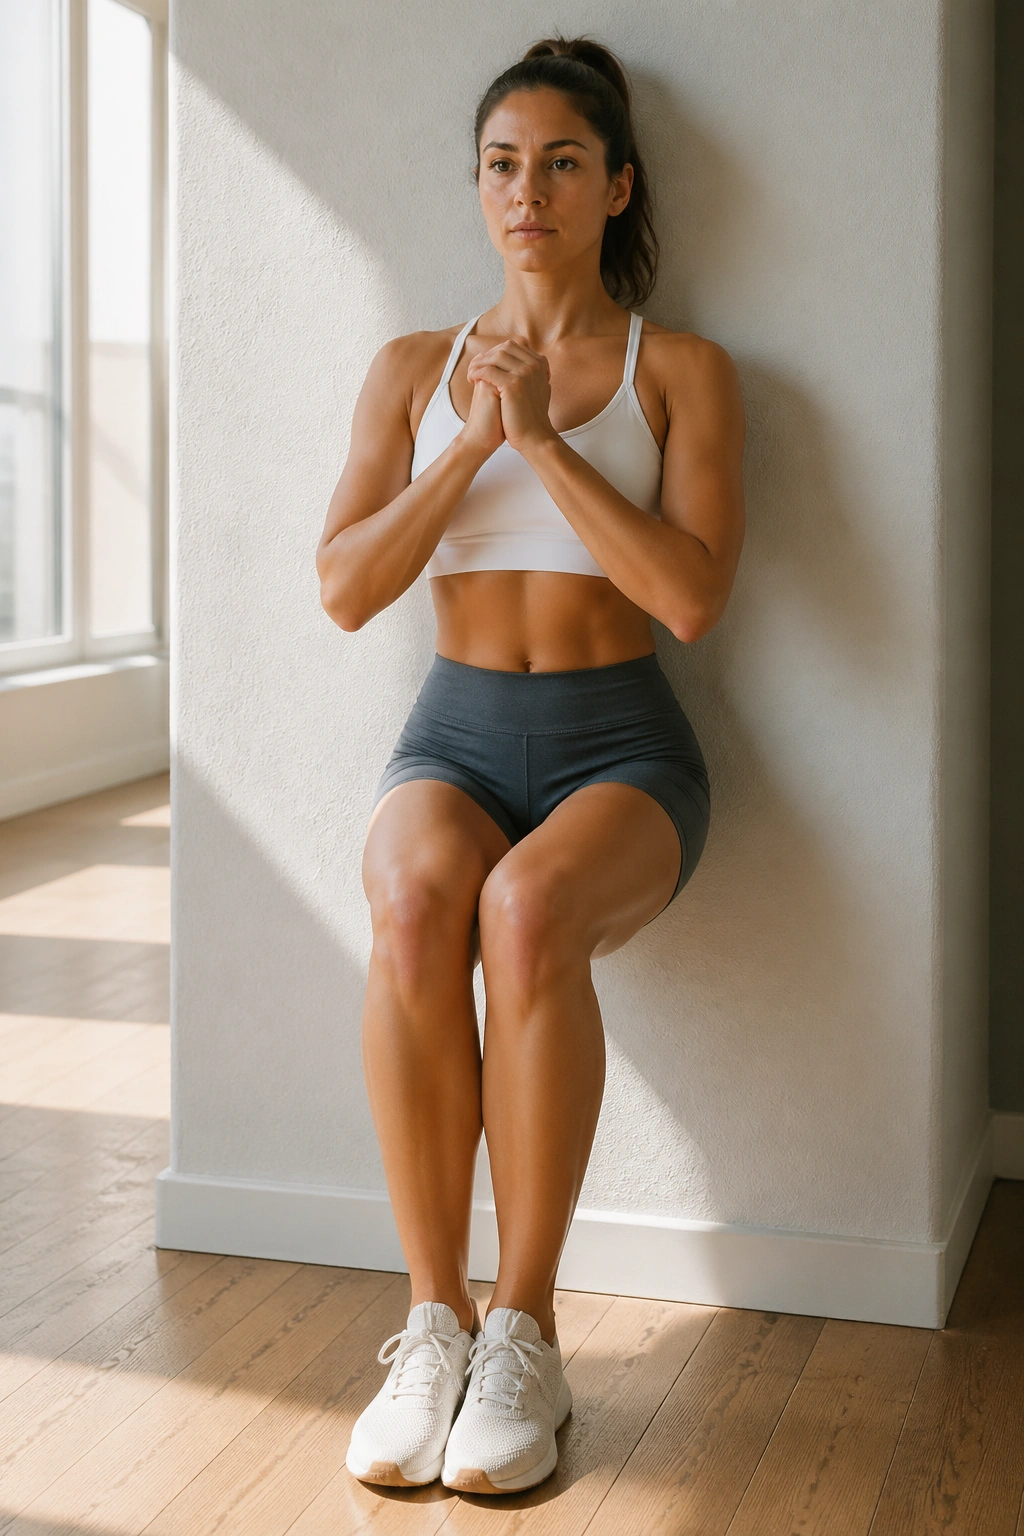
If your inner thighs shake halfway through the last 10 pulses, good. That is the point.
A narrow stance brings the adductors into the conversation fast, and the wall squat keeps you from cheating with momentum or a big bounce. It’s a plain-looking move with a nasty little payoff, which is usually a sign that it’s worth doing.
Stand with your back against the wall and your feet about 6 to 10 inches apart. Slide down until your knees bend to about 90 degrees, or a little higher if your knees are cranky. From there, pulse up and down just 1 to 2 inches. Not 4 inches. Not a dramatic bob. Tiny.
- Hold the chair for 15 to 20 seconds first.
- Pulse for 20 to 30 reps.
- Keep your ribs soft, not flared.
- Press the inner edges of your feet into the floor.
If your knees complain, raise the squat a bit and slow the pulses down. The exercise should feel like effort, not punishment.
This one is excellent when you want a clear leg workout without jumping. There’s no mystery to it. Your thighs will tell you exactly how it’s going.
5. Standing Wall Leg Sweep
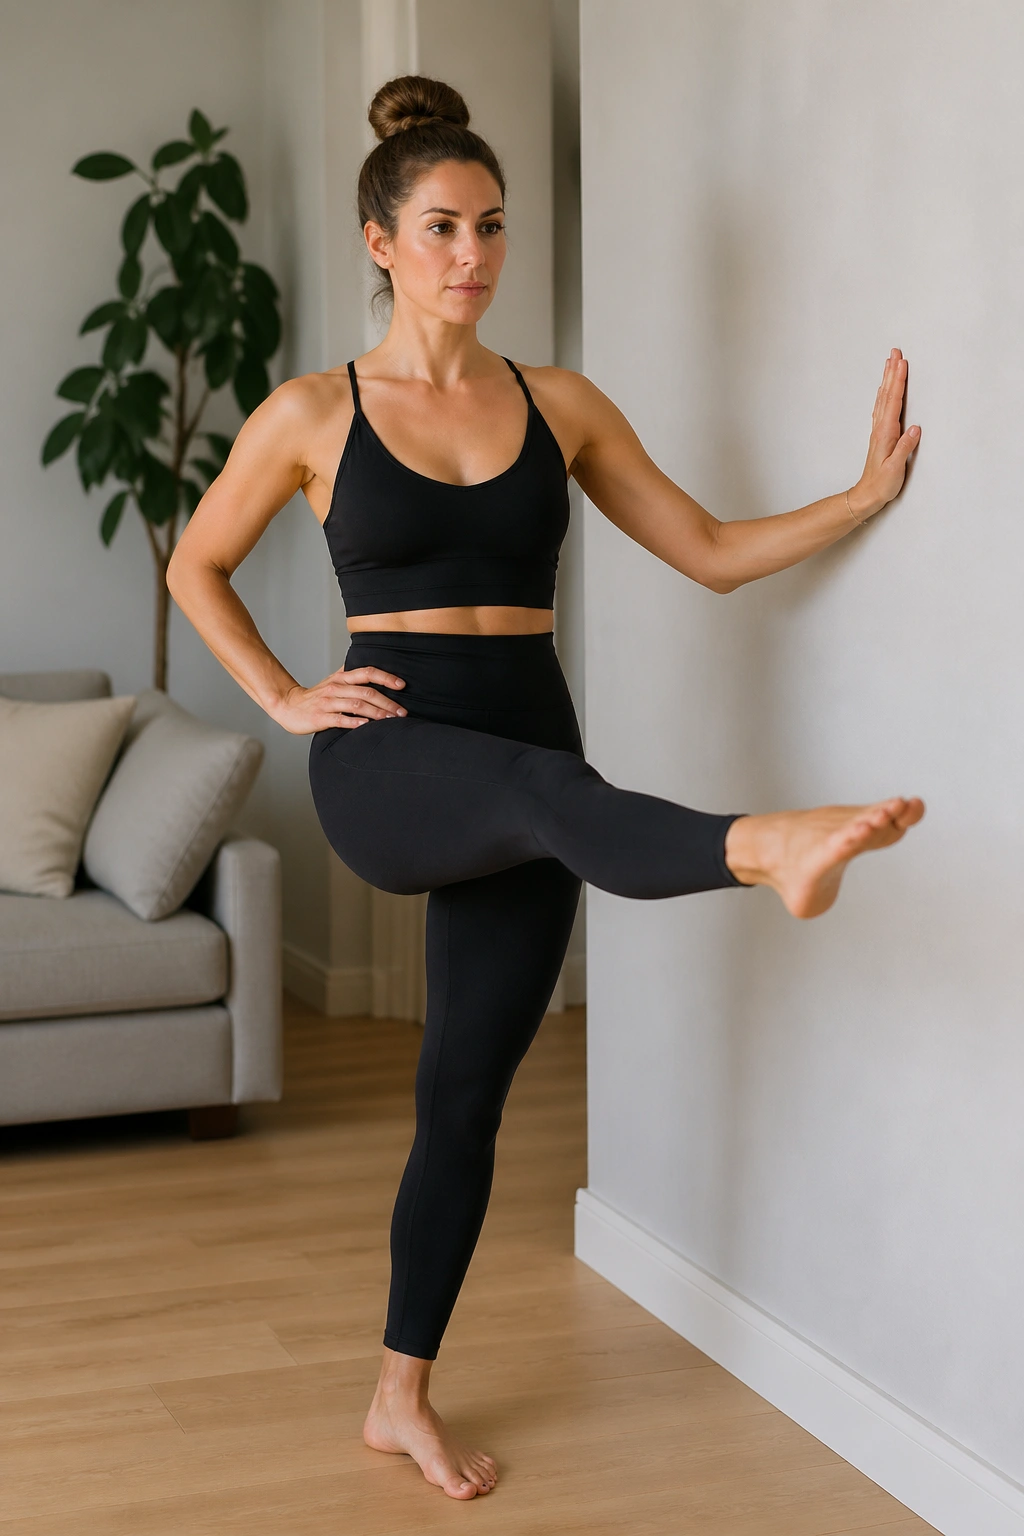
The standing leg sweep looks almost too easy until your standing hip starts working for real.
Stand side-on to the wall, one hand lightly resting on it for balance. Shift your weight into the leg closest to the wall, keep that knee soft, and sweep the free leg forward and back in a controlled arc. The moving leg should stay long, and your torso should stay stacked instead of leaning toward the wall or collapsing away from it.
That single detail — keeping the pelvis level — is what makes the movement useful. Without it, the exercise turns into a hip toss. With it, you get steady work through the glute on the standing side, the front of the hip on the moving side, and a clean hit to the outer thigh.
Try 8 to 12 sweeps forward, then 8 to 12 sweeps back on each side. Move slowly enough that you can feel the leg travel through space. If it becomes easy, pause for one second at the farthest point.
One quiet bonus here: the sweep teaches you where your body cheats. That shows up fast.
6. Wall Calf Raise Ladder
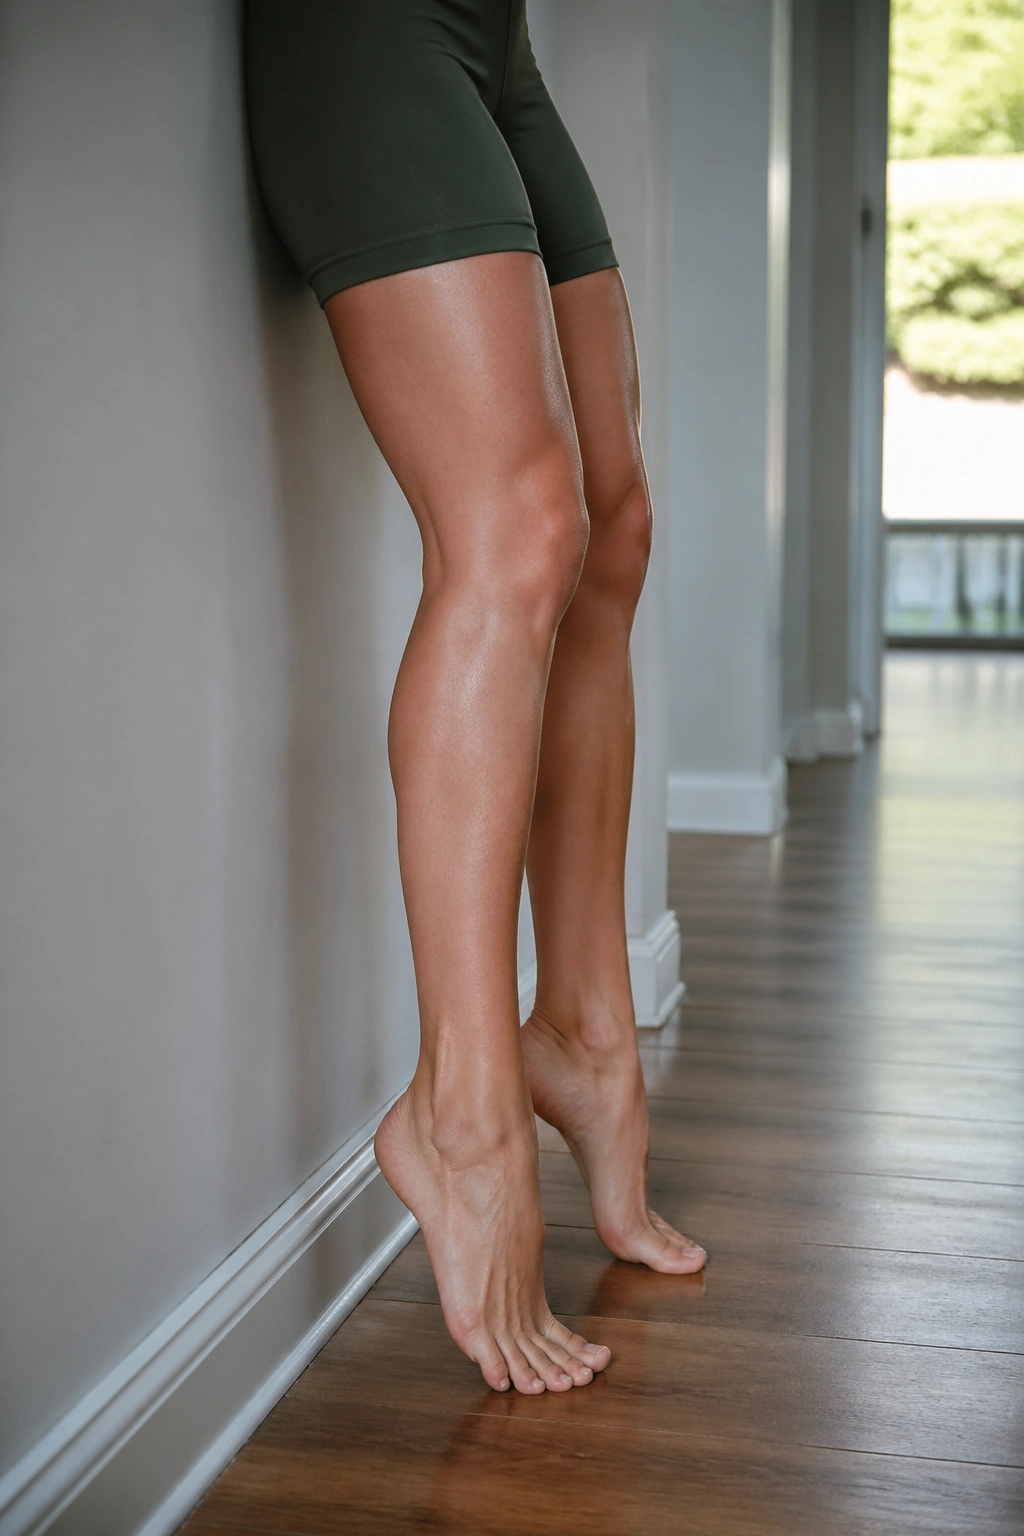
Wall calf raises are rude in the best possible way.
Unlike floor calf raises done half-awake while holding a counter, this version asks you to keep your whole body organized. Your spine stays long against the wall, your ribs stay stacked, and the calves have to do their job without help from a wobbling torso. That makes the burn arrive faster, and it also makes the movement cleaner.
Stand with your back against the wall and your feet hip-width apart, about a foot from the wall. Rise onto the balls of your feet for 12 reps, lower slowly, then repeat for 10 reps, then 8 reps. That little ladder keeps the set from going stale.
If you want more challenge, pause for 2 seconds at the top of each raise. If your ankles are stiff, keep the motion smaller and think about lifting the heels straight up rather than rolling to the outside edges of the feet.
This is the one I like for finishers because it’s simple, fast, and brutally honest. Your calves either hold up or they don’t.
7. Single-Leg Wall Hamstring Drive
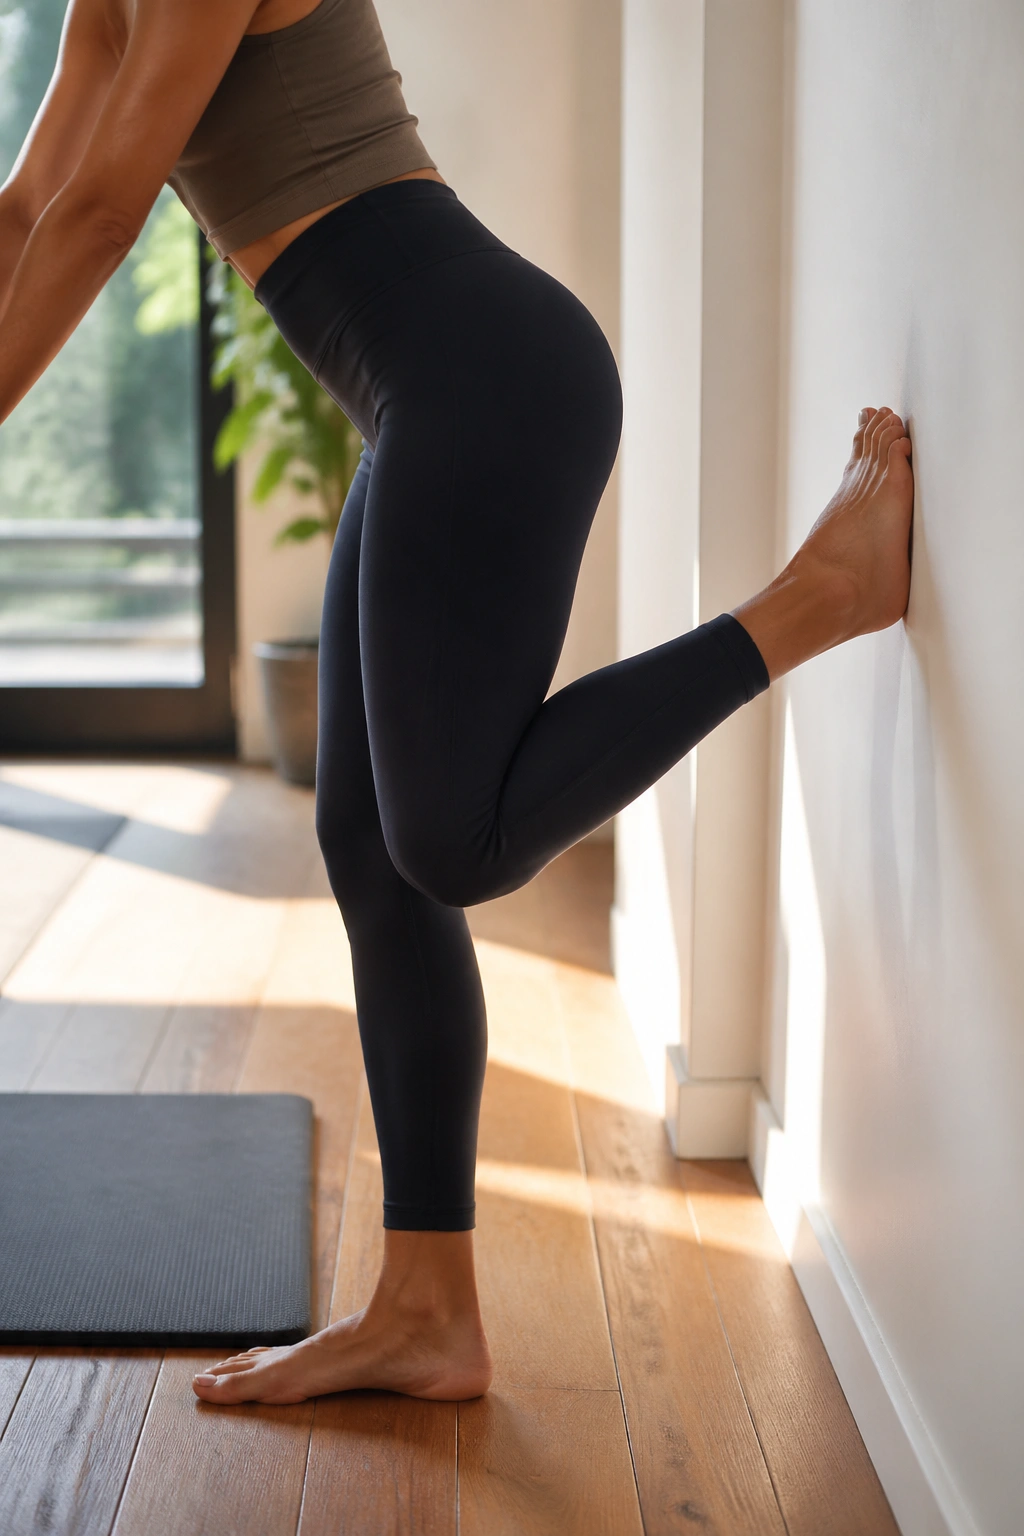
The back of your standing leg starts to feel warm before your breathing gets hard. That’s the giveaway that you’ve hit the right area.
Place one heel on the wall behind you at a low angle, almost like a gentle support. Keep your standing knee soft, hinge forward a few inches from the hips, and press the wall heel back without letting your pelvis twist open. Think of it as a tiny single-leg hinge with a wall anchor. Not a kick. Not a swing. A press.
What This One Does
The standing hamstring works to keep you stable while the wall leg presses back. Your glute on the standing side joins in, and the lower abs help stop the torso from dumping forward. It’s small, but it’s not soft.
How to Keep It Clean
- Keep the wall heel low, around hip height or lower.
- Hinge only until your back stays flat and calm.
- Press back for 6 to 8 reps per side.
- Add a 2-second squeeze at the top if you want more heat.
If balance is shaky, keep one fingertip on the wall and slow down. That is not cheating. It’s smart.
8. Wall Lunge Iso Hold
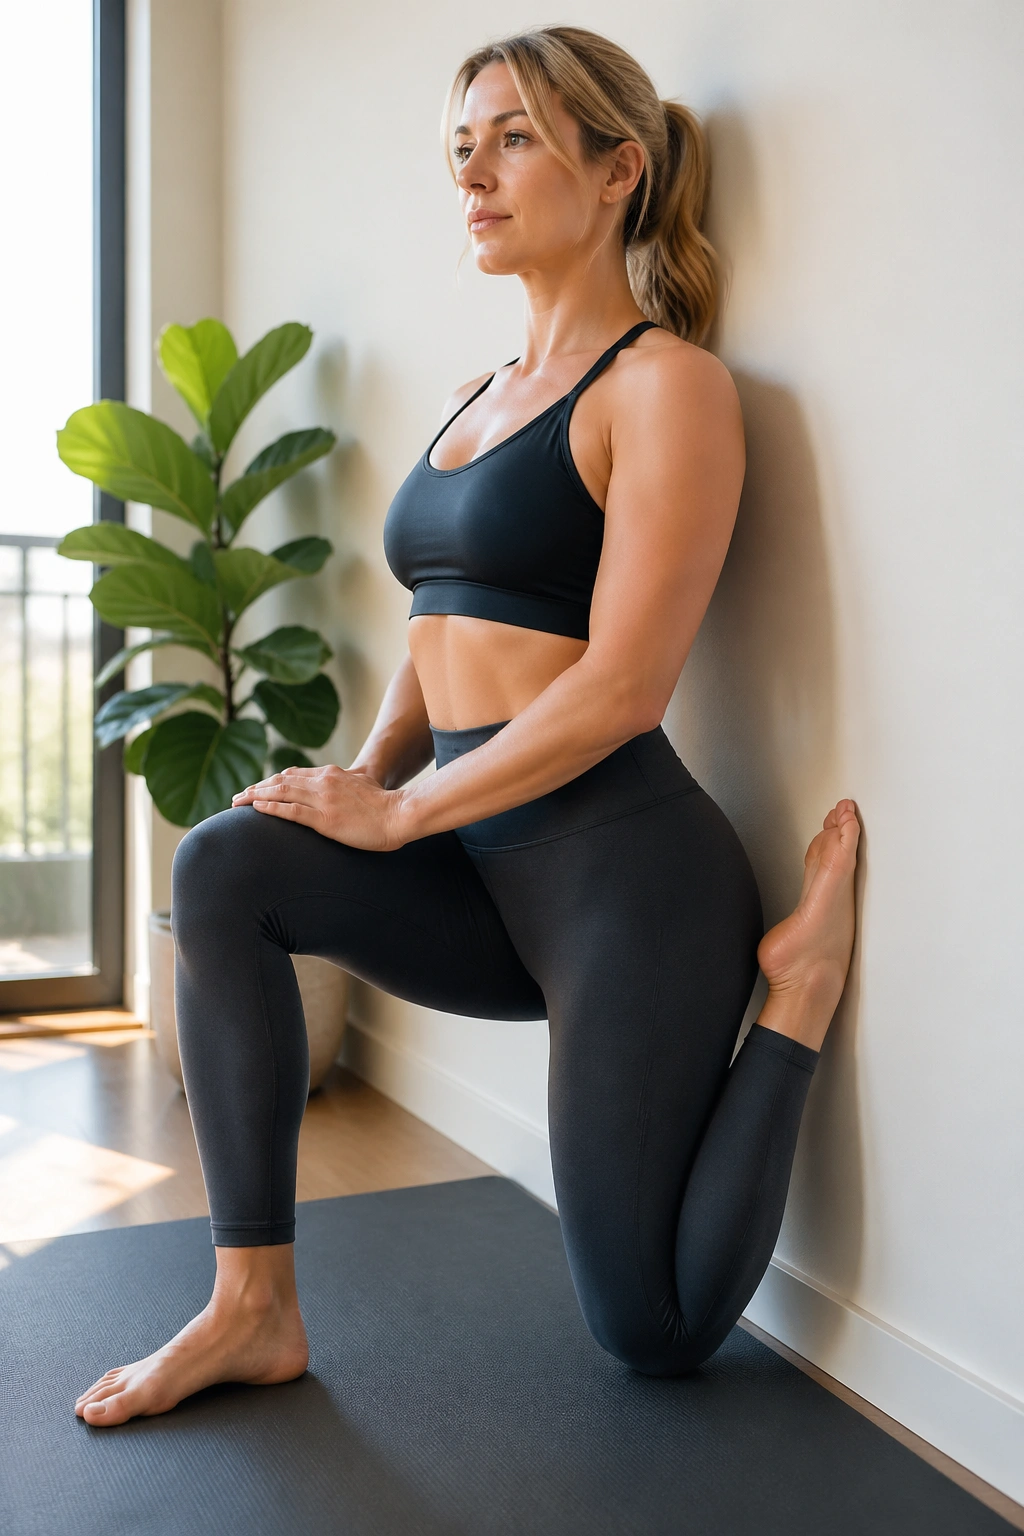
A long wall lunge hold will tell you a lot about your legs in about 20 seconds.
Set the Back Foot
Place your back foot against the wall with the toes curled under lightly or the top of the foot resting softly, depending on what feels better on your ankles. Step your front foot forward into a split stance and lower until both knees bend. The front shin can angle slightly forward, but not wildly. You want load, not collapse.
Find the Angle
The best position is usually the one that feels almost boring for the first five seconds. Then the front quad starts talking. Then the glute on the back side wakes up. Then you realize your core is doing more than you expected.
Hold for 20 to 30 seconds, then add 8 tiny pulses through the bottom half of the range. Keep your front heel planted and your chest lifted. If your lower back arches, shorten the stance a little.
Make the Pulse Count
The pulse is the whole point here. It should be almost too small to notice from across the room. That’s fine. Tiny range, big burn.
A lot of leg toning work is built on exactly that kind of awkward honesty.
9. Inner-Thigh Wall Squeeze
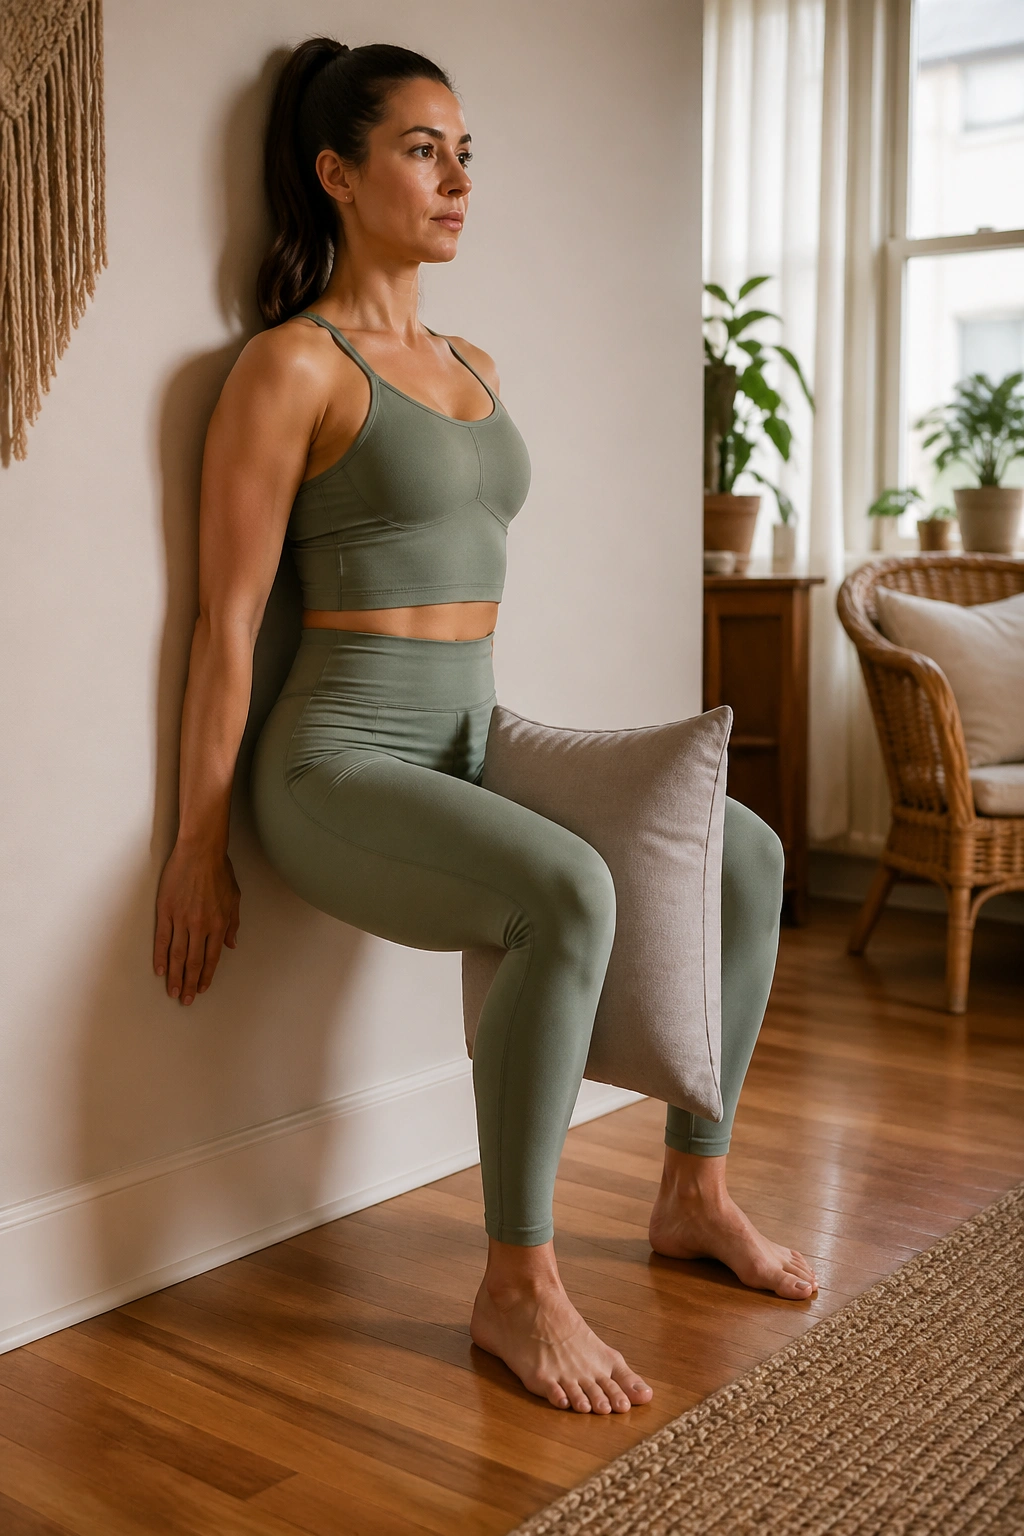
A pillow between the knees can look silly. It works anyway.
Sit in a wall chair, or come down into a half squat with your back against the wall, and place a small yoga block, firm pillow, or folded towel between your inner thighs. Squeeze in gently, hold, release halfway, then squeeze again. You’re training the adductors, and they matter more than most leg routines admit.
The squeeze should feel strong but controlled. If you crush the prop as hard as you can, your outer thighs and glutes may start to brace in a way that steals the work. Better to squeeze at about 70 percent effort and keep the rest of the body calm.
- Hold the squeeze for 5 seconds.
- Release for 2 seconds.
- Repeat for 10 to 12 rounds.
- Keep the knees lined up over the toes.
This move is especially nice after wider squat work, because the inner thighs get a chance to do their job without balance getting in the way. It also pairs well with wall holds, since the wall keeps the spine from wandering around.
10. Donkey Kick Into the Wall
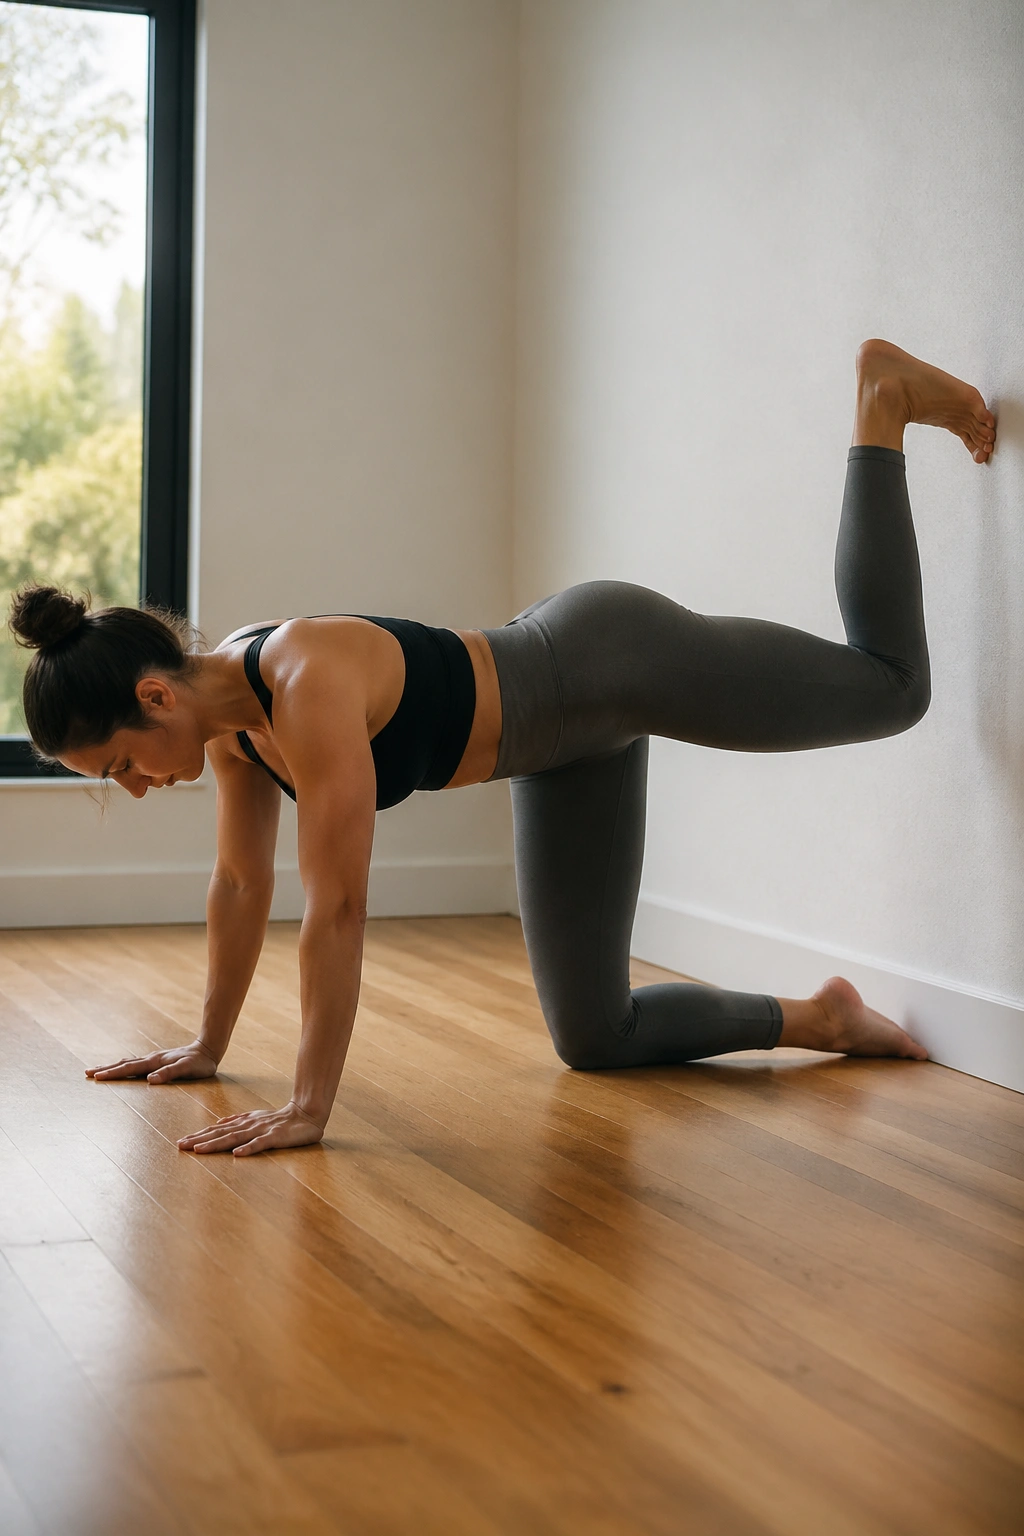
Donkey kicks get a bad rap because people rush them.
The wall version fixes that fast. Instead of kicking the leg wildly behind you, you keep the knee bent, place the sole of the foot lightly against the wall, and press the foot upward and back in a short, controlled path. The glute does the job; the lower back should stay mostly quiet.
Start on all fours with your hands under your shoulders and one knee under your hip. Bend the working knee at 90 degrees and press the sole of the foot into the wall behind you. Lift only as high as you can without tipping the pelvis or arching the spine. Lower with control. Repeat 10 to 15 times per side.
Do not chase height. That’s the trap. A bigger kick often means less glute and more lower-back grunting.
If you want more leg tone, make the rep slower instead. Three seconds up, one second squeeze, three seconds down. That tempo gets ugly fast in the best way.
11. Wall Fire Hydrant Press
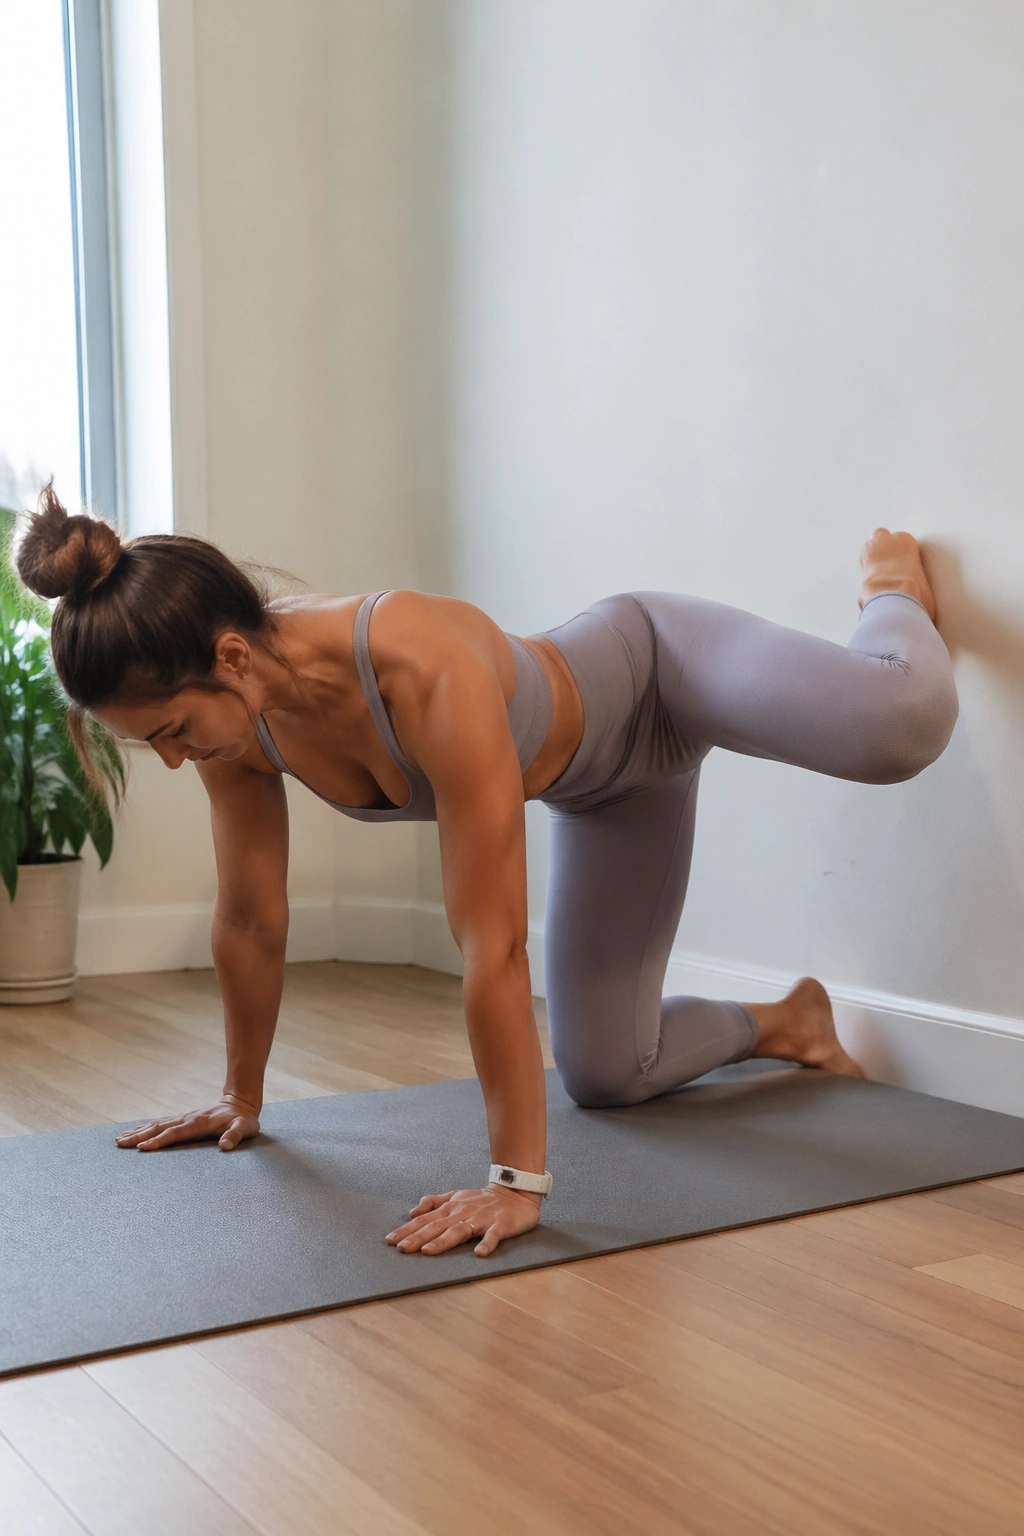
What makes a wall fire hydrant different from a regular hydrant?
The wall gives you a target, and that target makes cheating harder. On the floor, a lot of people fling the knee out to the side and call it done. Against the wall, you have to lift with the outer hip and keep the pelvis from rolling open. That’s the real work.
How to Use It
Come onto all fours with one knee bent and lifted out to the side. Instead of opening the leg into space, press the bent knee or outer thigh gently into the wall beside you. Hold for 2 to 3 seconds, then release just enough to reset.
You’ll feel this on the side of the glute, the outer hip, and sometimes deep in the upper thigh. If your shoulders start doing all the work, shift your hands farther apart and lower the pace.
Best Rep Range
- 8 to 10 reps per side for control.
- 12 to 15 reps if you want a stronger burn.
- Finish with a 10-second hold at the top.
The wall keeps the motion honest. That’s the whole point.
12. Split Squat Pulses at the Wall
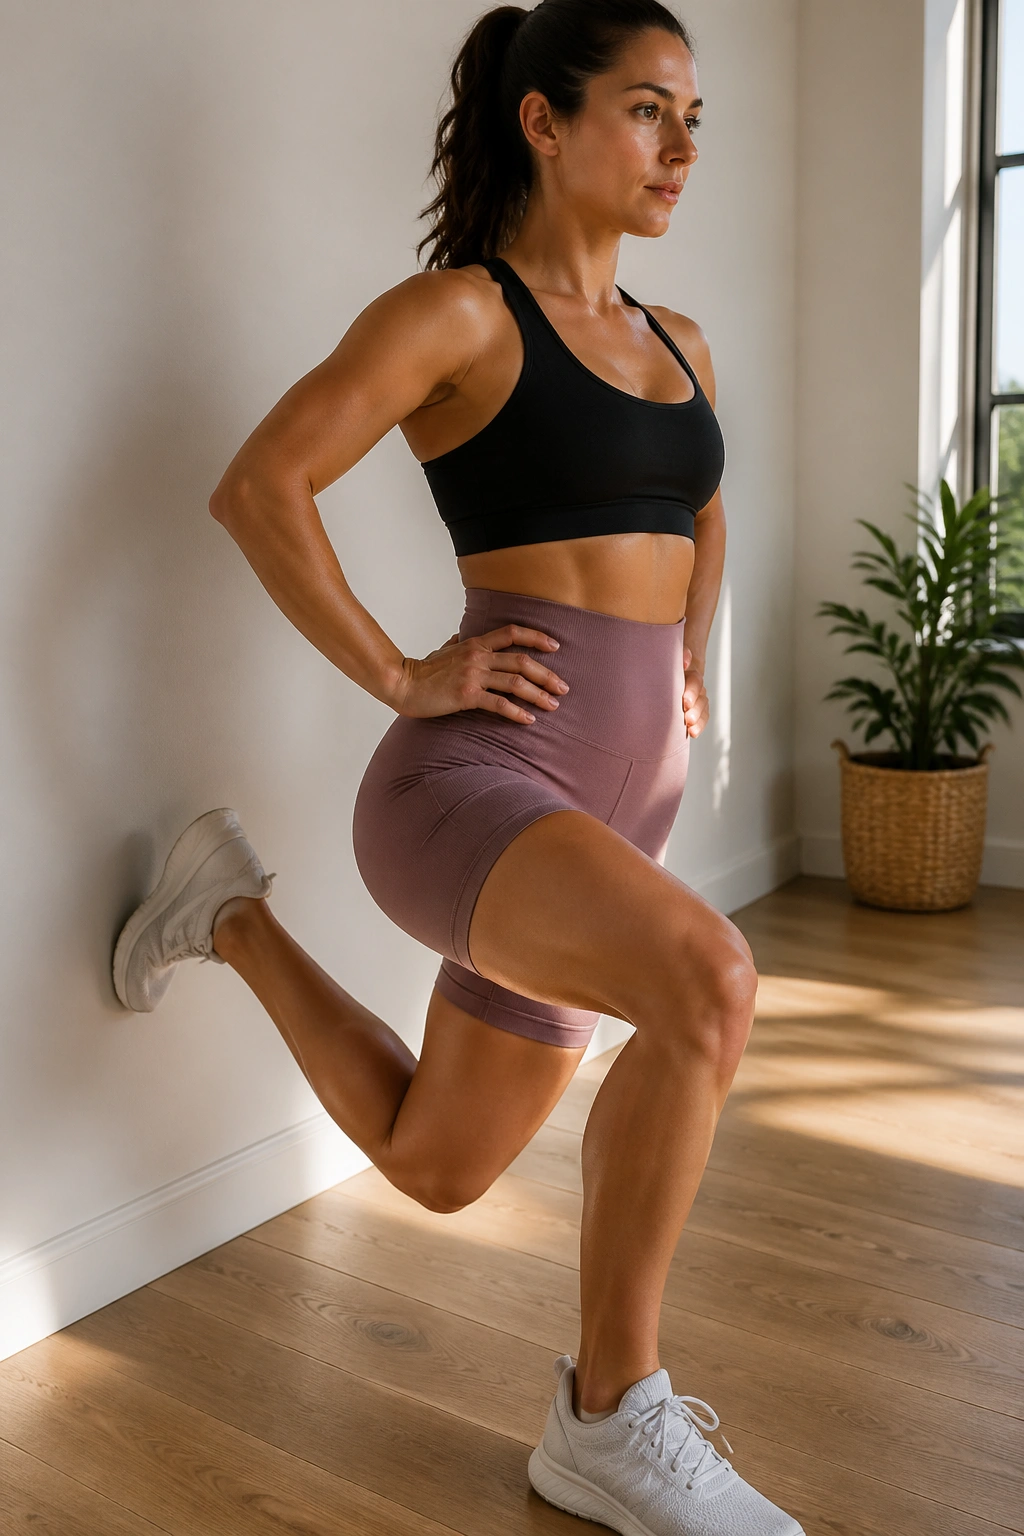
Picture your back toes brushing the wall while you sink into a split squat. Nice and steady. Nothing fancy.
That position gives you a long stance, a stable back line, and a lot of pressure in the front leg, which is where the real shaping happens. The pulses are tiny, but the front thigh will know about them before you’re halfway through.
Keep the front foot planted and the torso tall. Lower into the split squat until both knees are bent. Then pulse up and down 1 inch for 12 to 20 reps, staying smooth. If you want to make it harder, pause for 15 seconds at the bottom before the pulses begin.
This is one of those moves that looks cleaner than it feels. That’s a good sign. Real leg work rarely feels polite.
Don’t let the back knee slam toward the floor. Keep the motion controlled and the hips square. If the front knee goes way past the toes and starts feeling cranky, shorten the stance by a few inches.
13. Wall Glute Bridge With Toe Taps
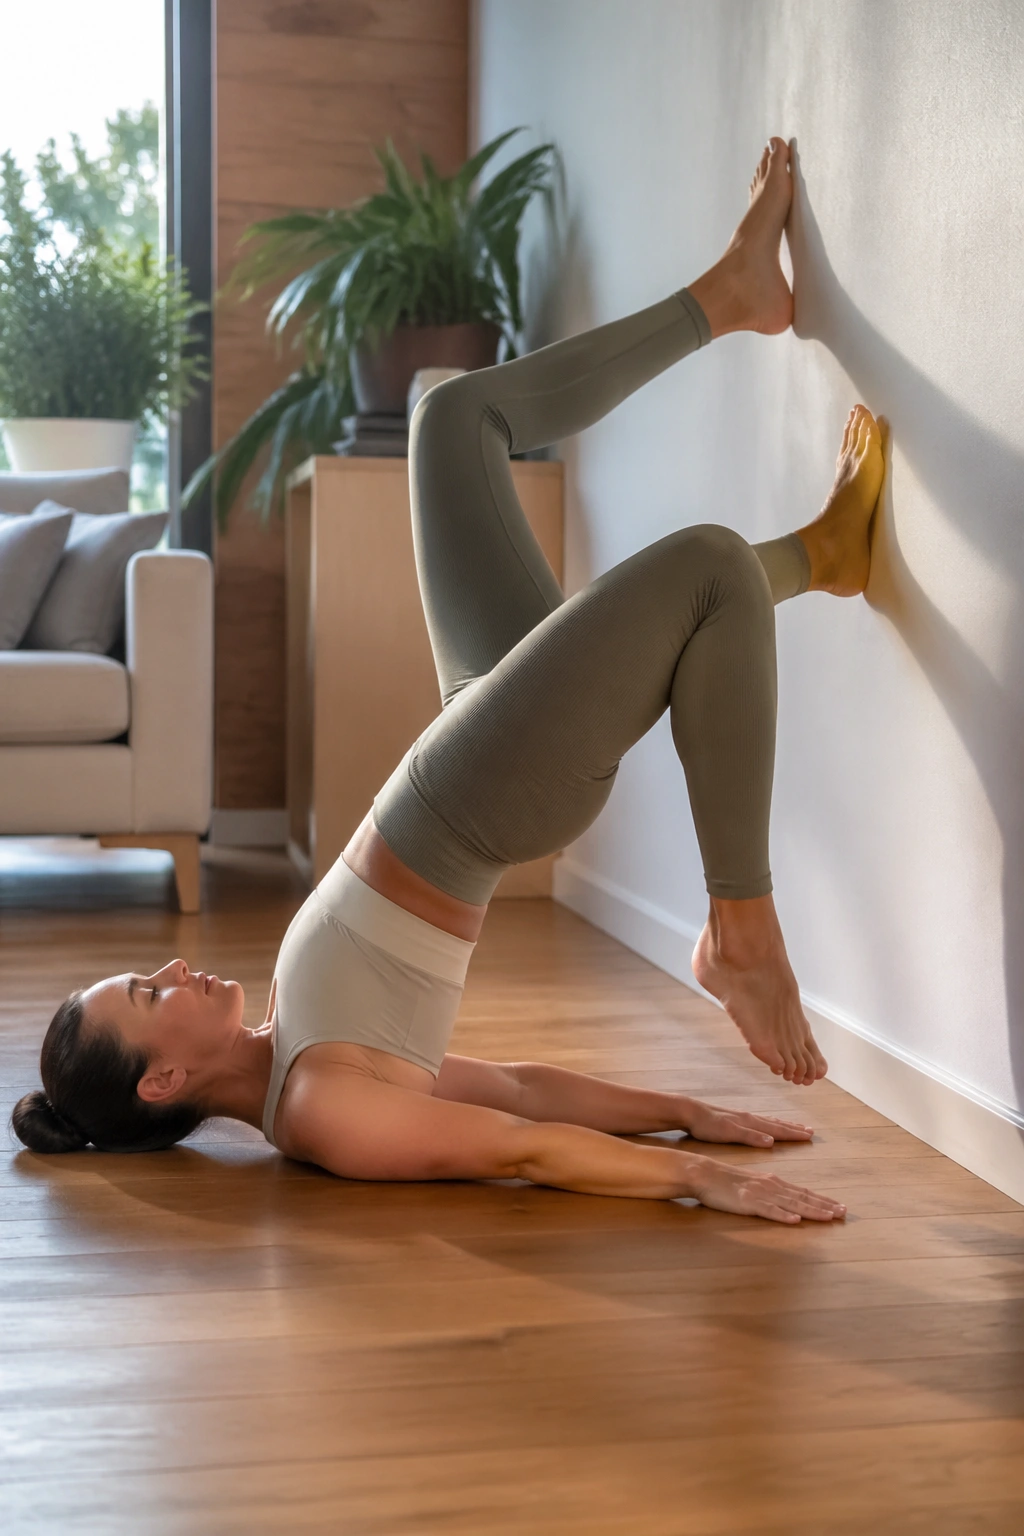
This one sounds fiddly. It’s worth it.
Lie on your back with both feet on the wall, hips lifted into a bridge. From there, keep one leg steady while the other foot peels lightly off the wall for a toe tap, then returns. The bridge stays up. The pelvis stays level. The leg doing the tapping is not allowed to throw the whole shape off.
The first thing you’ll notice is the hamstrings. The second is the glutes. The third is how fast your core gets involved when you stop letting the hips drift. That’s the useful part.
Try 6 to 8 toe taps per side with a 1-second pause on the wall each time. If the hamstrings cramp, move your feet a little farther down the wall. That usually helps right away. Too much knee bend can turn a bridge into a calf issue.
One reason I like this move: it trains coordination without needing speed. The legs stay honest, and the bridge position keeps the loading where you want it.
14. Wall Hamstring Walkouts
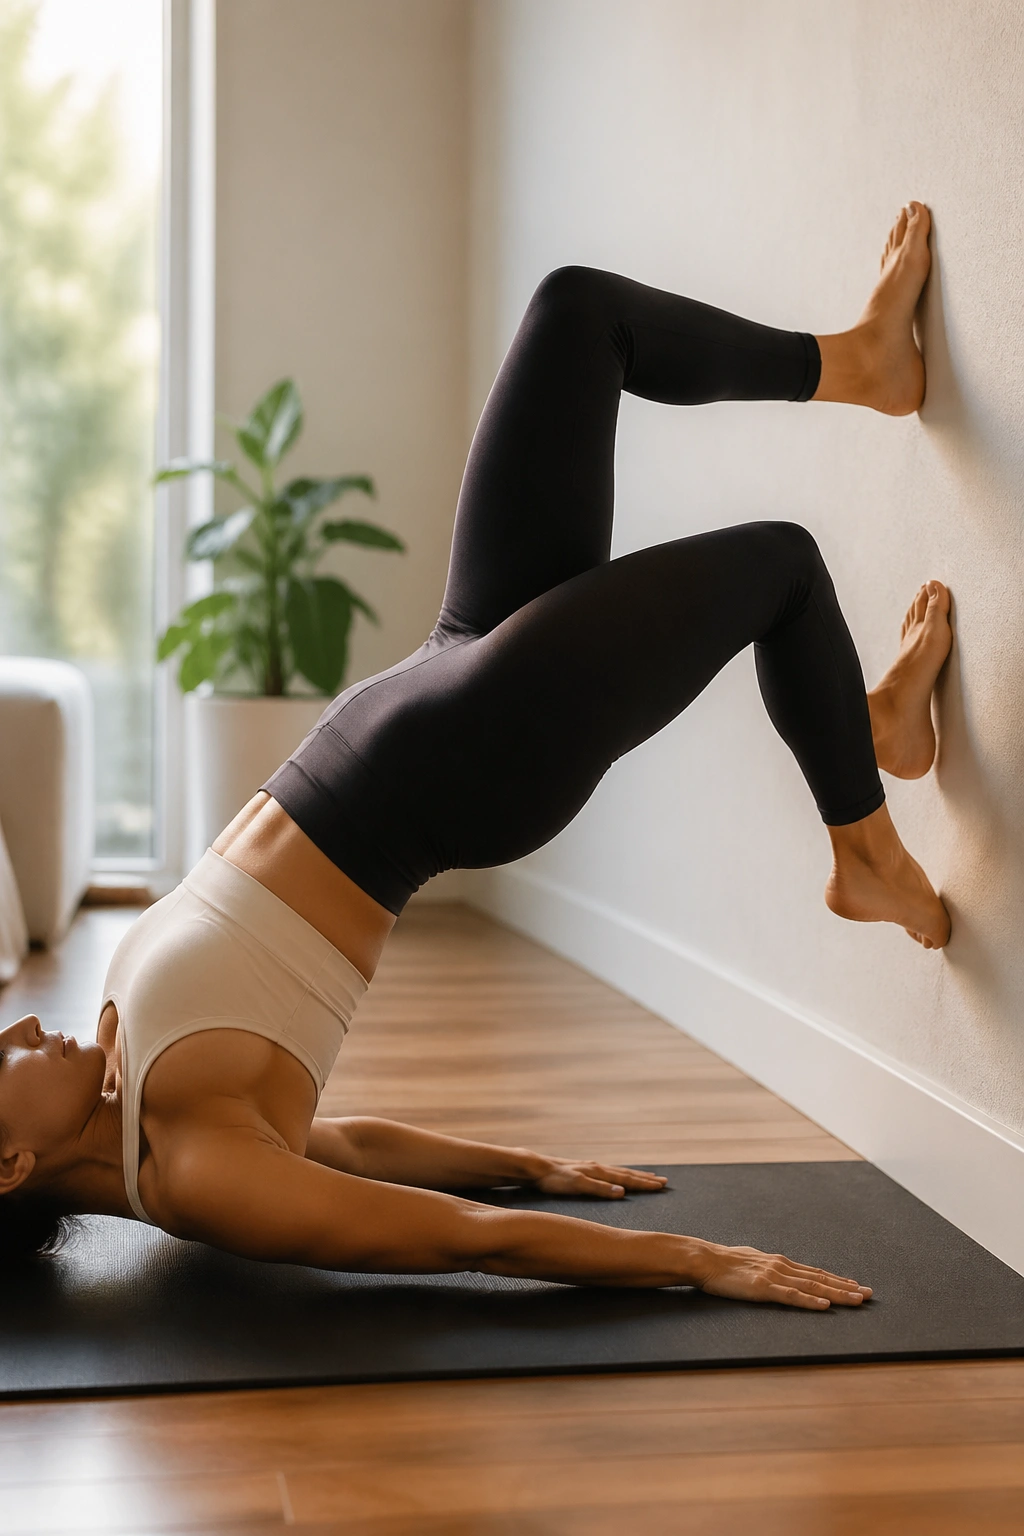
Compared with ordinary floor bridge walkouts, the wall version asks less of your wrists and more of your hips.
Start in a bridge with your feet on the wall and your hips lifted. Walk one foot a few inches down the wall, then the other, then walk them back to the starting height. The bridge should stay high the whole time. If your hips drop, the walkout got too ambitious.
What to Feel
- A steady pull through the hamstrings.
- Glutes staying switched on.
- Core bracing without breath-holding.
- A clean, even load from side to side.
Who It Suits
This is a smart pick if you want hamstring work without sprinting or jumping. It’s also good for people who get bored with straight bridge holds. The changing foot position keeps the brain awake.
Do 6 to 8 walkouts per set. If that feels easy, slow each step down to a 3-second glide. That makes the movement much tougher without changing the shape much at all.
15. Wall Chair March Finisher
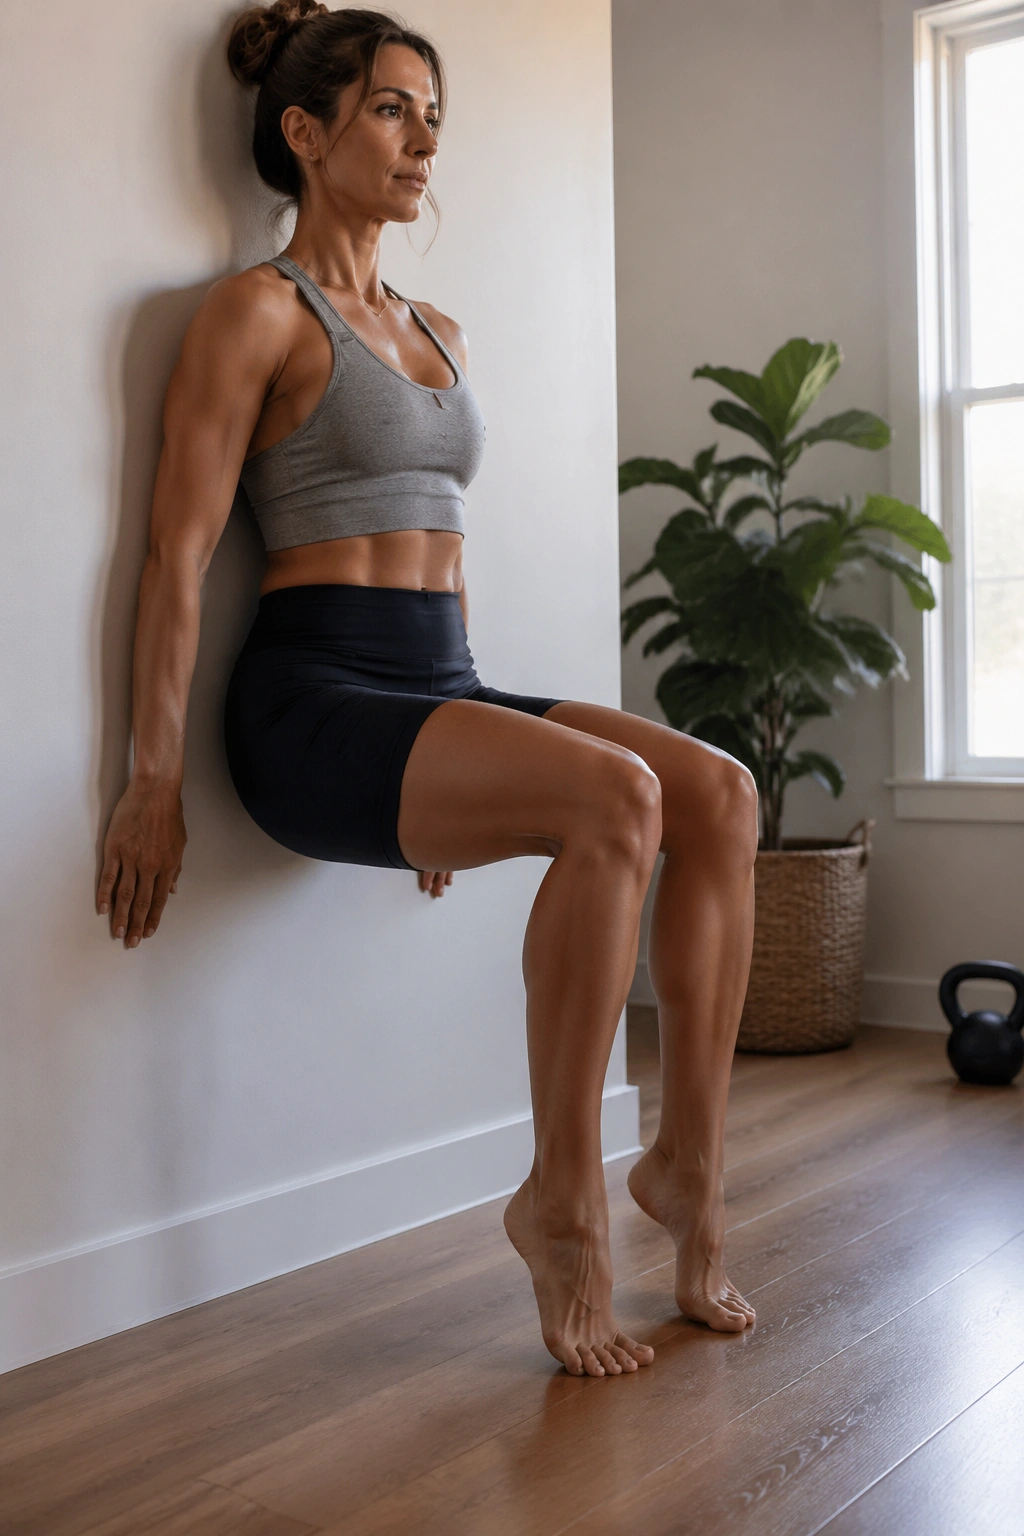
This is the one that leaves your legs honest.
Sit into a wall chair, hold the position, and march one knee up a few inches at a time without losing the squat shape. The standing leg has to keep working while the lifted leg gives you a brief break. That tiny switch makes the quads, glutes, and hip flexors share the burden in a way plain holds do not.
Start with a 20-second hold, then march 10 times per side, then go back to the hold for another 15 to 20 seconds. If that’s too much, cut the march count in half and keep the posture clean. If it feels easy, lower the seat by an inch.
The move gets better when you stop racing it. Slow knee lifts, quiet ribs, steady breath. That’s the whole recipe.
Use this as the last piece of a lower-body session, or tack it onto two or three other wall Pilates workouts when you want a quick leg finish. No fuss. Just that deep, clean fatigue in the thighs and calves that tells you the work landed where it should.
