



A good senior workout is not about sweating buckets. It’s about making the ordinary parts of the day feel easier: standing up from a low sofa, getting into a car without grimacing, carrying a pan from the stove to the sink, or turning fast enough to catch your balance before a wobble becomes a fall.
That’s why functional exercises for seniors at home are such a smart place to start. They train the same patterns you use in real life — squatting, stepping, reaching, pushing, pulling, carrying, and balancing — instead of wasting time on movements that look busy but don’t help much when the phone rings from the other room or the stairs are waiting at the end of the hall.
The best home exercise plans for older adults usually have the same shape underneath. A little leg strength. A little balance work. Some posture and upper-body pushing and pulling. Enough mobility to keep joints moving without feeling stiff and rusty. And, yes, a bit of caution. The body changes with age, but it still adapts fast when you give it the right kind of work.
No fancy equipment required. A sturdy chair, a wall, a countertop, a staircase, and a clear patch of floor will get you surprisingly far. Start with the move that teaches almost everything else: getting up from a chair.
1. Sit-to-Stand From a Chair
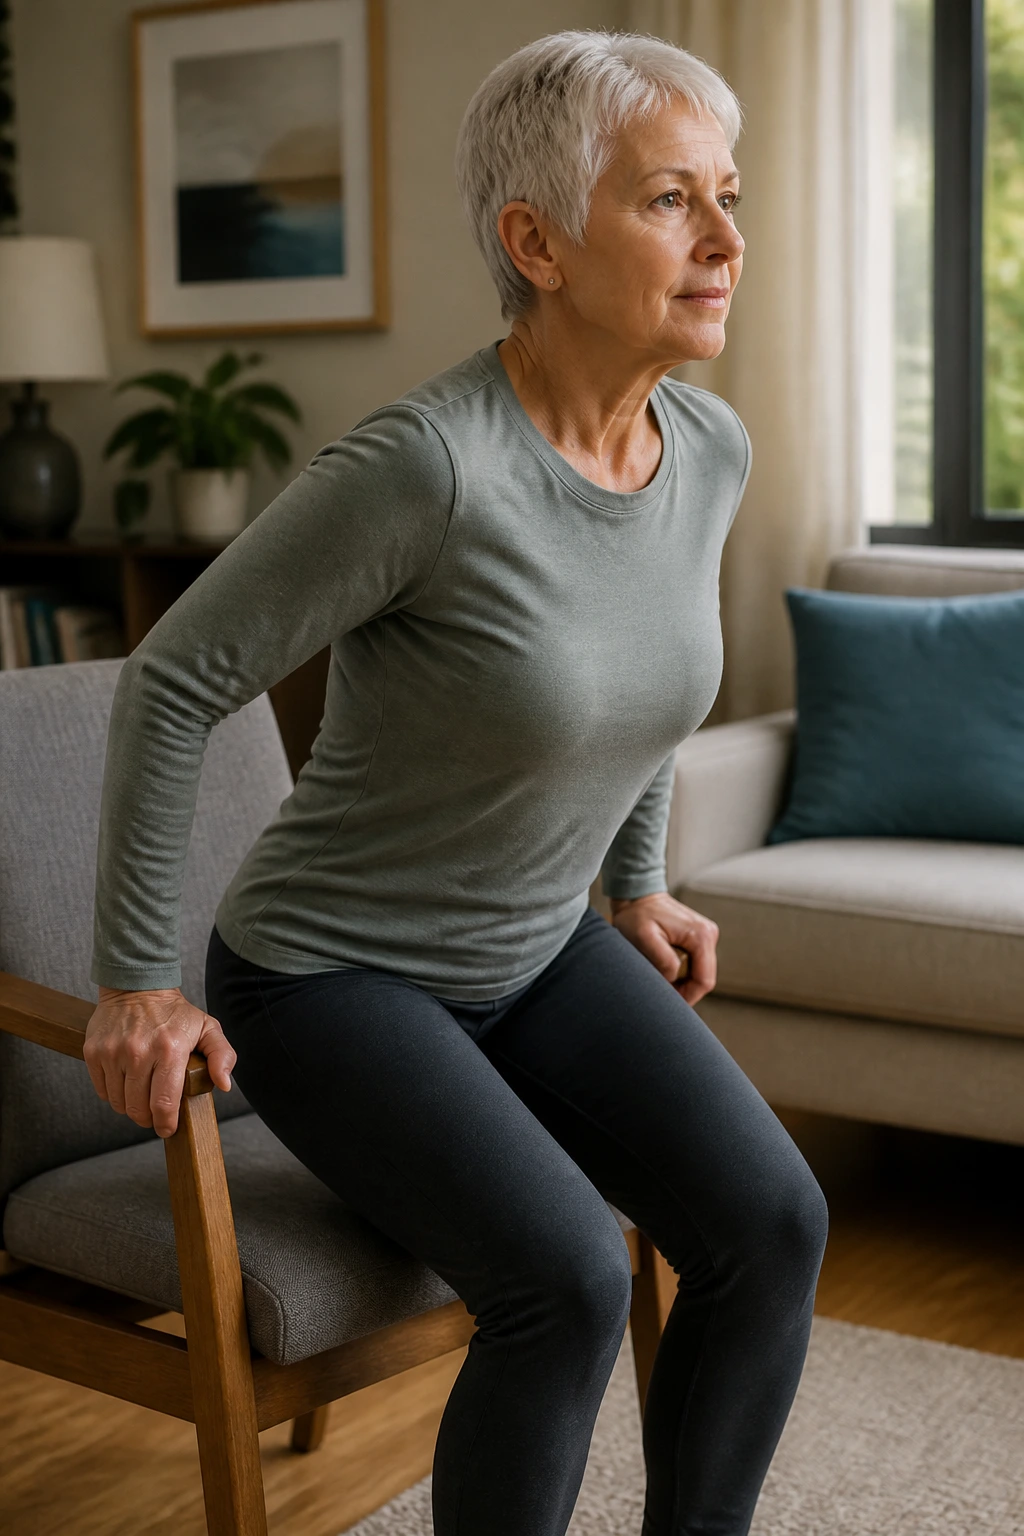
A chair stand is the closest thing older adults have to a universal strength test. If you can get up smoothly, control the way down, and do it a few times without pushing off hard with your hands, a lot of daily tasks get easier fast. That’s not theory. That’s life.
Why It Earns the Top Spot
The movement looks simple, which is exactly why people underestimate it. Your quads, glutes, and core all work together, and your feet, ankles, and back have to cooperate too. It’s the same pattern you use for the couch, the toilet, the car seat, and half the chairs in the world.
Set your feet flat, about hip-width apart, then lean your chest forward a little before you stand. That forward shift matters. If you stay bolt upright and try to muscle your way up, you’ll feel stuck.
- Use a sturdy chair that does not slide.
- Keep your knees in line with your toes.
- Stand up by pressing through your whole foot, not just your toes.
- Lower back down under control instead of plopping.
Pro tip: If the chair is too low, place a firm cushion on it. A tiny change in seat height can turn a frustrating rep into a clean one.
2. Wall Push-Ups
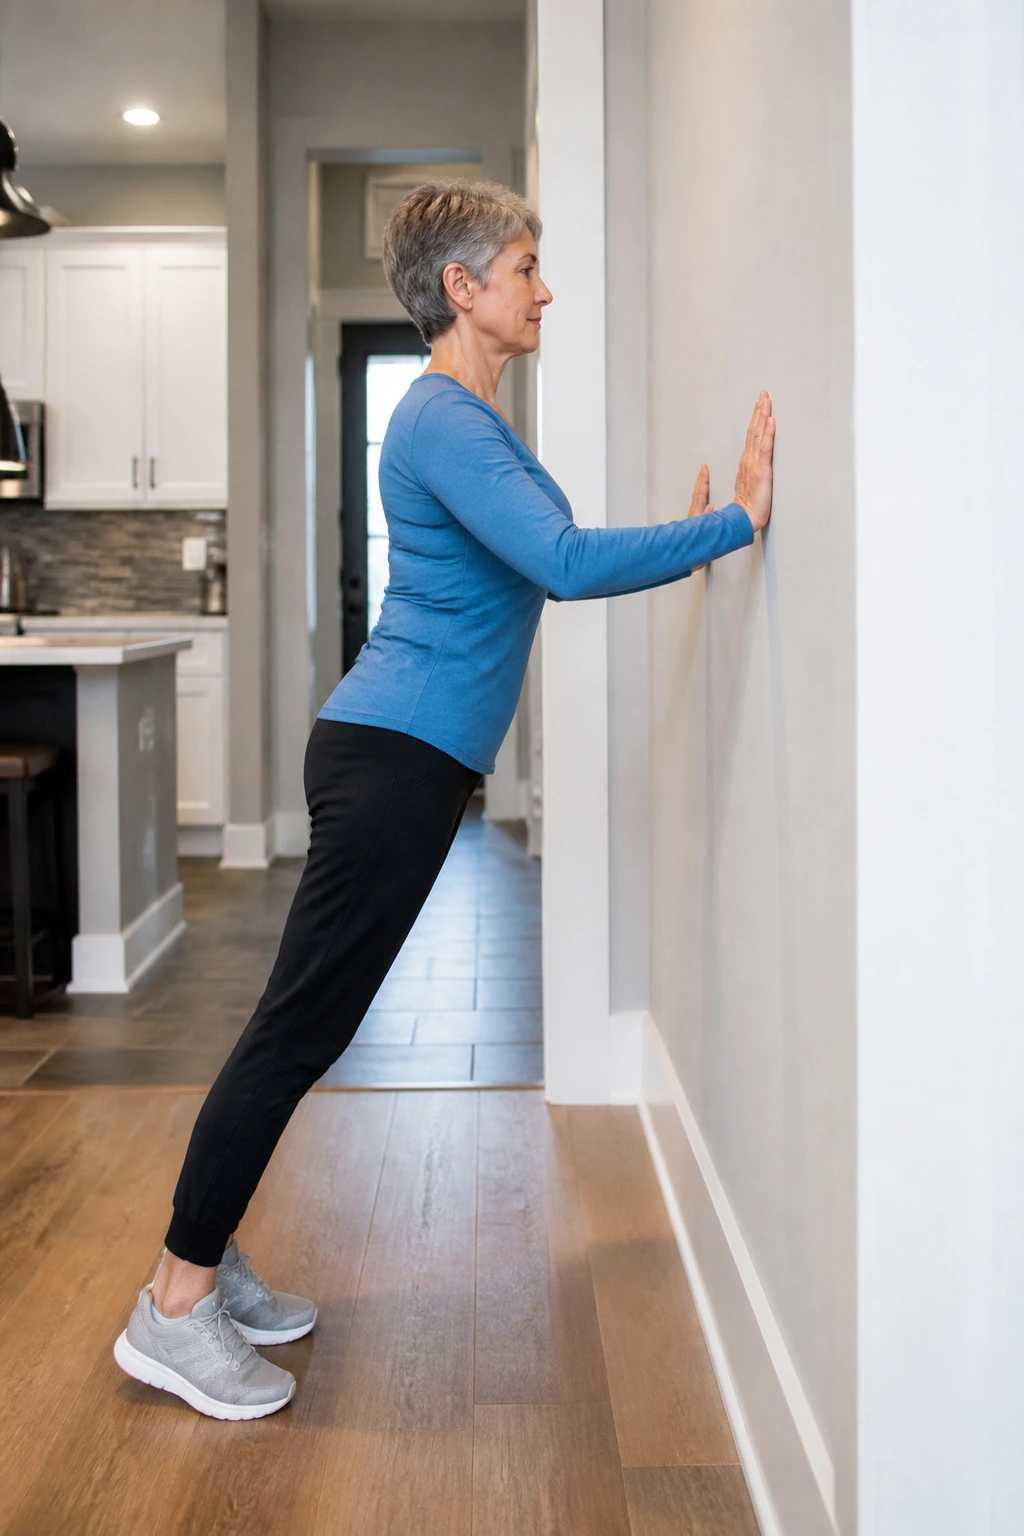
Wall push-ups are one of those exercises that look almost too easy, until you do them with good form. Then you feel your chest, shoulders, and upper arms working in a way that matters for real life — pushing a heavy door open, rising from a countertop, or steadying yourself when you need to brace against something.
The best part is the joint friendliness. Because your body angle is more upright than it would be on the floor, wall push-ups usually feel kinder on the wrists and shoulders. That makes them a smart entry point for seniors who want upper-body strength without getting down on the ground.
Stand about an arm’s length from a wall, place your hands at chest height, and keep your body in one straight line from head to heels. Lower with control until your nose or chest gets close to the wall, then push away. Don’t shrug your shoulders up toward your ears. That is the common mistake here, and it steals the work from the chest and arms.
A good starting dose is 2 sets of 8 to 12 reps. If that feels easy, step your feet back a little farther. If it feels rough, move closer to the wall. Small changes matter.
3. Marching in Place
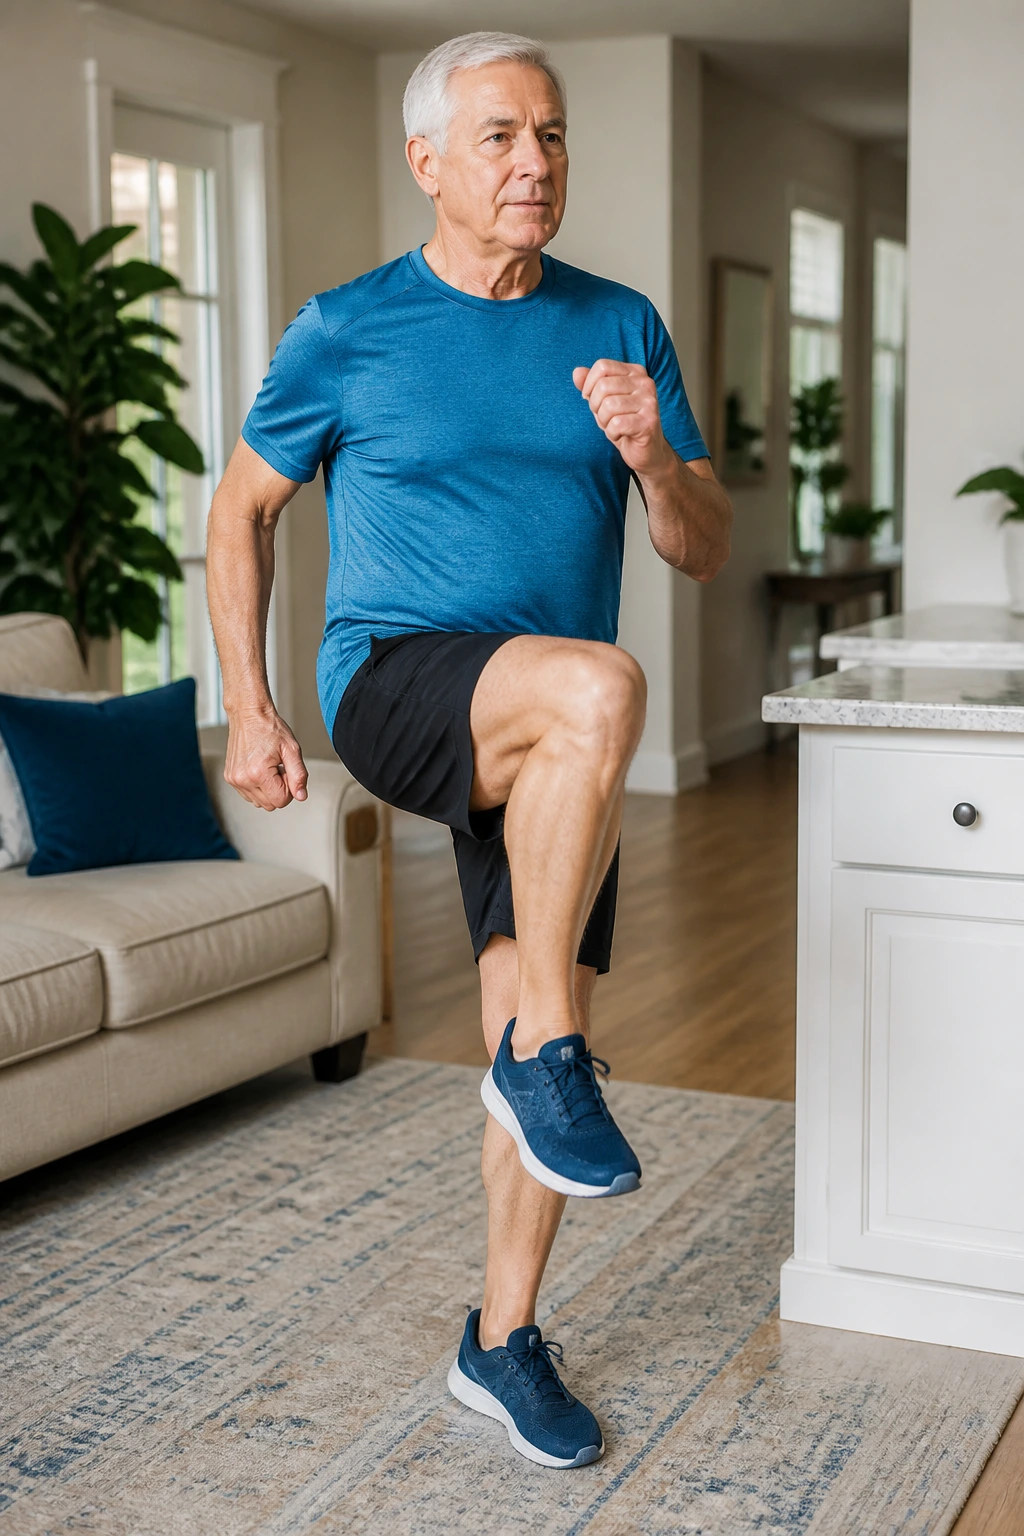
Need a simple way to warm up your legs, heart, and coordination without leaving the living room? Marching in place does a lot more than people give it credit for.
It wakes up the hip flexors, teaches rhythm, and gets the ankles moving. It also gives you an honest look at your balance on a day when you may not feel especially steady. That’s useful information. Better to notice it while holding the back of a chair than while rushing to answer the door.
How to Use It
Stand tall near a counter or chair and lift one knee at a time, as if you’re walking in place with purpose. Swing the opposite arm naturally. Keep the movement smooth, not sharp.
- Start with 30 seconds.
- Rest for 15 to 30 seconds.
- Repeat for 4 to 6 rounds.
- Use a light fingertip touch on a counter if balance feels shaky.
A lot of people march too fast and turn it into a sloppy bounce. Slow it down. The goal is clean knee lift, steady posture, and feet landing under control. If you can keep your ribs stacked over your hips while you do it, you’re doing it right.
4. Heel Raises
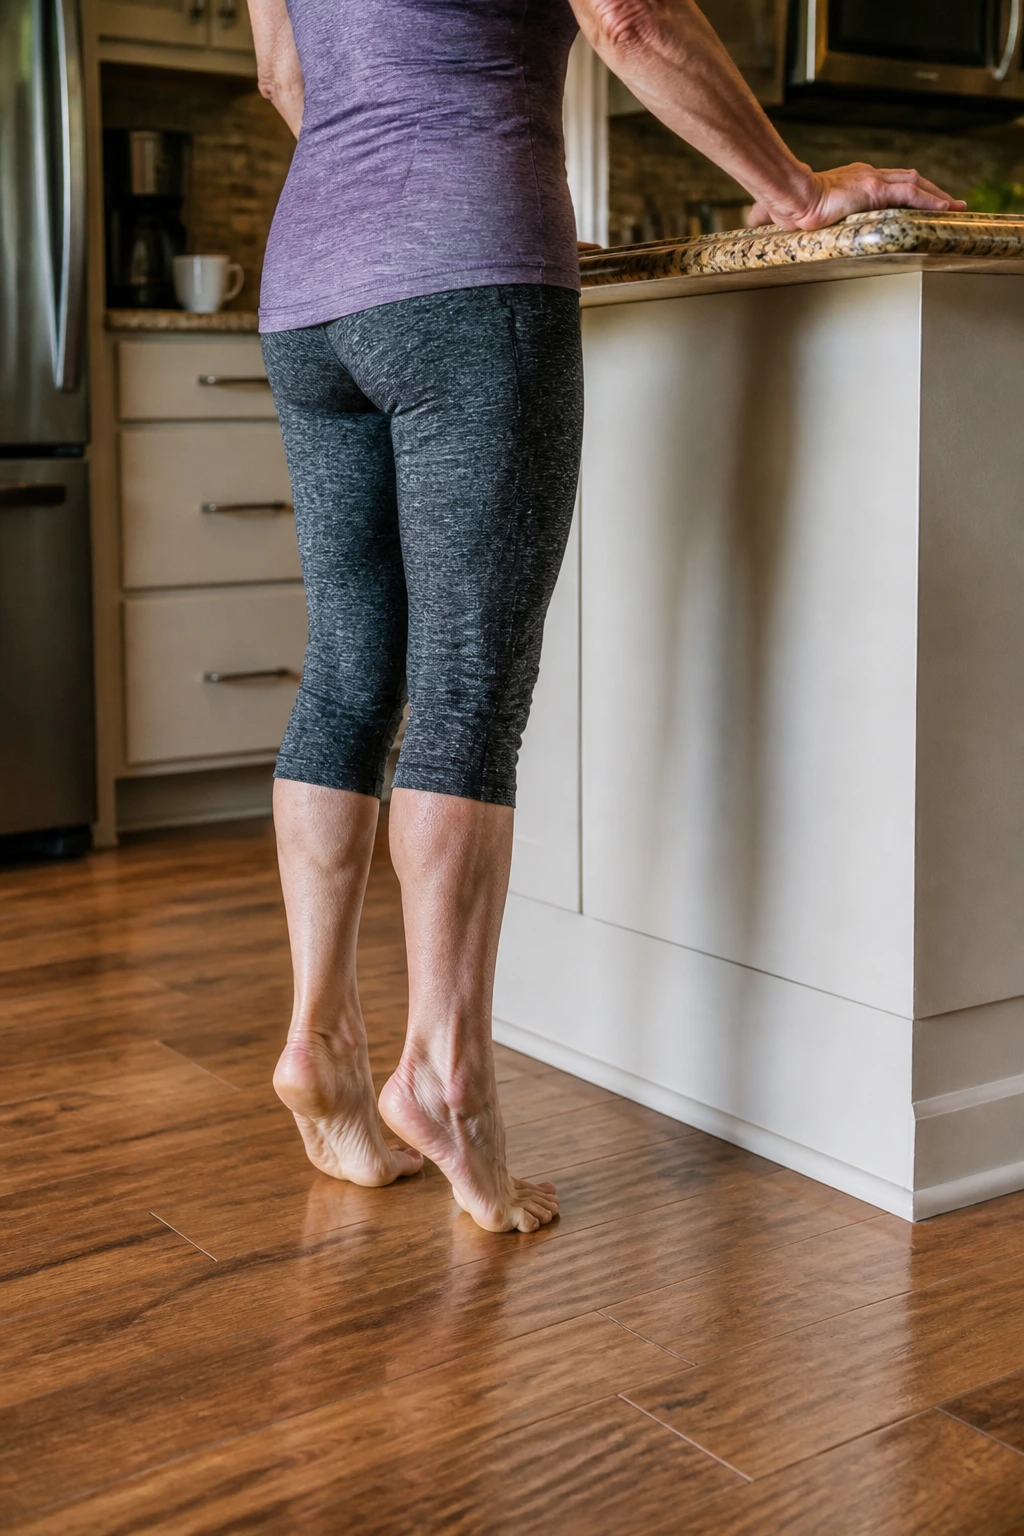
Picture someone standing at the kitchen counter while the kettle warms or the microwave hums. That is the perfect heel-raise moment. Small movement. Big payoff.
Heel raises train the calves and the small stabilizers around the ankles, which matter more than most people think. Strong calves help with walking speed, stair climbing, and balance recovery. Weak ankles are one reason a little trip can turn into a big stumble.
Stand behind a chair or near a counter, feet hip-width apart. Rise up onto the balls of your feet, pause for one second at the top, then lower slowly until your heels touch the floor again. That slow lower is where a lot of the benefit lives. Don’t rush it.
- Start with 10 to 15 reps.
- Keep your weight centered over the big toe and second toe.
- Hold the chair lightly, not death-grip it.
- If standing is hard, do the same move seated by lifting the heels only.
The burn shows up fast. Good. You want it to.
5. Toe Raises
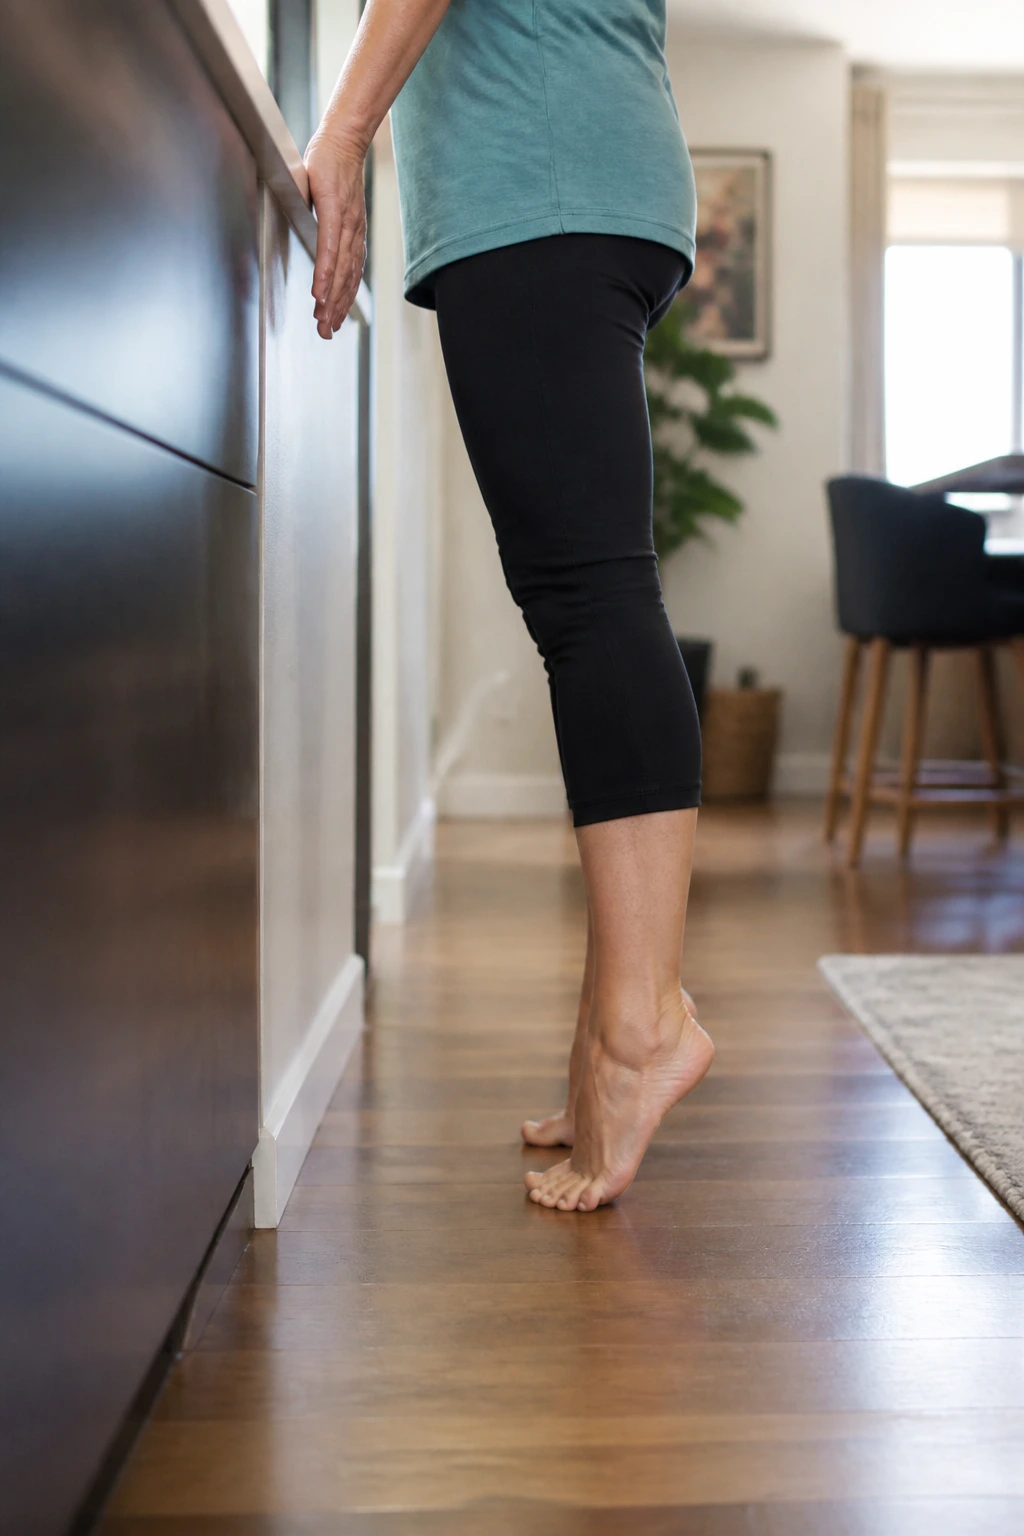
Toe raises do the opposite job, and that’s why they belong in the same program as heel raises. They work the muscles along the front of the shin, which help lift the foot during walking so your toes don’t drag.
That sounds small until you notice how many trips happen because a foot didn’t clear the floor cleanly. Uneven sidewalks, loose rugs, and cluttered hallways all punish lazy foot lift.
Stand with your back near a wall or your hands on a counter. Keep your heels planted and lift your toes toward your shins. Lower them with control. The movement is short. No need to swing the whole leg.
Tiny movement. Big payoff.
If standing toe raises feel awkward, do them while seated with your heels on the floor. That version still wakes up the shin muscles and is a good place to start if your ankles feel stiff in the morning. Two sets of 10 to 15 reps is enough for most beginners.
What I like about this exercise is how practical it is. It helps with walking, sure, but it also teaches cleaner foot placement. That matters every time you step over a threshold or turn fast in a hallway.
6. Step-Ups on a Low Step
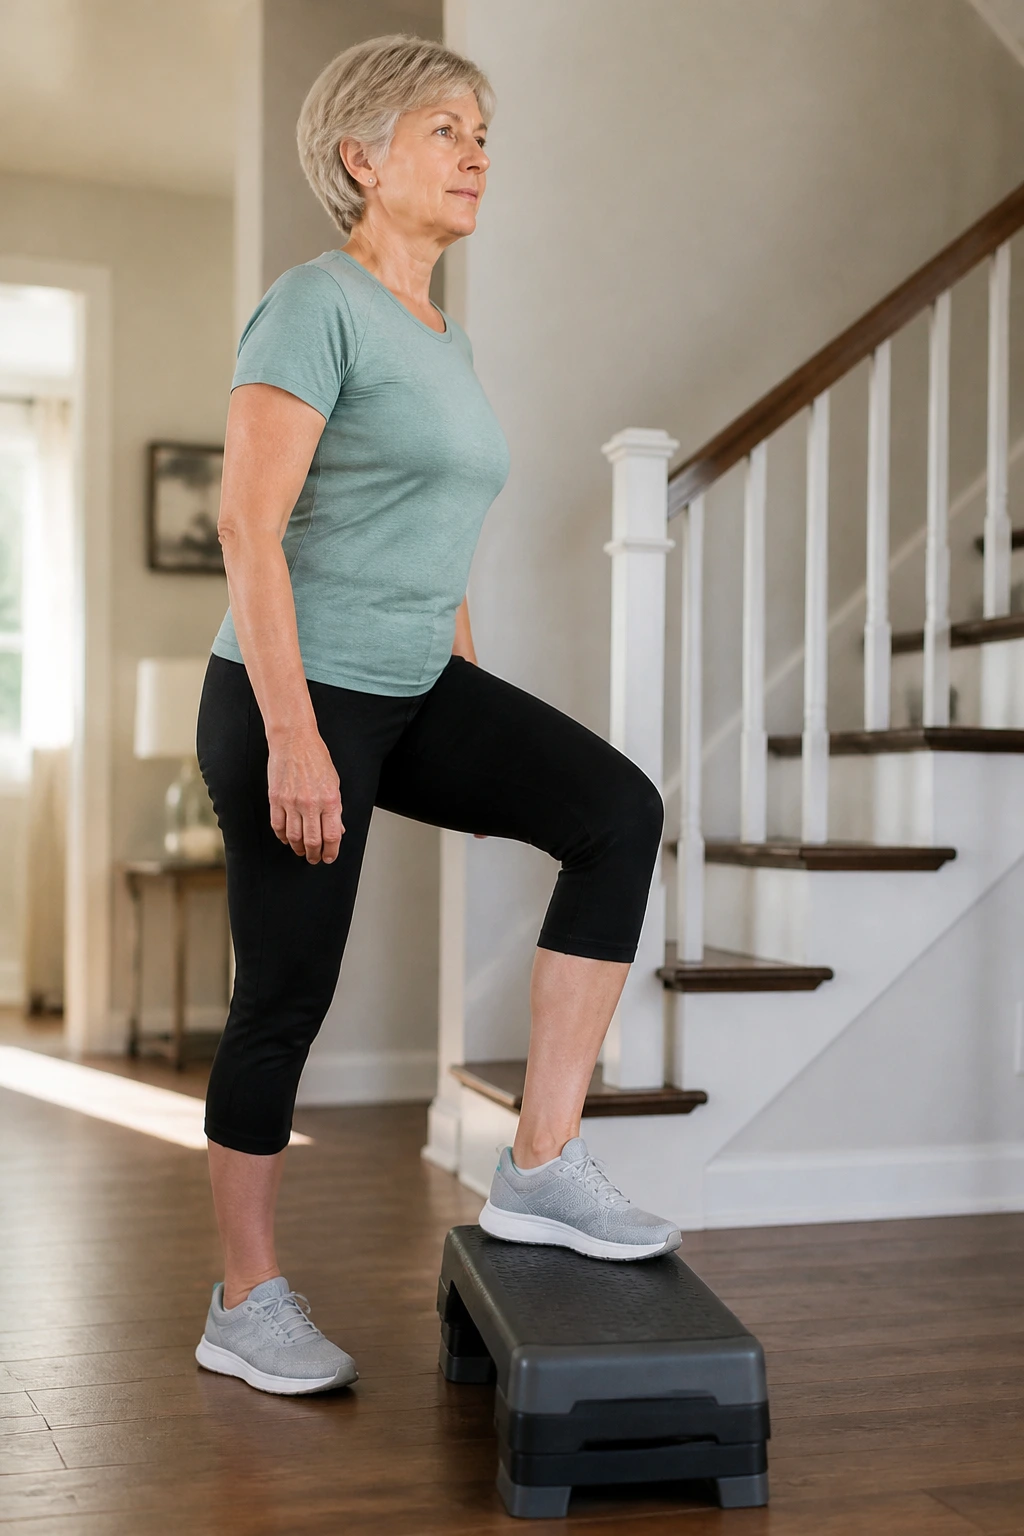
A low step is a miniature staircase, and that makes step-ups one of the most useful home exercises you can do. If a person struggles with one step, a flight of stairs becomes a fight. Step-ups are the bridge.
Unlike marching in place, this move asks your standing leg to do real lifting. The working leg has to push your body upward, while the other leg controls the descent. That is close to what stairs demand, which is why step-ups transfer so well to daily life.
Use the bottom stair, a sturdy aerobic step, or a platform that sits around 4 to 6 inches high to begin. Hold a railing or countertop lightly. Step up with one foot, bring the second foot up, then step back down the same way. Keep your torso tall and avoid throwing your weight forward.
Who should make this a priority? Anyone who hesitates on stairs, anyone who feels one leg is much weaker than the other, and anyone whose knees complain when climbing. Start with 5 reps each leg and build from there.
The big mistake is rushing the way down. Lower under control. That’s the part that teaches the leg to absorb force.
7. Heel-to-Toe Stand
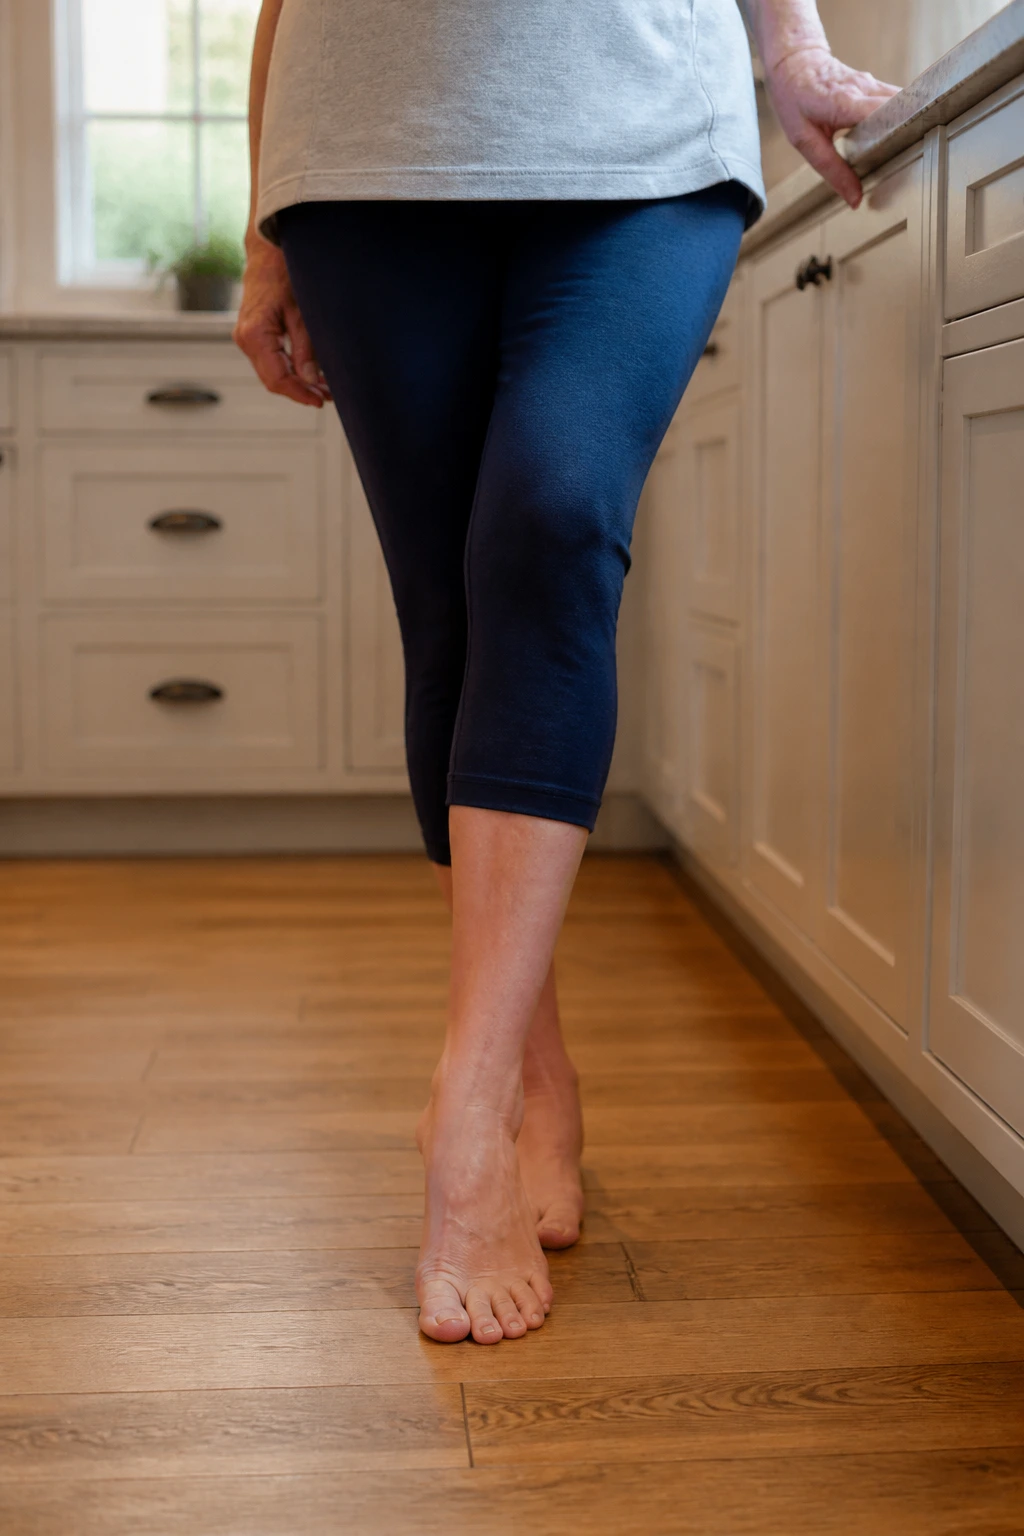
Standing with one foot lined up directly in front of the other looks simple until you try to hold it for more than a few seconds. Then it gets honest. Fast.
This is one of the cleanest balance exercises for seniors because it narrows your base of support without asking you to jump, twist, or get down on the floor. It teaches the body to make tiny ankle and hip corrections, which is exactly what you want when you’re reaching for a shelf or turning in a tight space.
Why Balance Training Cannot Be Skipped
A lot of people spend years training strength and ignoring balance. That’s backward. Strength helps, sure, but balance is the thing that tells that strength where to go when the floor is not cooperating.
Stand near a counter with one hand close enough to touch if needed. Put one foot directly in front of the other so the heel of the front foot almost touches the toes of the back foot. Hold for 20 to 30 seconds, then switch sides.
- Keep your eyes on one spot ahead of you.
- Soften your knees a little.
- Breathe. People hold their breath here all the time.
- Make it harder by using less hand support, not by forcing a wobbly stance.
Best time to do it: while brushing your teeth or waiting for coffee to brew. That’s not a joke. Habit beats perfection.
8. Single-Leg Stand With Support
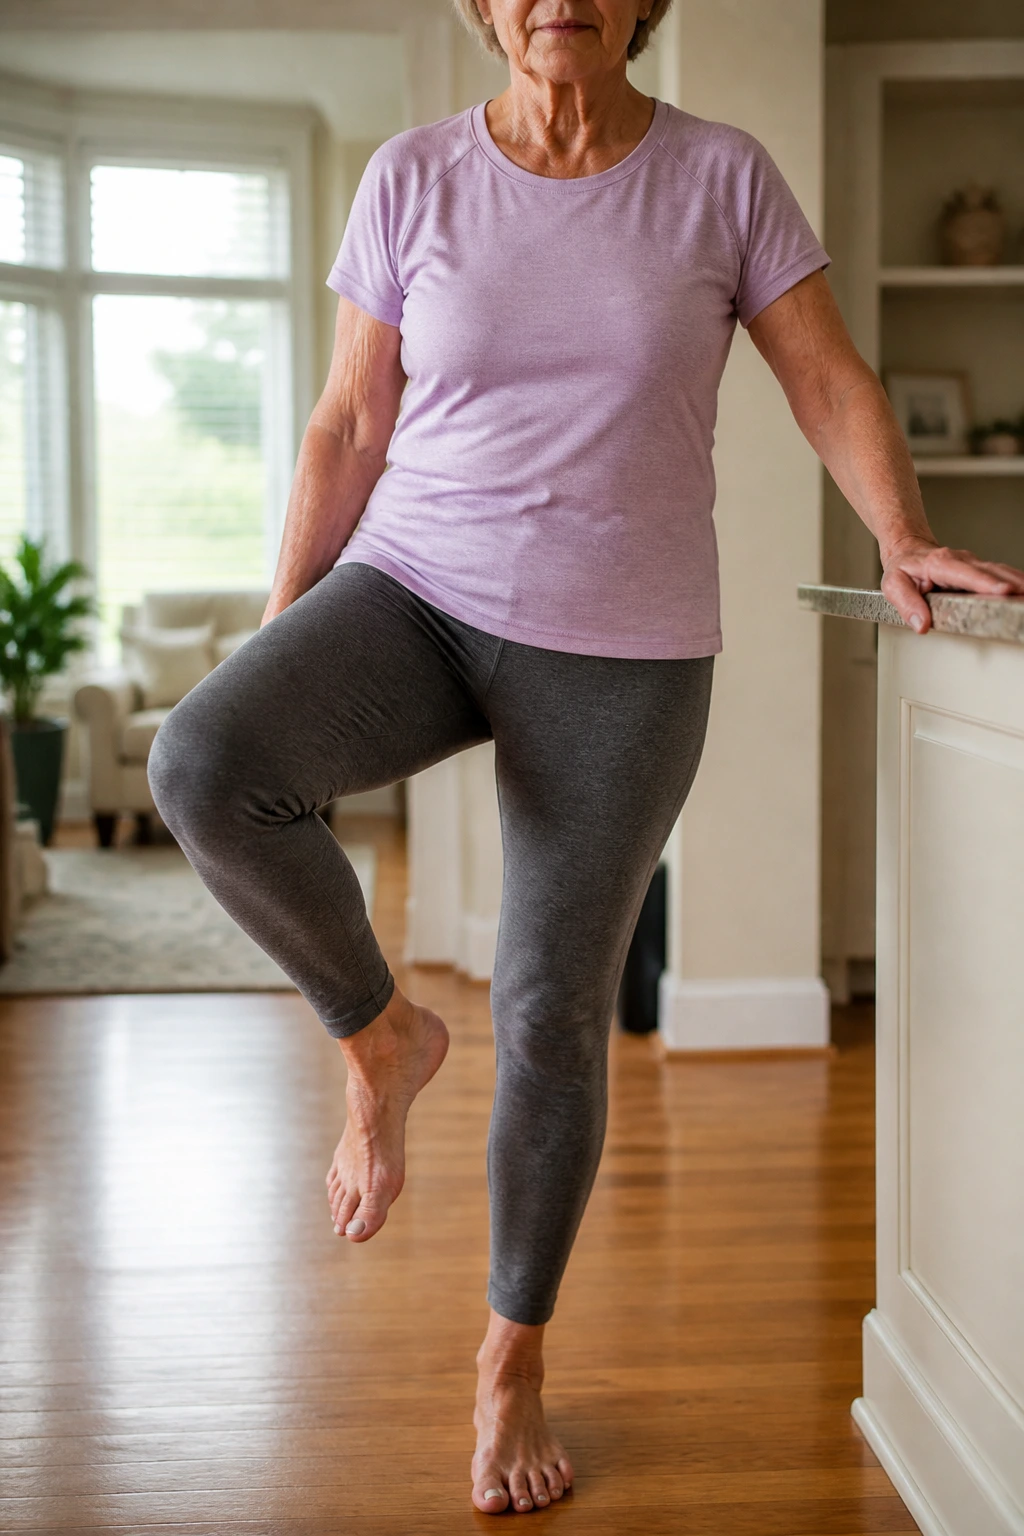
Here’s the blunt version: if one leg can’t handle your weight for a few seconds, your whole body has to work harder every time you step, pivot, or catch yourself. Single-leg standing finds the weak link quickly.
The move is simple, but it reveals a lot. You’ll notice one side feels steadier, one ankle trembles earlier, or one hip drops faster than the other. That information is gold. It tells you where to spend your effort.
Hold a counter with one or two fingertips. Lift one foot a few inches off the floor and stand tall on the other leg. Keep your hips level and your shoulders relaxed. Start with 5 to 10 seconds per side, then repeat for 3 rounds.
No heroics. If you feel yourself gripping the counter hard or tilting sideways, shorten the hold. Clean reps beat shaky long holds every time.
A useful trick: stand on your stronger side first, then switch. If you always start on the shaky leg, the drill can feel punishing before you’ve warmed up. A calm setup makes people stick with it longer, and that matters more than squeezing out an extra two seconds.
9. Side Leg Raises
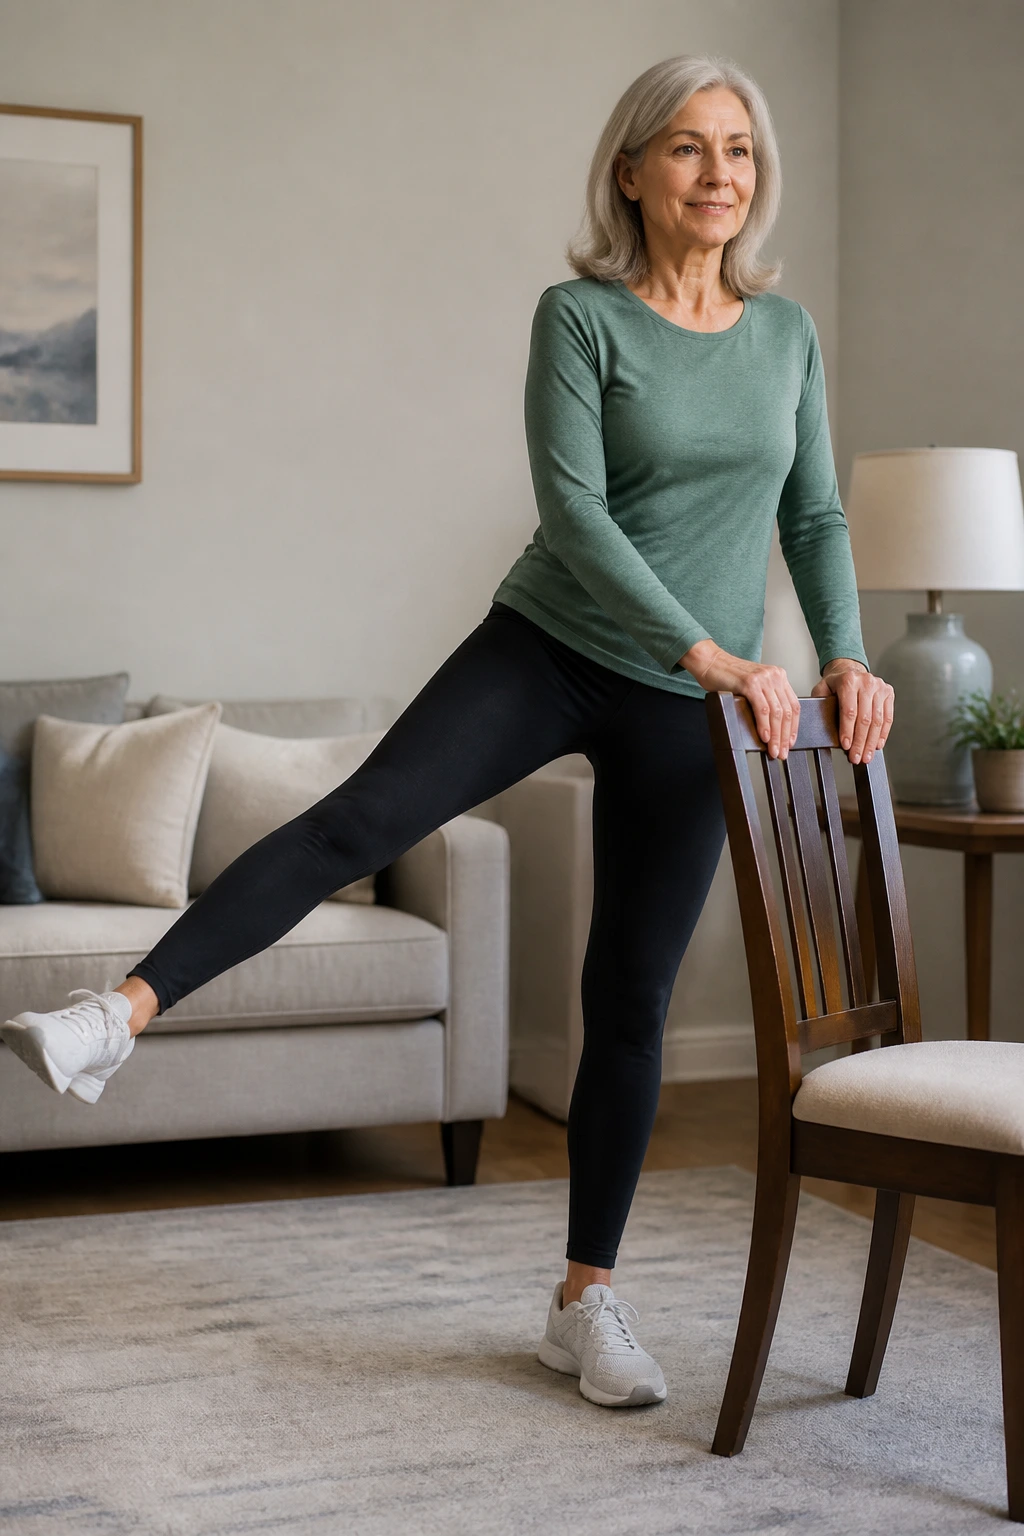
Most people walk forward all day and barely train the muscles that stop them from tipping side to side. That’s a mistake. Side leg raises target the outer hip, which helps with stability when you step off a curb, sidestep around a chair, or keep your pelvis level while walking.
You’ll feel this in the outer glute and along the side of the hip. That area tends to go quiet unless you wake it up on purpose. Once you do, your walking often feels cleaner. Not dramatic. Just more controlled.
How to Use It
Stand tall behind a chair, shift your weight onto one leg, and slowly lift the other leg out to the side a few inches. Keep the toes pointed forward or slightly down. If the toes turn up, the hip often cheats.
- Move only as high as you can without leaning.
- Keep the standing knee soft.
- Use 10 to 12 reps each side.
- Pause for one second at the top.
The upper body wants to help too much here. Don’t let it. If your torso leans, the exercise stops training the hip the way you think it is. A tiny lift done cleanly is better than a giant swing with bad form.
10. Glute Bridges
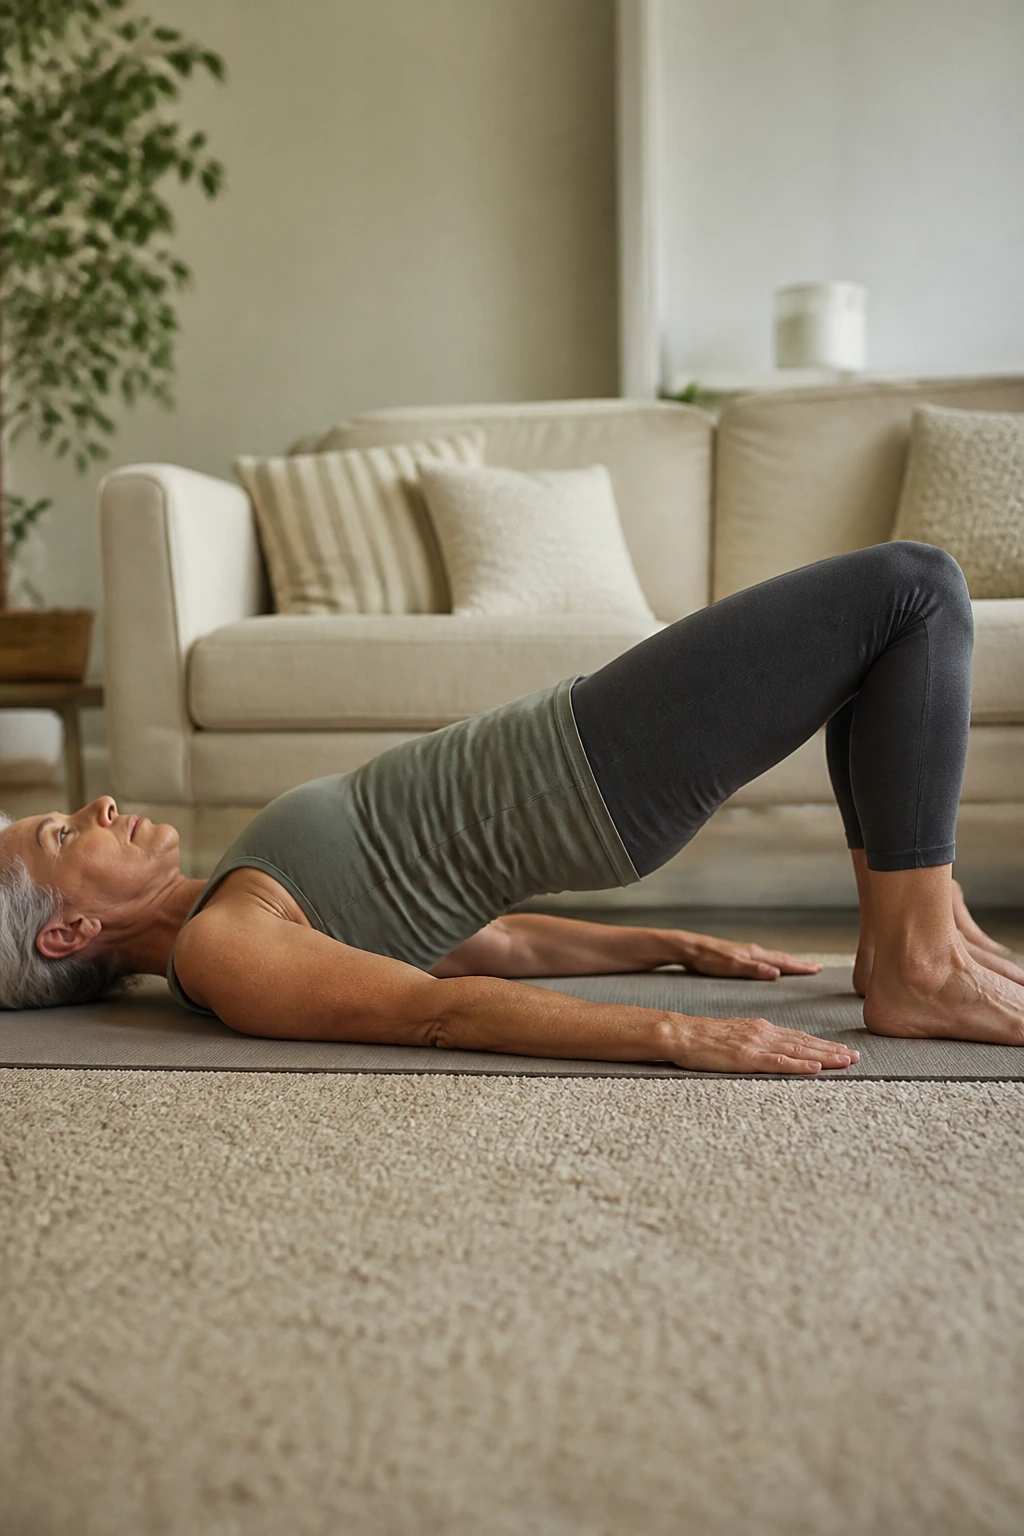
Lying on the floor and lifting your hips sounds almost too ordinary to matter, but glute bridges are one of the best ways to train the back side of the body at home. They hit the glutes, hamstrings, and core without loading the spine much.
That matters for seniors because the glutes do a lot of the work in standing, walking, climbing, and getting out of chairs. If they’re weak, the lower back often picks up the slack. You feel that as tightness, fatigue, or a vague sense that your hips never quite do their share.
Lie on your back with your knees bent and feet flat, about hip-width apart. Press through your heels and lift your hips until your body forms a straight line from shoulders to knees. Squeeze your buttocks gently at the top, then lower slowly.
- Start with 8 to 12 reps.
- Keep your ribs down, not flared.
- Stop if you feel sharp back pain.
- If the floor is too hard, do the same movement on a firm bed edge with caution.
The bridge is not flashy. It doesn’t need to be. It just works.
11. Bird Dog
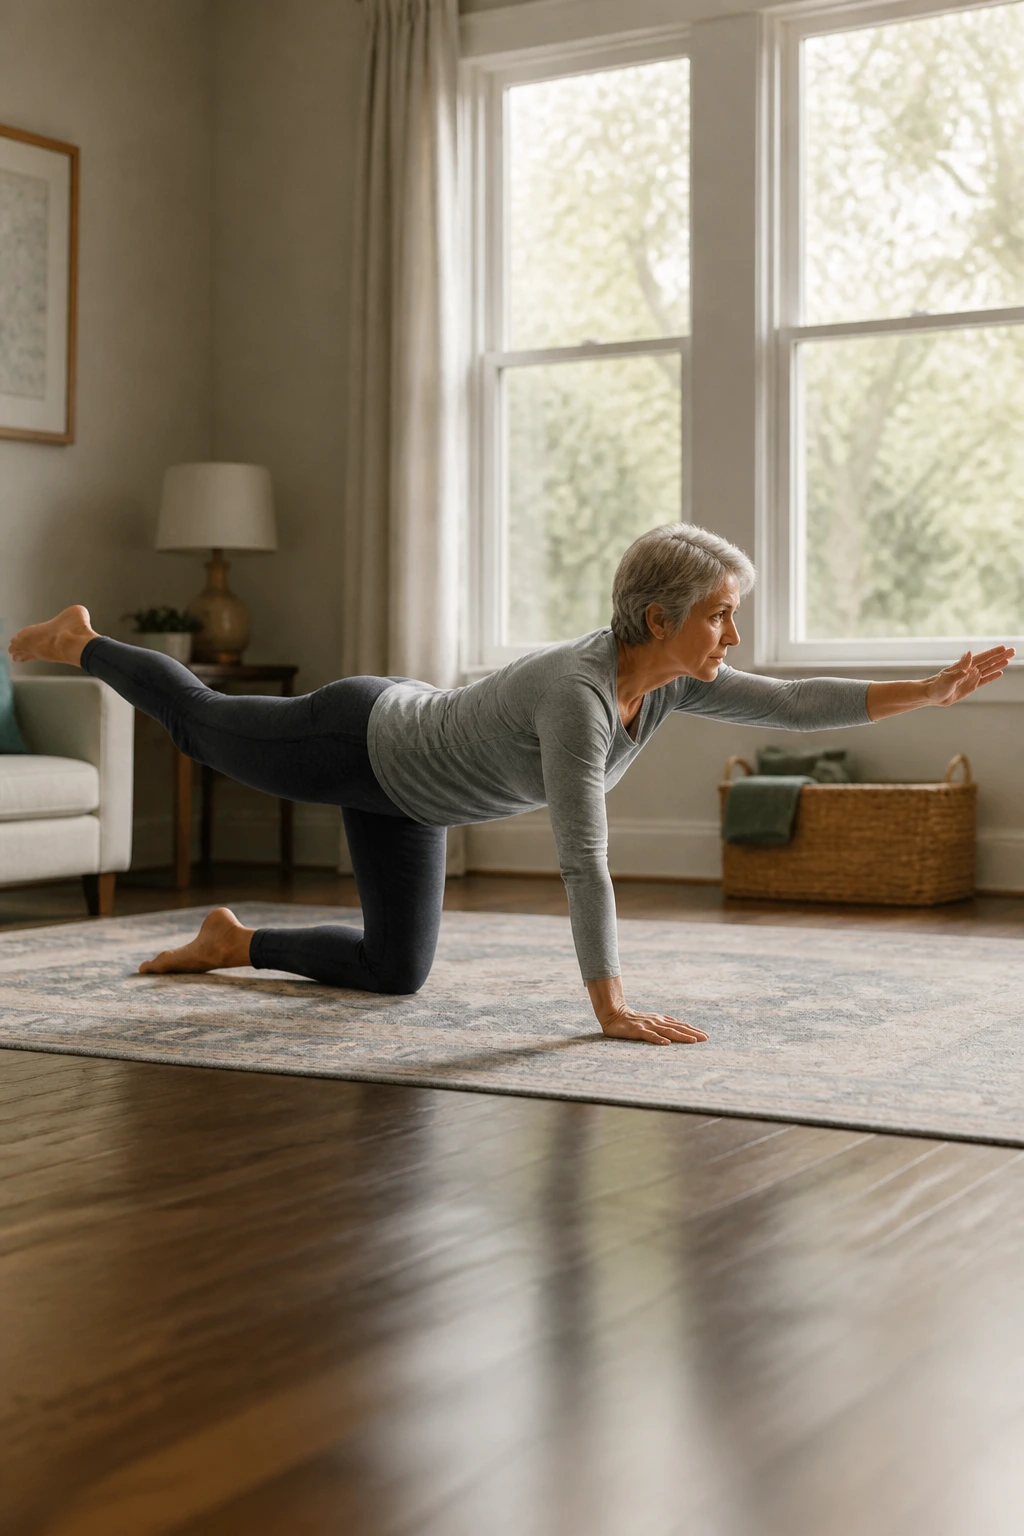
Bird dog is one of those exercises that looks calm from the outside and feels sneaky inside. Your back has to stay quiet while your opposite arm and leg move, and that’s exactly why it’s useful.
The goal is simple: train the core to resist twisting. That kind of strength helps when you carry a laundry basket, reach across a seat, or turn to grab something from the back of a shelf. It’s a small move with a big carryover.
Get on hands and knees, with hands under shoulders and knees under hips. Reach one arm forward while extending the opposite leg back, but only as far as you can without your lower back sagging. Hold for a second or two, then return and switch sides.
A common mistake is lifting the leg too high and arching the back like a cat stretching. Don’t do that. A level back is the point. Another mistake is racing through the reps. Slow is better here.
If getting on the floor is difficult, do a standing version with one hand on a countertop and extend the opposite leg back. It is not exactly the same, but it still teaches control.
12. Hip Hinge Practice
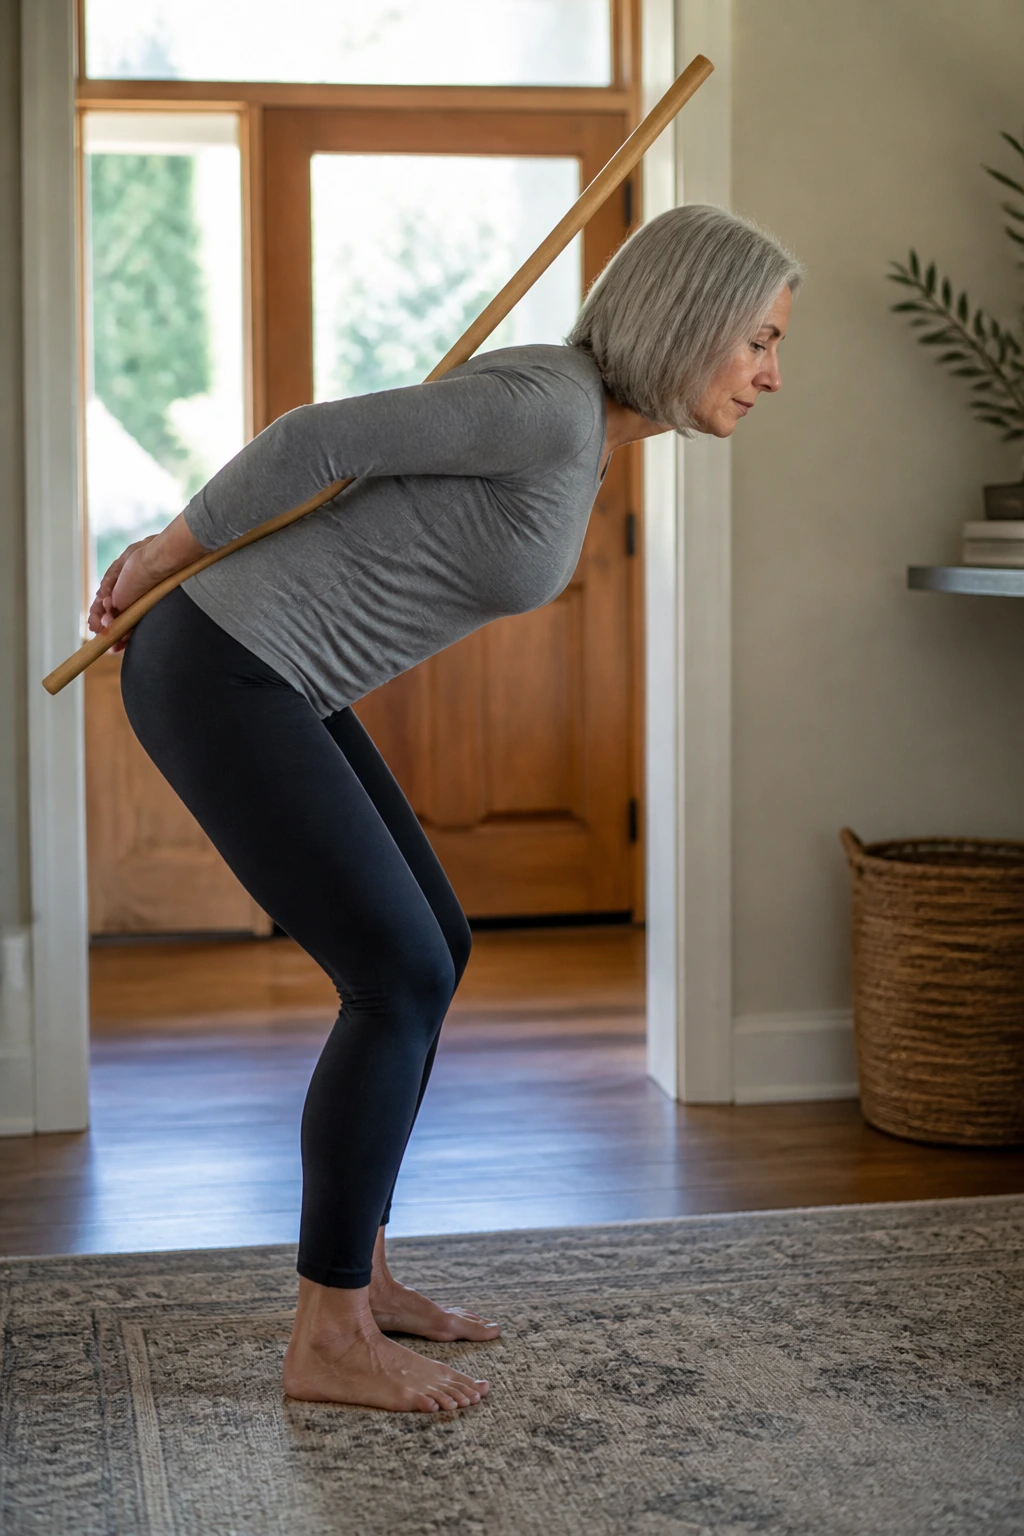
Bending at the hips is one of the most important skills in the body, and it gets ignored because people think “bend over” and “hip hinge” are the same thing. They’re not.
A hip hinge means sending the hips back while the spine stays long and the knees stay softly bent. That pattern protects the back when you pick up a laundry basket, pet bowl, grocery bag, or dropped spoon. It also teaches the glutes to do their job instead of dumping the load into the low back.
Unlike a squat, a hinge keeps the shins more vertical and the hips doing the work. That’s what makes it especially useful for lifting from the floor or reaching into a low cabinet. Stand with your hands on your hip creases and push the hips back as if closing a car door with your backside. Your torso will tip forward a little. That’s fine.
Who benefits most? Anyone who has ever felt a pinch in the lower back after picking something up too fast.
Use a broom handle along your back if you want feedback: one point at the head, one between the shoulder blades, one at the tailbone. Keep all three points touching as you hinge. That simple trick teaches the pattern fast.
13. Farmer Carry
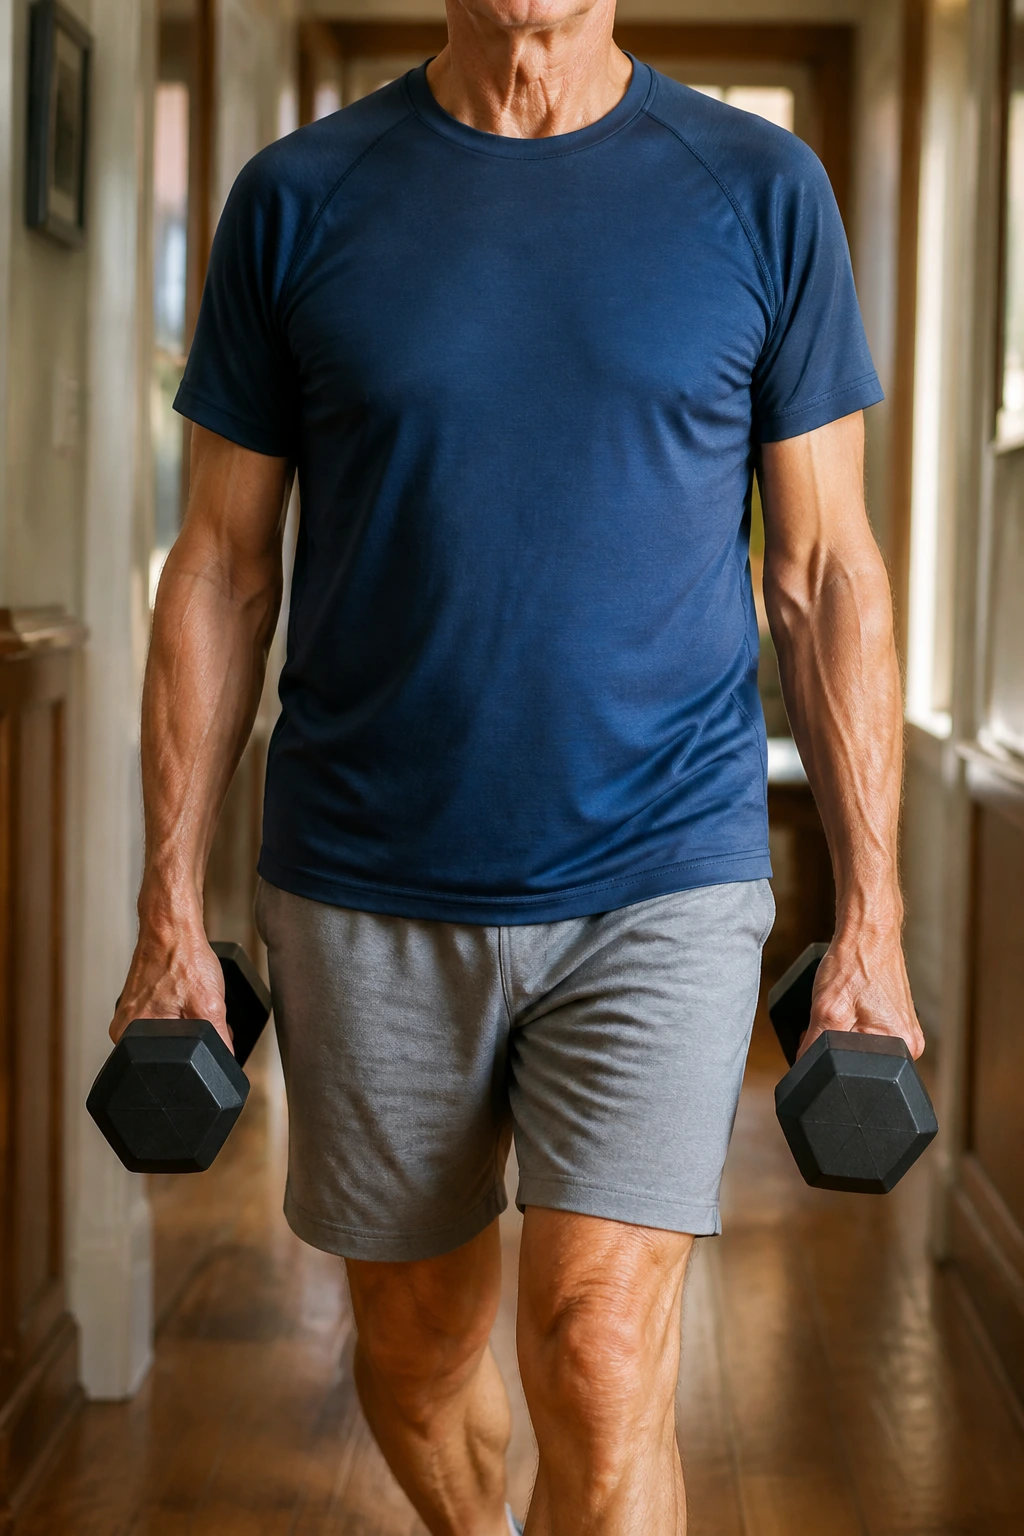
Carrying groceries, a laundry basket, or a heavy pot is not a separate category from exercise. It is exercise. That’s why farmer carries deserve a spot in any senior home routine.
The move teaches grip strength, posture, core stiffness, and walking control all at once. It also has one of the best real-life payoffs of any exercise on this list, because we all carry things. Some days, too many things.
Why It Works in Real Life
Stand tall with a pair of light dumbbells, two soup cans, or grocery bags of equal weight. Let your arms hang by your sides and walk slowly for 20 to 40 steps or about 20 to 30 seconds. Keep your ribs stacked over your hips and your shoulders relaxed.
- Choose a weight that lets you walk without leaning.
- Keep your steps even and controlled.
- Stop if your grip turns sloppy.
- Use a hallway, not a cluttered room.
Best cue: pretend a string is lifting the top of your head. That keeps your posture from collapsing as the weight gets tiring.
You do not need heavy weights here. A modest load carried well beats a big load held crookedly.
14. Resistance Band or Towel Rows
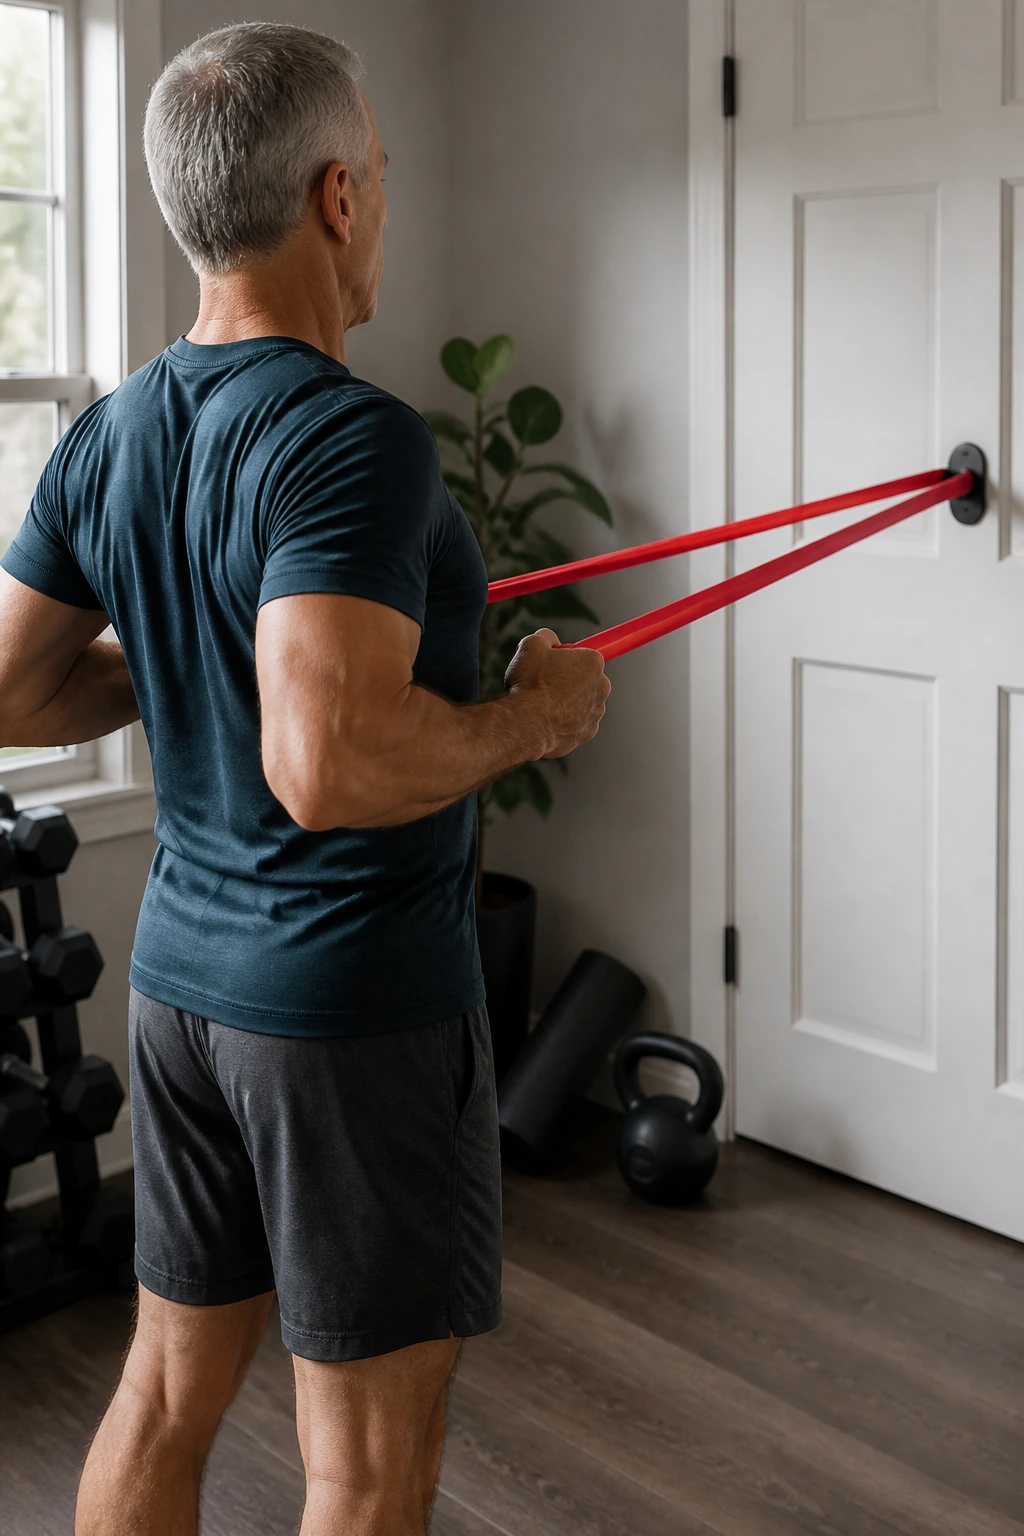
If there’s one exercise that fixes the “rounded shoulders, head forward, neck tight” pattern, it’s a row. And older adults spend a lot of time in that rounded shape without meaning to. Reading, cooking, looking at a phone, folding clothes — all of it nudges the upper back forward.
Rows pull the shoulders back into better position and strengthen the muscles between the shoulder blades. That makes standing feel easier and breathing feel less cramped. It also helps with everyday tasks like opening a heavy door or pulling a drawer shut.
Sit or stand with a resistance band anchored securely, or loop a towel around a sturdy post. Pull your elbows back while keeping your chest open and your neck long. Think about sliding the shoulder blades down and back, not pinching them hard together.
A hard squeeze at the end is not the goal. Smooth control is. Two sets of 10 to 15 reps is a fine starting point.
If you don’t have a band, a towel row against a sturdy fixed object can work, but don’t get clever with weak door handles or sketchy anchors. That’s how useful exercises turn into dumb accidents.
15. Overhead Reach With Heel Lift
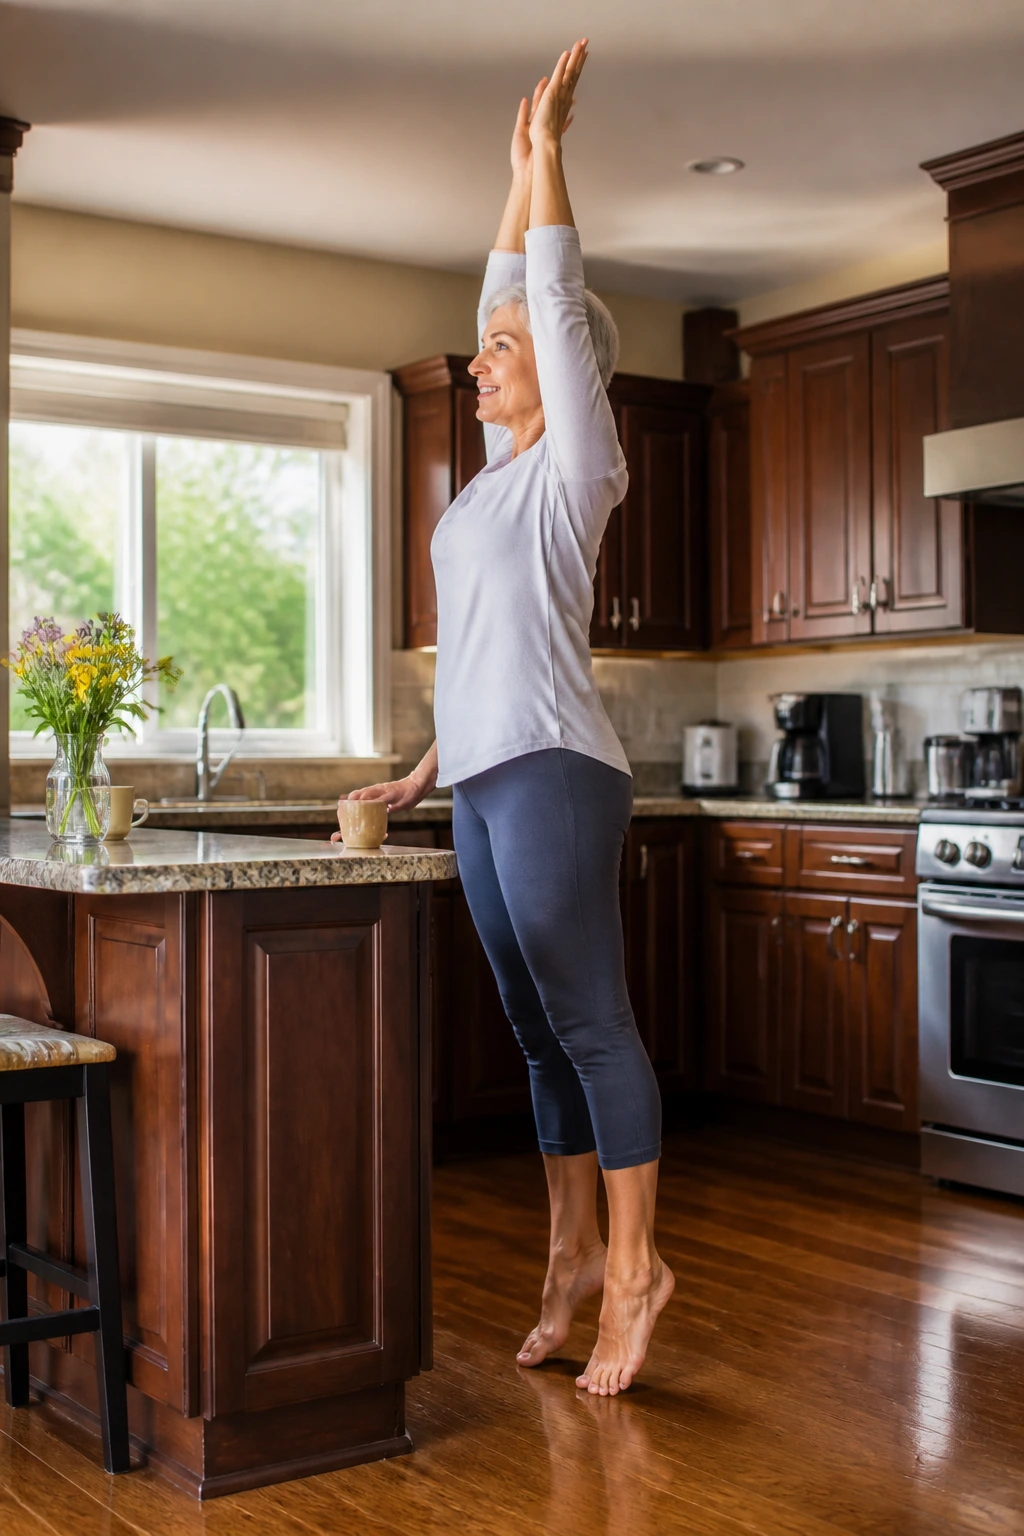
Need a move that helps with cabinets, shelves, curtains, and balance at the same time? This one does it.
Reaching overhead trains shoulder mobility, while the heel lift adds a small balance challenge and wakes up the calves. In daily life, you often do both together anyway. You reach up, stretch, and shift weight without thinking. Practicing that combo on purpose makes the motion steadier.
How to Scale It
Stand near a counter for light support. Raise one or both arms overhead while lifting onto the balls of your feet, then lower with control. Keep your ribs from flaring forward. That is the trap. People often arch their lower back to get the arms higher, and the shoulders do less useful work.
- Start with 6 to 8 slow reps.
- Use one arm at a time if both arms feel stiff.
- Keep your neck relaxed.
- Stop before the motion gets sloppy.
A water bottle or light can of food can make the movement more useful once the body learns the pattern. But start empty-handed. Range first, load later.
This is a good move for mornings, when the body feels compressed and the joints want a gentle wake-up.
16. Side Steps With a Mini Squat
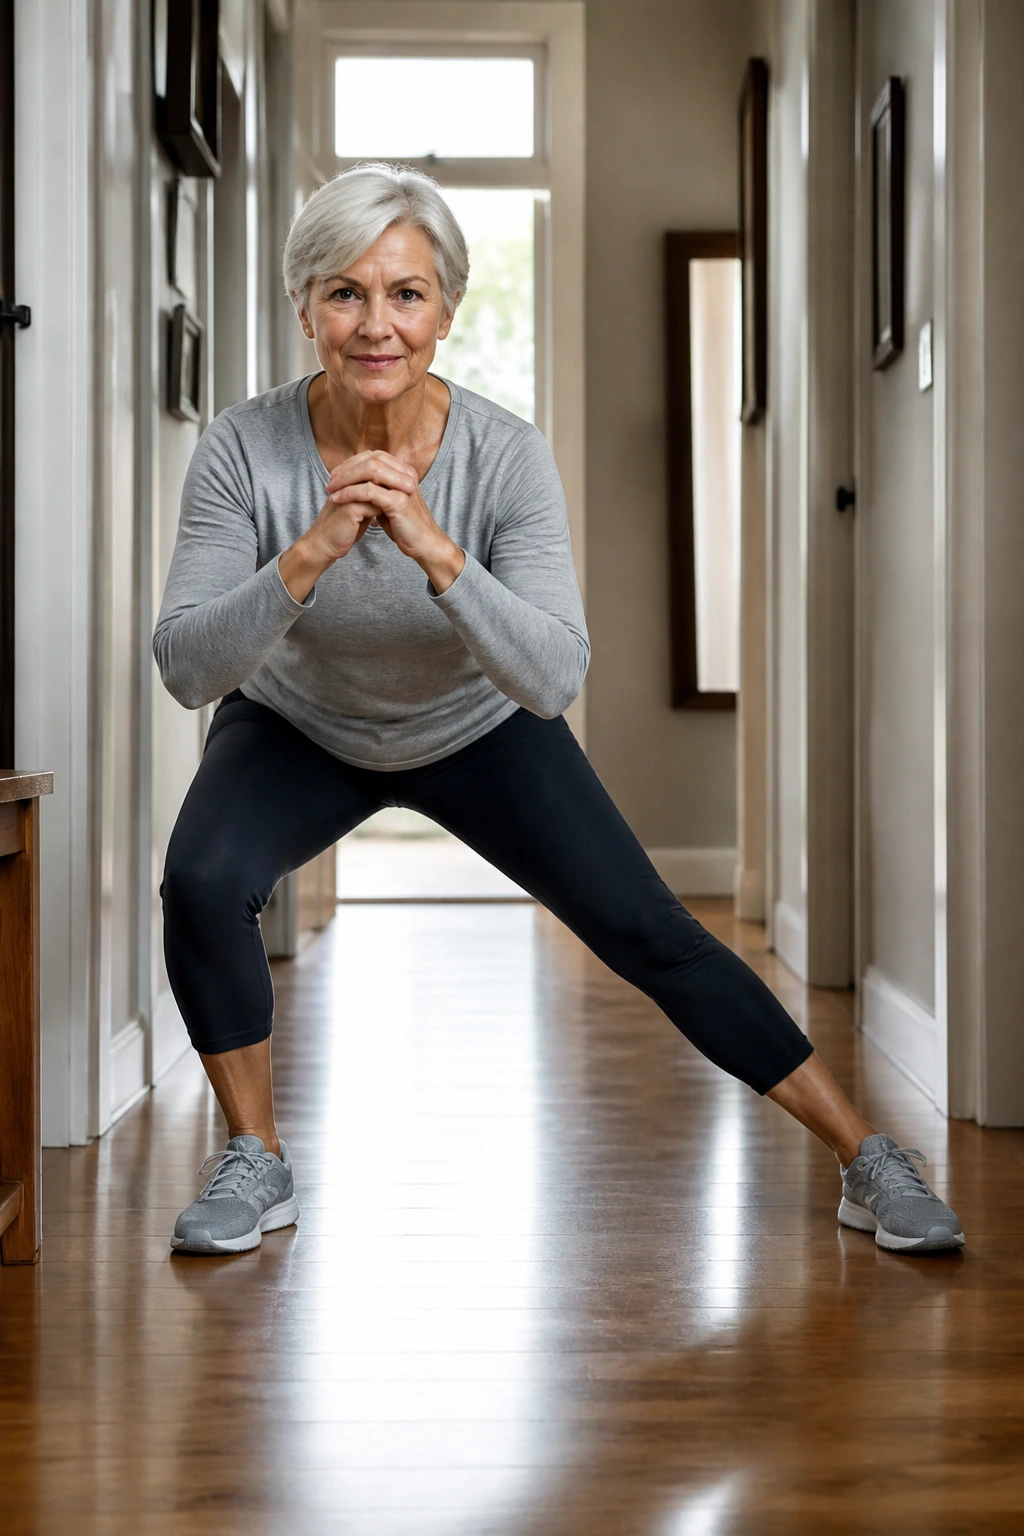
Most people walk straight ahead and forget that real life often requires moving sideways. Getting around a dog bed, scooting past a chair, shifting in a kitchen, or stepping away from an obstacle — all of that uses lateral movement.
Side steps with a mini squat train the hips, thighs, and balance in a way straight-line walking does not. They also challenge the body to stay low and controlled instead of bouncing upright with each step.
Stand with soft knees and take a small squat position, as if you’re about to sit back into a chair that isn’t there. Step to the side, then bring the other foot in. Do three to five steps one way, then go back the other way.
- Keep feet pointing forward.
- Don’t let the knees collapse inward.
- Stay low enough to feel the thighs work, but not so low that your back rounds.
- Hold onto a counter if needed.
The outer hips will probably complain a little. Good. That means they’re waking up. They’re often lazy until someone gives them a reason.
17. Slow Chair Lowering
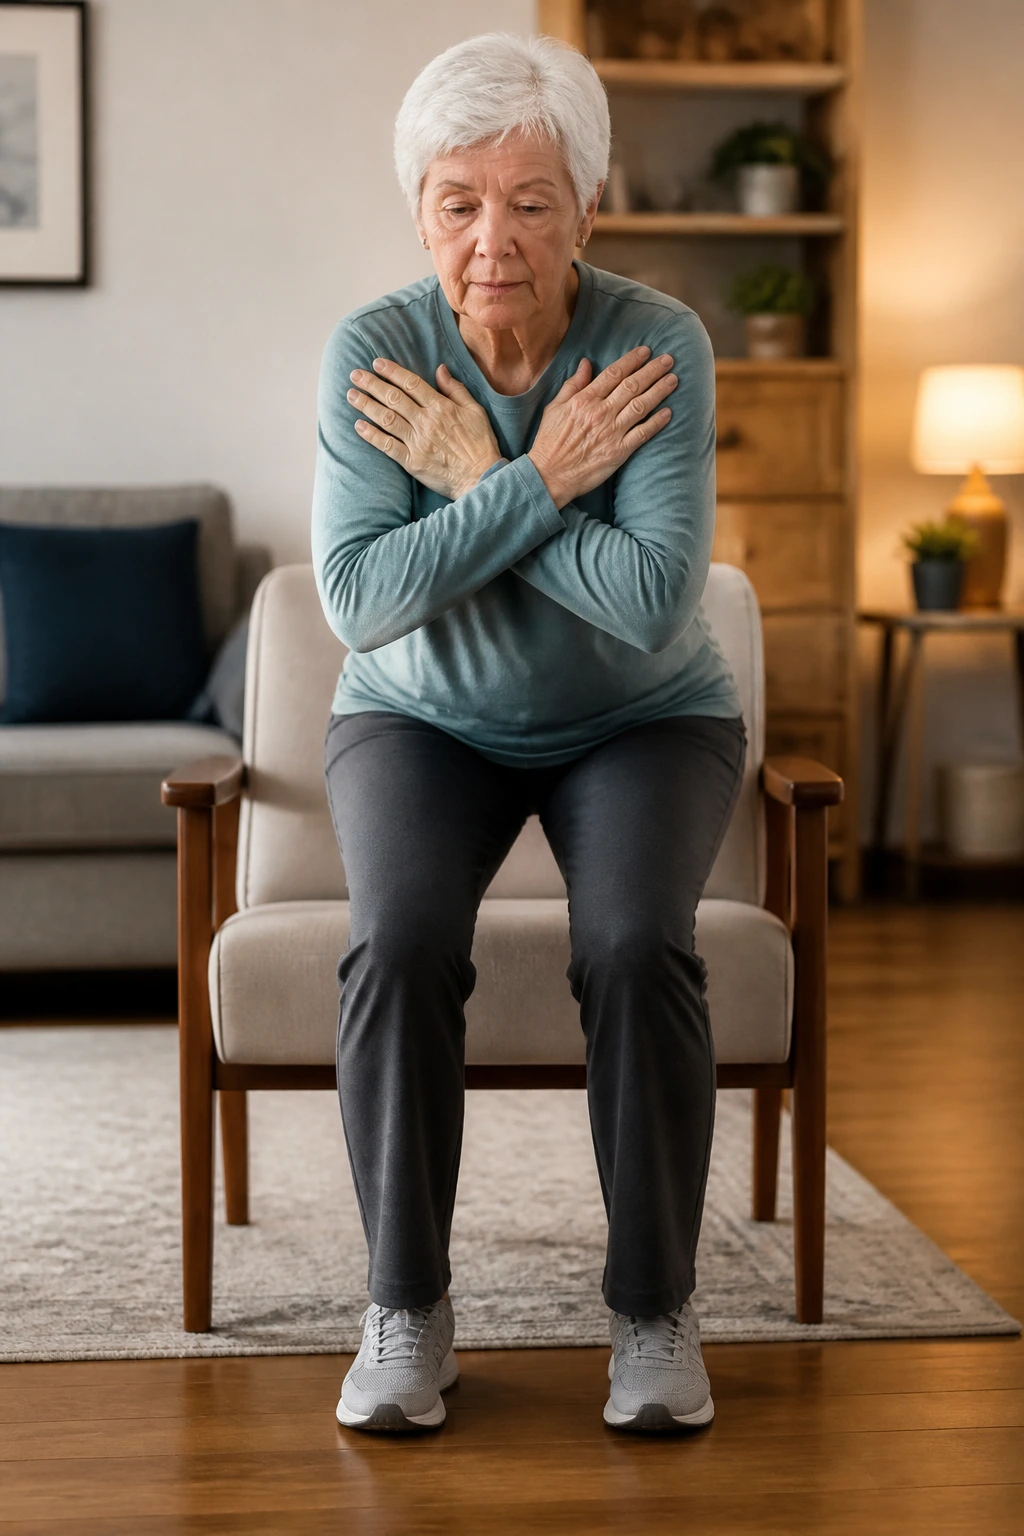
People love the standing part of a sit-to-stand and skip the sitting part. That’s a mistake. The way down matters just as much, maybe more.
Slow chair lowering trains the quads to control your body weight on the descent, which is a real-world skill every time you sit, lower yourself onto a toilet, or ease into a car seat. It also teaches knee control and helps you avoid that uncontrolled drop that can jar the joints.
Stand in front of a chair with feet set well. Cross your arms over your chest if you can, or keep your hands lightly on the chair sides for safety. Lower yourself for a count of 3 to 5 seconds until you’re seated, then stand up again or rest before another rep.
This is one of those exercises that looks boring and feels serious.
- Use a higher chair at first.
- Keep your weight balanced over mid-foot.
- Stop before you collapse backward.
- Aim for 5 clean reps, not 15 sloppy ones.
If your knees feel cranky, reduce the depth and slow the lowering even more. Control beats depth every time.
18. Floor-to-Stand Practice
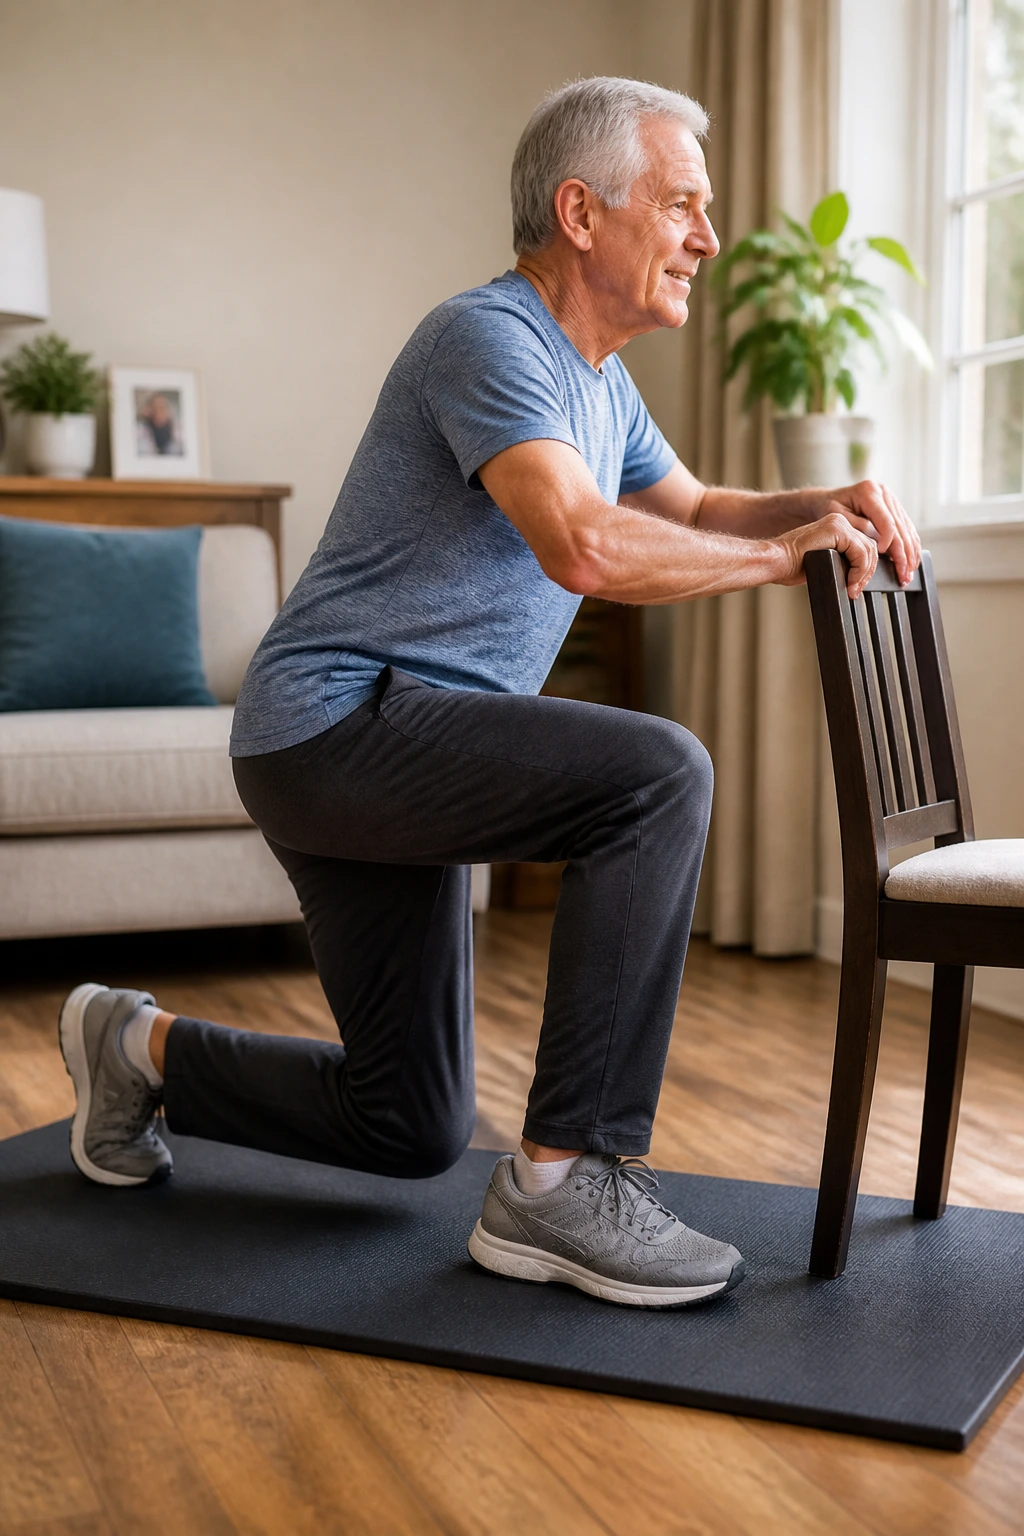
Getting up from the floor is one of the most practical strength skills a person can keep. If you ever fall, kneel to reach something, garden, play with grandkids, or sit on a low surface, this skill matters.
It’s also the kind of movement that exposes real weakness fast. Not bad weakness. Honest weakness. The floor does not care how good your intentions are.
Use a thick mat and a sturdy chair nearby. Start from kneeling or one-knee-down position, place one hand on the chair, and bring one foot flat on the floor. Push through the front foot and use the chair for support as you rise. Move slowly. No rushing. The goal is a controlled climb, not a dramatic leap.
Who should approach this carefully? Anyone with knee pain, dizziness, major balance issues, or recent surgery. In those cases, work with a clinician or therapist first. There’s no prize for forcing a floor get-up before your body is ready.
Still, if you can practice it safely, do it. The confidence alone is worth it.
19. Backward Walking
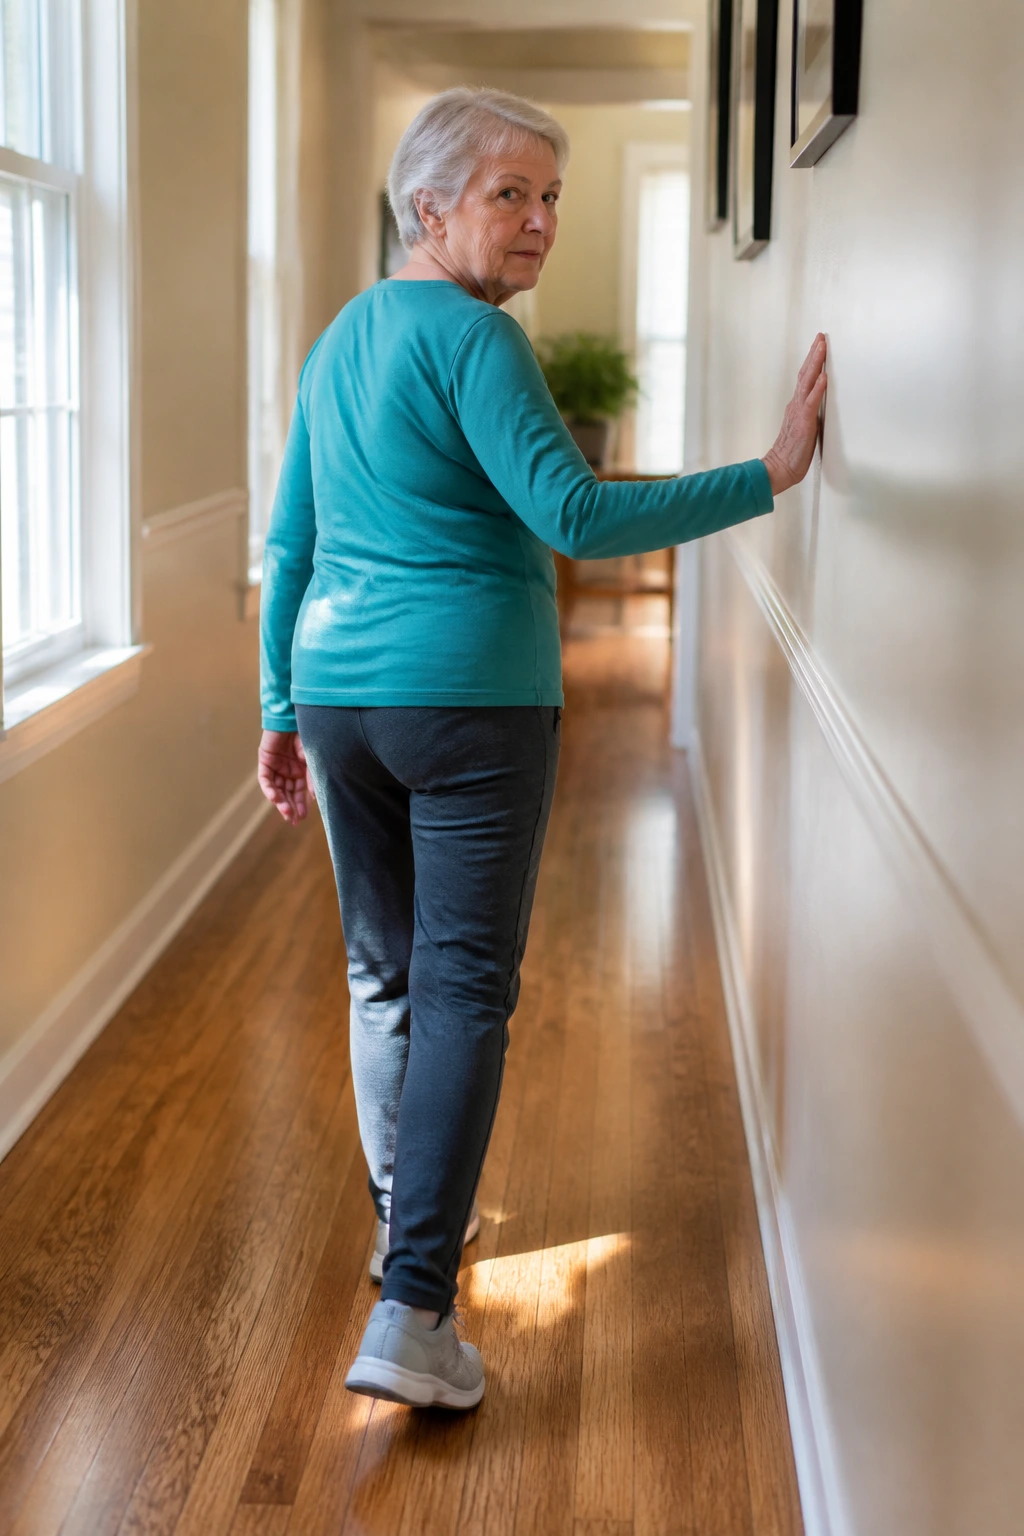
Walking backward sounds odd until you try it and realize how much attention it demands. That is part of the point.
Backward walking challenges balance, coordination, and leg strength in a way forward walking does not. It makes the quads and calves work differently, and it forces the brain to pay close attention to placement. That can sharpen body awareness in a useful way.
Why Backward Walking Deserves a Spot
Stand in a clear hallway or beside a counter. Take small steps backward, one at a time, and keep your eyes looking where you’re going — which means checking your path often. Stay slow. No lunging. No fast turns.
- Start with 10 to 20 steps.
- Use a wall or counter if needed.
- Keep the steps short.
- Stop if the space is cluttered or your vision feels off.
A lot of people overstride and get unstable. Don’t. This is not a power move. It’s a control drill.
If you’ve never tried it, the first few steps may feel awkward. That’s normal. Awkward does not mean wrong. It means your nervous system is paying attention, which is exactly what you want.
20. Cross-Body Reach and Rotational Step Touch
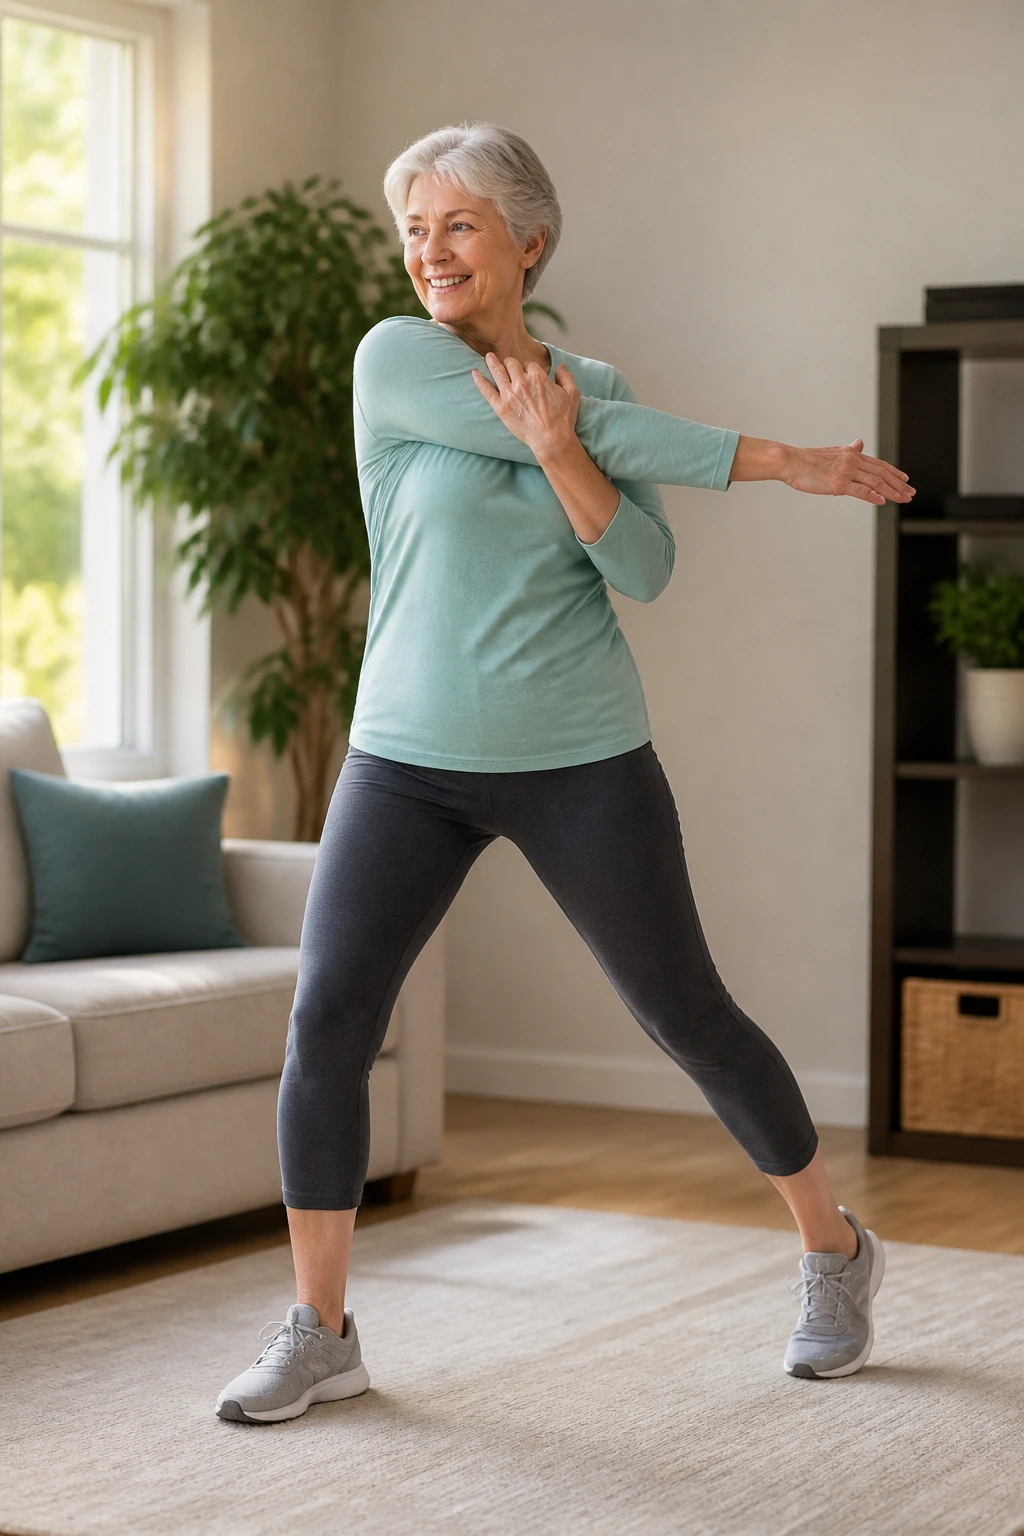
The body turns all day long, even if you don’t think about it. You reach into the back seat of a car, twist toward a sink, place something on a shelf, or turn to answer someone behind you. Cross-body reaching trains that rotation without making it wild.
This is a good finish because it wakes up the trunk, hips, and shoulders together. Step to the right and reach the left hand across the body, then switch sides. Keep the motion smooth and unhurried. You’re training control through rotation, not trying to crank out a dance routine.
If you want one standing coordination move that feels useful fast, make it this one.
- Step lightly, then reach across.
- Keep the knees soft.
- Turn the torso a little, not a lot.
- Do 8 to 12 reps per side.
A nice bonus: this move can loosen the upper back after a long stretch of sitting. It also reminds the hips that they’re allowed to help when the trunk turns. That part gets forgotten more often than it should.
Final Thoughts
The best home exercise plan for older adults is not complicated. It is steady, balanced, and built around movements that pay rent in daily life. Stand up. Step. Push. Pull. Carry. Balance. Repeat.
A chair, a wall, a counter, and a bit of floor space can cover a surprising amount of ground if you use them well. Start small, stay clean with the form, and keep the sessions short enough that you’ll actually come back tomorrow.
Ten focused minutes beats a perfect plan that never leaves the notebook.
