



Your posture usually doesn’t fail in one dramatic collapse. It slips a little at a time — shoulders creeping forward, chin jutting out, ribs flaring, lower back doing more work than it should. By the end of a desk-heavy day, you can feel it in your neck and between your shoulder blades, and that heavy, slumped feeling is exactly why back workouts at home for better posture matter more than most people think.
Standing taller is not about pinning your shoulders back like a toy soldier. That looks stiff, and it rarely lasts. What actually helps is building the strength and endurance to hold your upper back, spine, and shoulder blades in a better position without thinking about it every ten seconds. That means the lower traps, rhomboids, rear delts, spinal erectors, glutes, and even your core all need a turn.
The nice part? You do not need a full gym. A wall, a towel, a backpack, a light band, and a little floor space can do a lot of the work. The moves below are the ones I keep coming back to because they teach the body to stay open through the chest, stable through the torso, and less annoying through the neck.
Start with the first one and pay attention to what lights up. That feedback matters more than a fancy setup.
1. Wall Angels
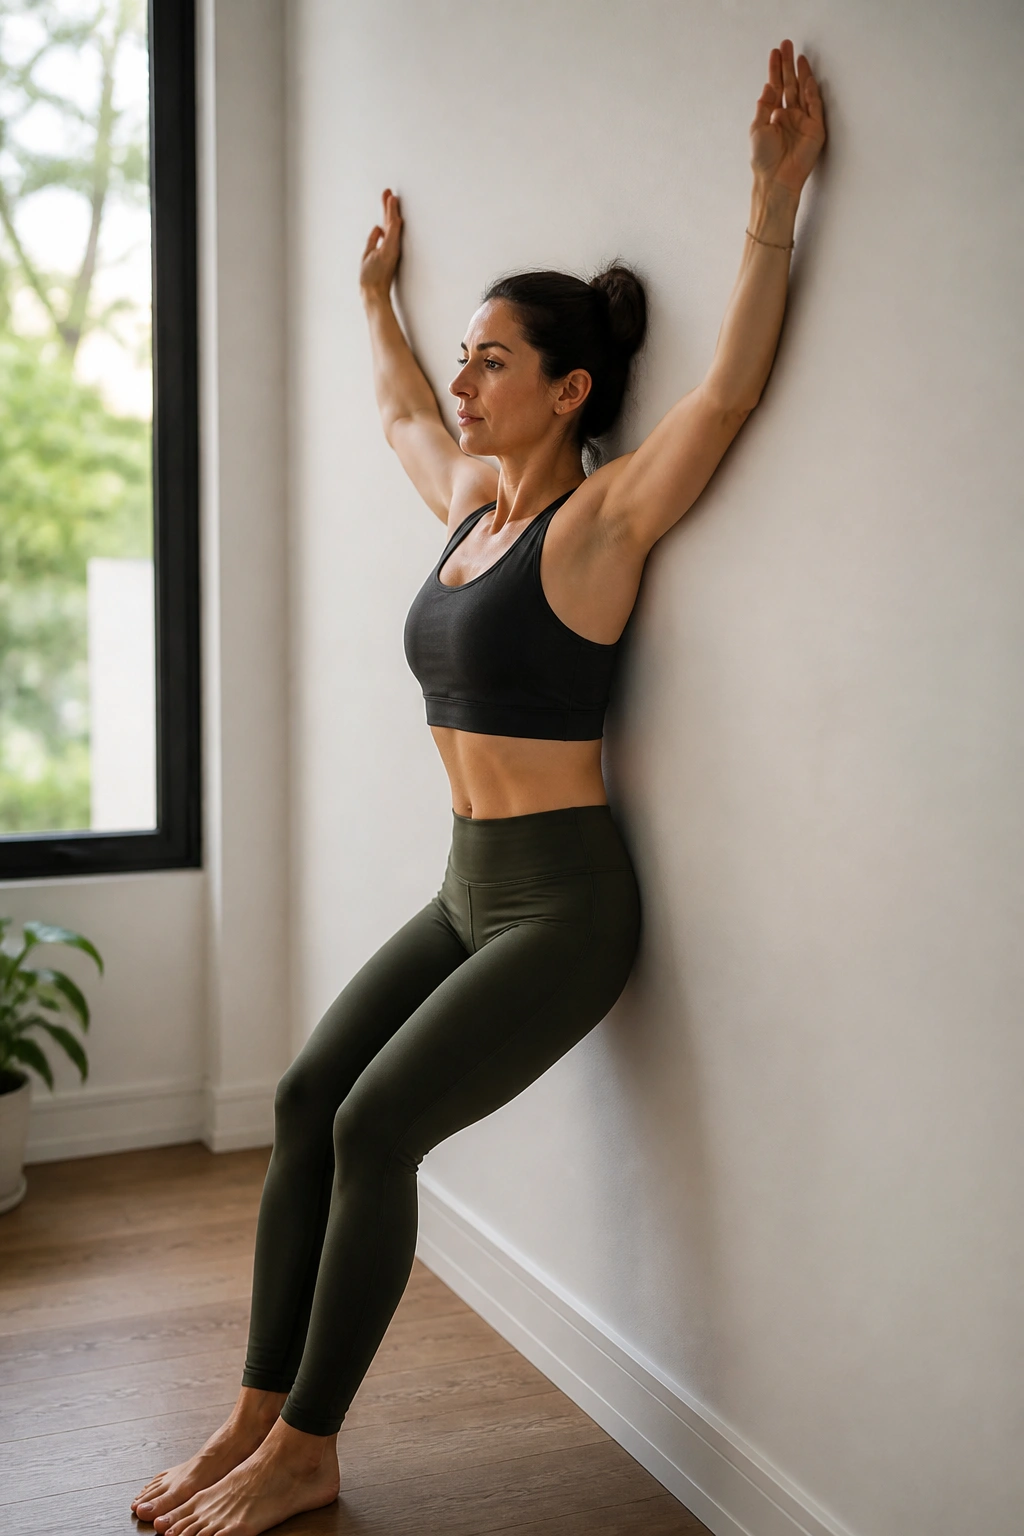
Wall angels look almost too simple, which is why people rush them and miss the point. Done well, they teach your shoulder blades to move cleanly while your ribs stay down and your head stops drifting forward. That combination is gold for posture.
Set your back against a wall, heels a few inches out, and press the back of your head, upper back, and tailbone toward the surface. Then slide your arms up and down in a slow, controlled path. If your lower back arches hard just to get your hands overhead, step your feet farther forward. The goal is control, not height.
What to feel
- Mild work across the mid-back, not the neck.
- Smooth shoulder movement, not pinching.
- A small stretch through the chest as the arms rise.
Do 2 sets of 8 to 10 slow reps. Pause for a second at the top and bottom of each rep. If the wall makes you shrug, a floor version with bent knees works too. Clean reps beat bigger ones every time.
2. Prone Y Raises
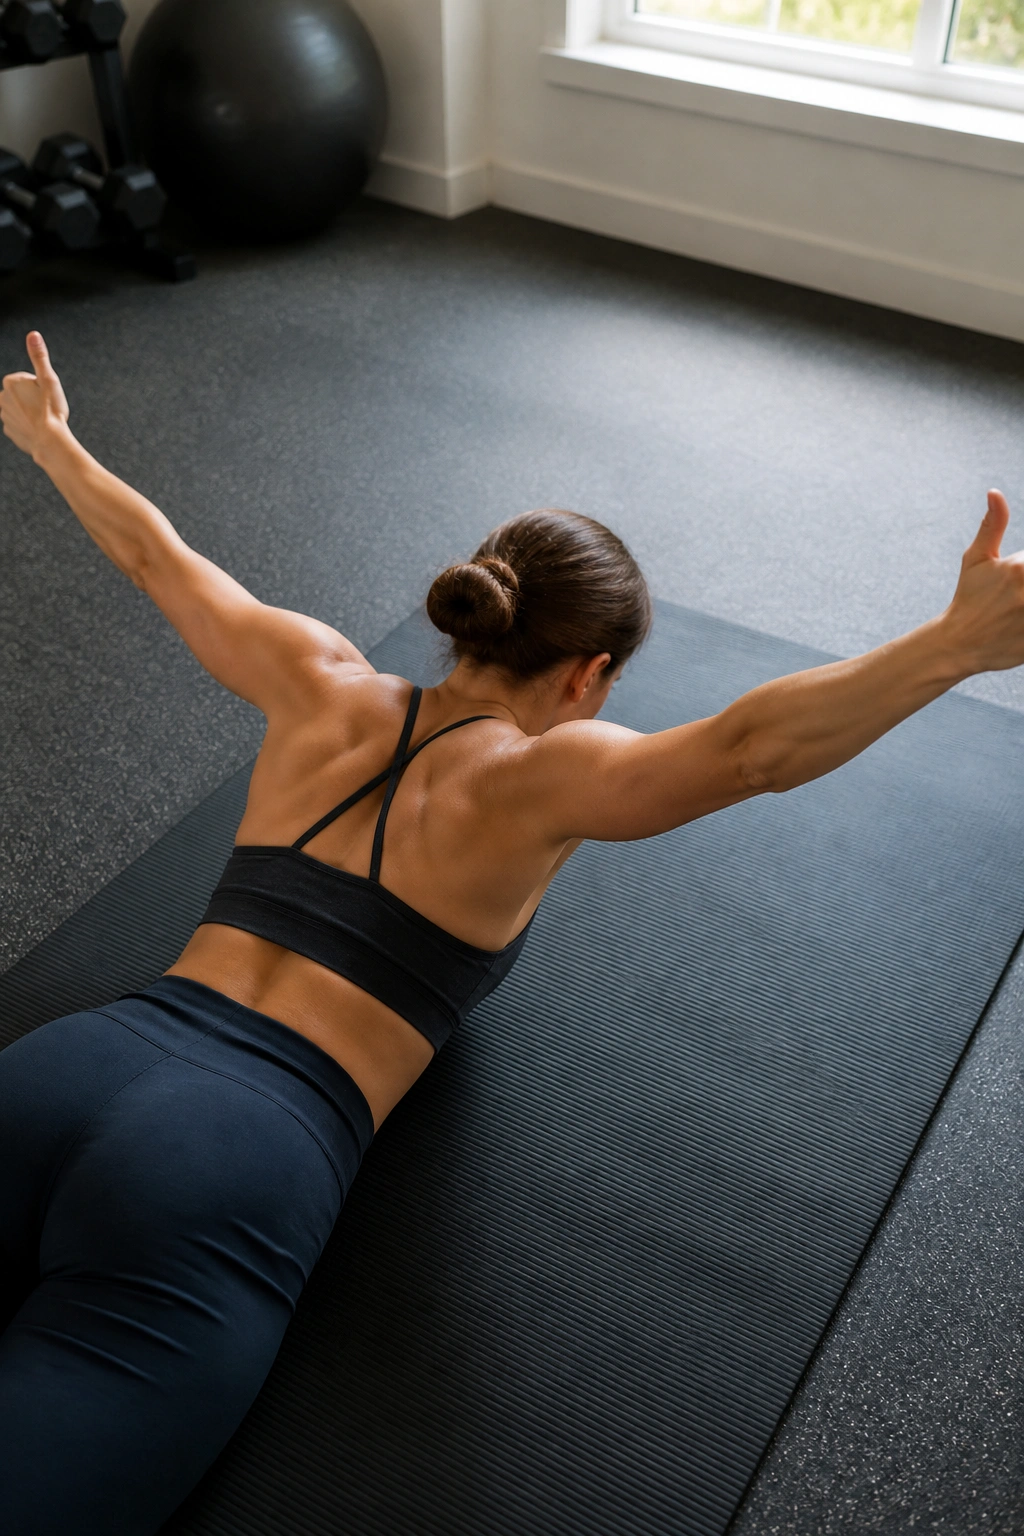
Lie face down and reach your arms into a Y shape, thumbs pointed up. That one detail matters. Thumbs up tends to keep the shoulders from rolling inward and helps the lower traps take over instead of the upper traps doing all the yelling.
I like this move because it exposes weak spots fast. If your upper back is undertrained, the first few reps feel tiny and awkward. Good. That awkwardness is useful information, not failure.
Lift your chest just a few inches, then raise the arms off the floor by an inch or two. Hold the top for 2 seconds and lower under control. You do not need a big range here. Small, clean lifts build more useful posture strength than flinging your arms around.
Try 2 to 3 sets of 8 to 12 reps. If your neck gets tight, tuck the chin a little and keep the gaze down. No need to turn it into a lower-back exercise.
3. Prone T Raises
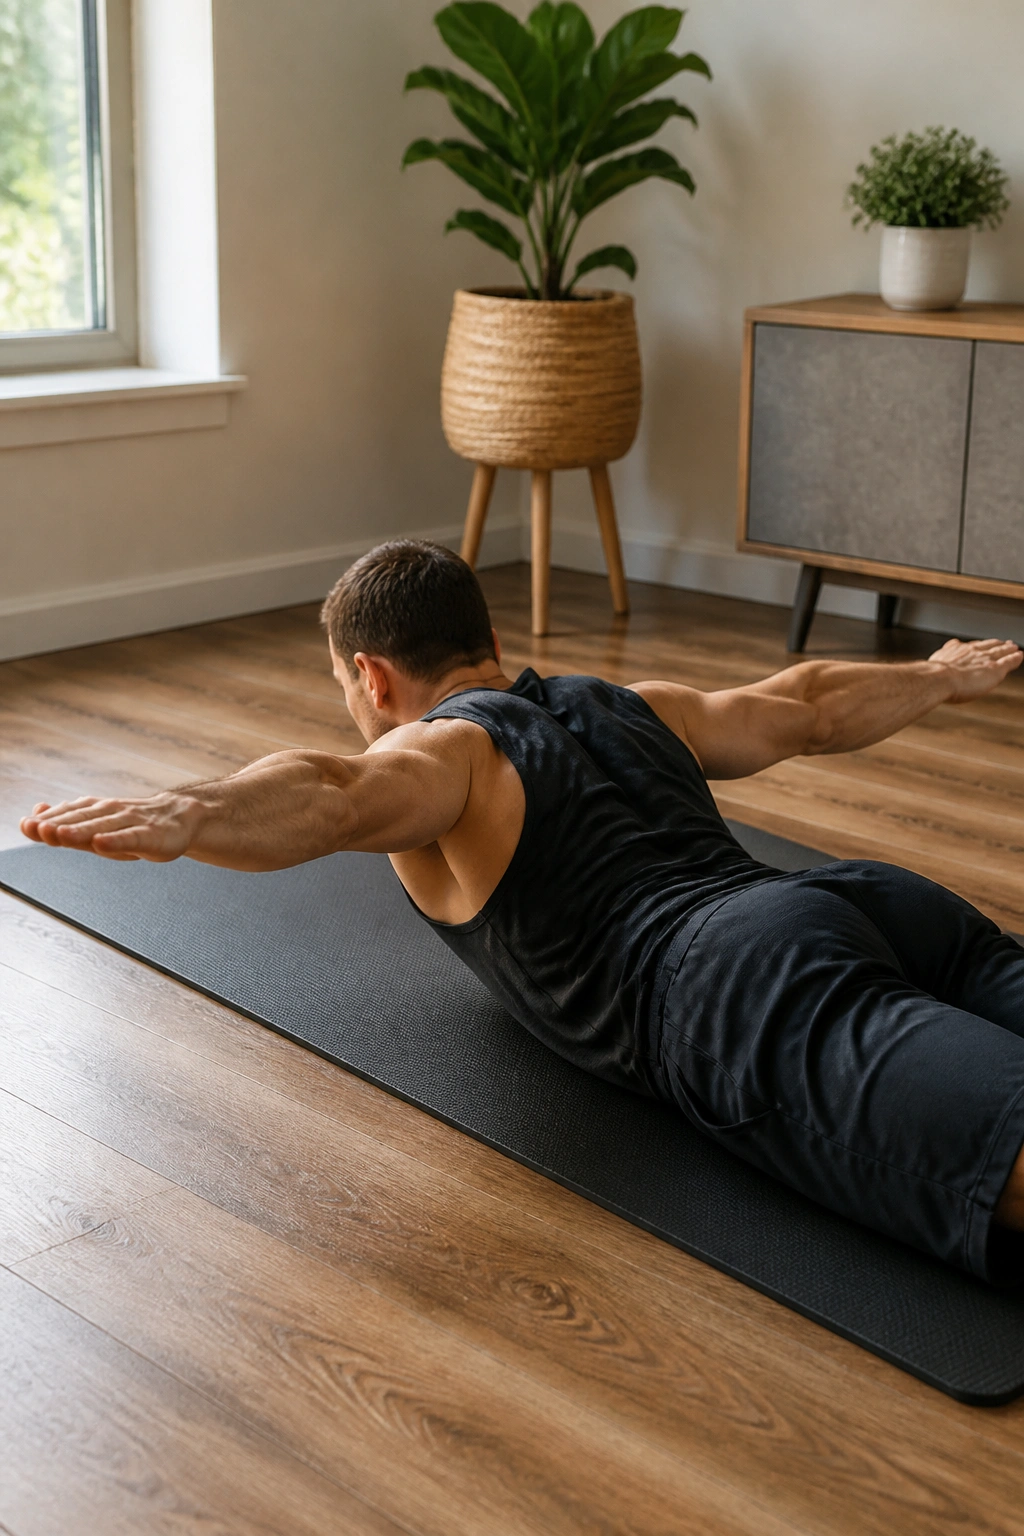
The T raise is the one that makes your shoulder blades work for their money. Lie face down with your arms stretched straight out to the sides, palms facing the floor or turned slightly forward. Then lift the arms just off the floor and squeeze between the shoulder blades for a beat.
It should feel like the middle of your upper back is doing the heavy lifting. If you feel it mostly in your traps near the neck, lighten up the effort and shorten the range. That little squeeze in the center matters more than how high the hands rise.
Form cues that help
- Keep the forehead resting on a towel or mat.
- Reach long through the fingertips.
- Lower slowly for a count of 3 seconds.
- Stop before the shoulders shrug.
2 sets of 10 to 12 reps is plenty. This one works best when you move like you’re trying not to wake someone up. Quiet reps. That’s the feel.
4. Prone W Raises
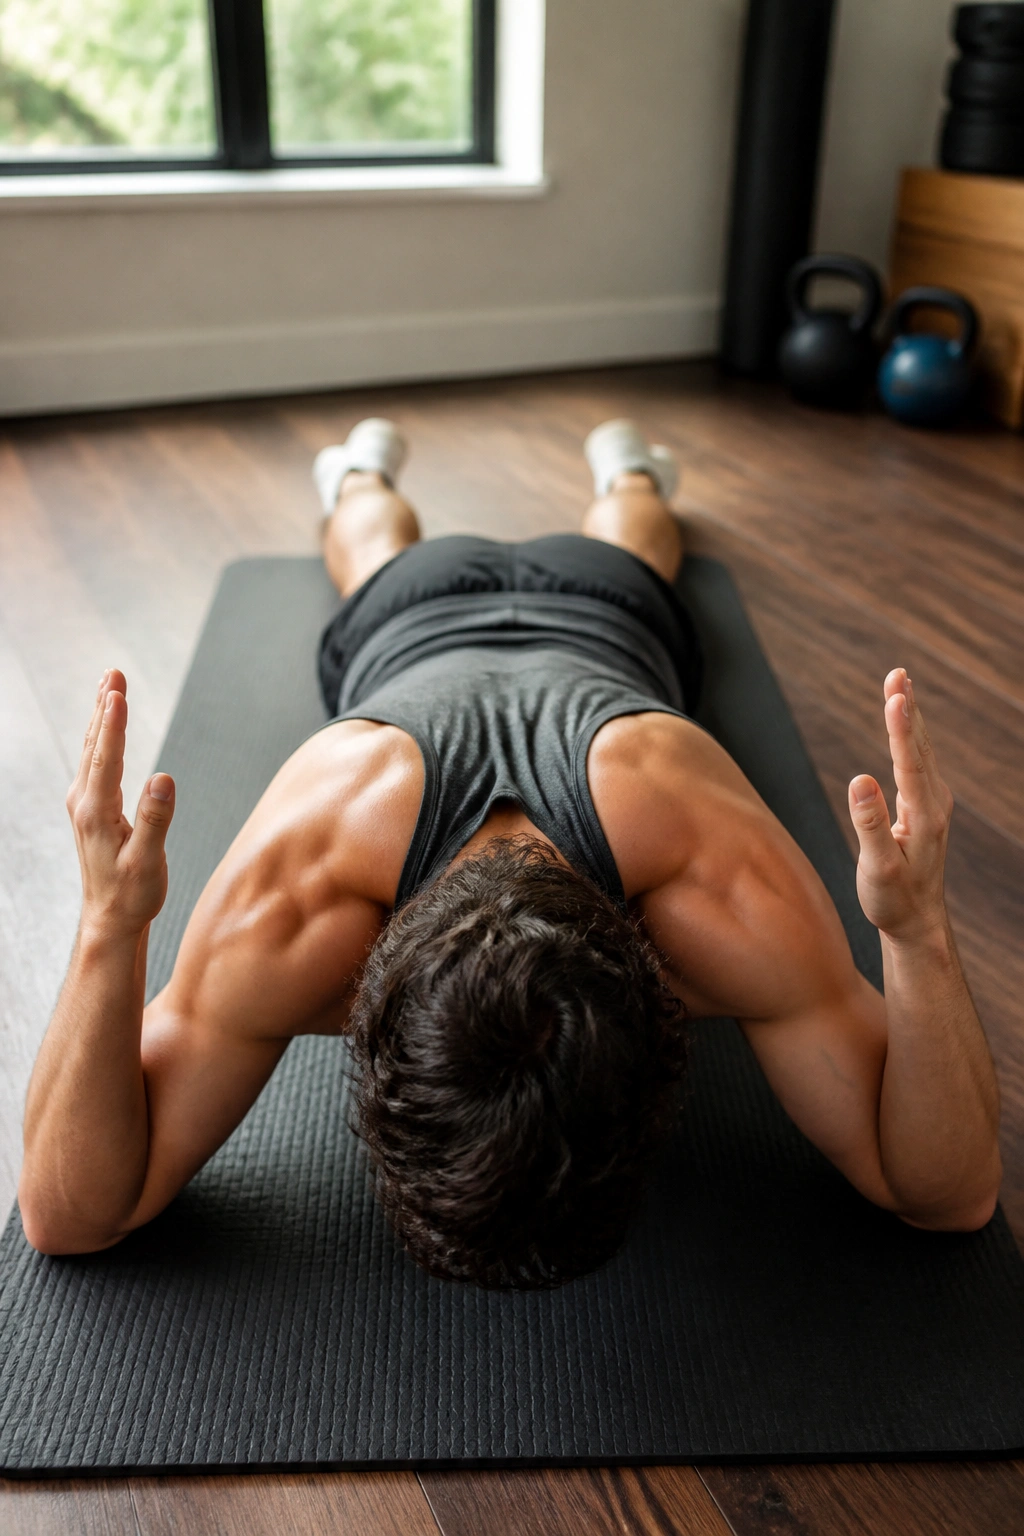
A W raise looks like the missing link between a row and a shoulder-health drill. Bend your elbows, pull them down toward your sides, and lift the forearms so your arms form a W shape. The key is keeping the shoulders away from your ears while you squeeze the shoulder blades down and back.
This is a sneaky good posture move because it hits the smaller muscles that help your shoulders sit in a better place all day. Those muscles do not get much attention until they’re tired, and then your posture falls apart by lunchtime.
How to make the squeeze count
- Start with palms facing down or slightly in.
- Keep the elbows close to your torso.
- Hold the top for 1 to 2 seconds.
- Lower without dropping into the floor.
Use 2 sets of 8 to 10 reps. If the movement feels too small, that’s fine. Small and precise is the point. You are teaching the back of the shoulders to work without compensation.
5. Reverse Snow Angels
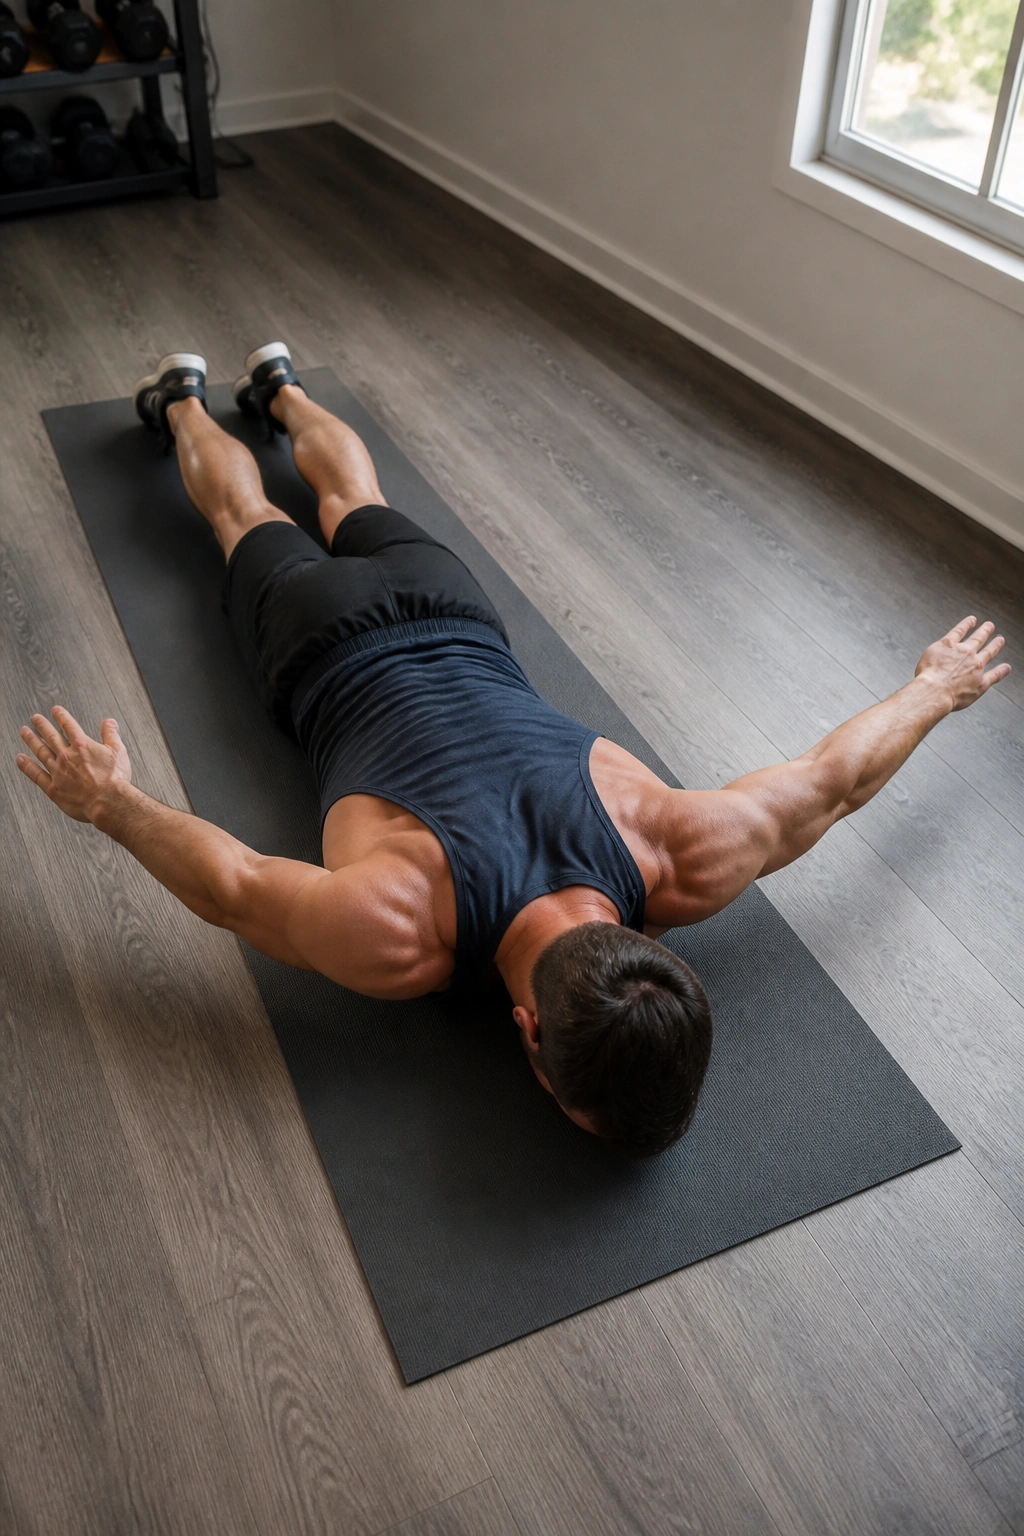
This one feels graceful when it’s done right and a little ridiculous when it’s done wrong. Lie face down, arms by your sides, then sweep them out and around in a wide arc until they reach overhead, like drawing a snow angel on the floor. Keep the chest lightly lifted and the movement slow enough that you can control the path.
Reverse snow angels build endurance across the rear delts, mid-back, and lower traps. They also ask the thoracic spine to move without the chest collapsing into the floor. That matters if your posture problem starts with a rounded upper back and not just weak shoulders.
Use a folded towel under the forehead so the neck stays neutral. If the arms scrape the floor the entire time, shorten the arc a little. If the low back tries to take over, lower the chest.
2 sets of 6 to 8 slow reps is enough. Treat each rep like a deliberate sweep, not a frantic reach. There is no prize for speed here.
6. Superman Hold
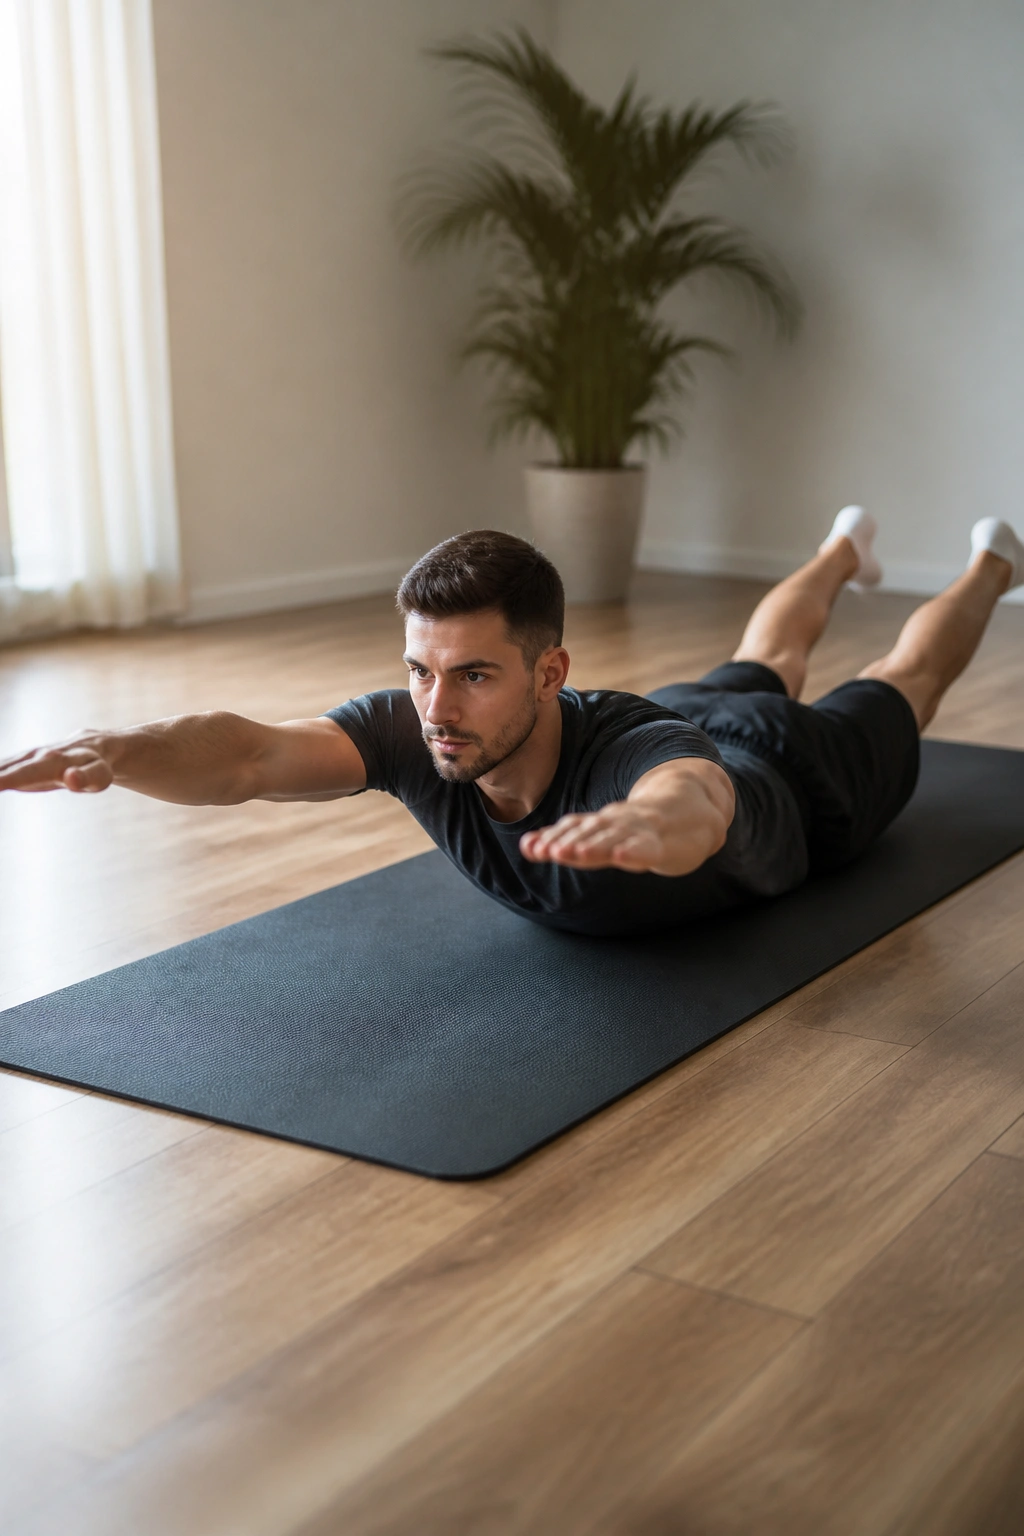
This one gets overused, then misunderstood. People think Superman means cranking the chest and legs as high as possible. That’s how the lower back gets irritated. The better version is smaller, steadier, and much more useful for posture.
Lie face down, extend your arms overhead, and lift your hands and feet just a few inches off the floor. Squeeze the glutes first, then engage the muscles along the spine. Your neck should stay long. If you feel a pinch in the low back, lower the lift by half and slow everything down.
A cleaner way to hold it
- Lift for 10 to 20 seconds.
- Rest for 20 to 30 seconds.
- Repeat for 3 rounds.
- Keep breathing, even if the hold burns.
What I like here is the posture lesson hidden inside the exercise. You learn to stabilize the back without over-arching it. That’s a skill, not just a burn.
7. Bird Dog
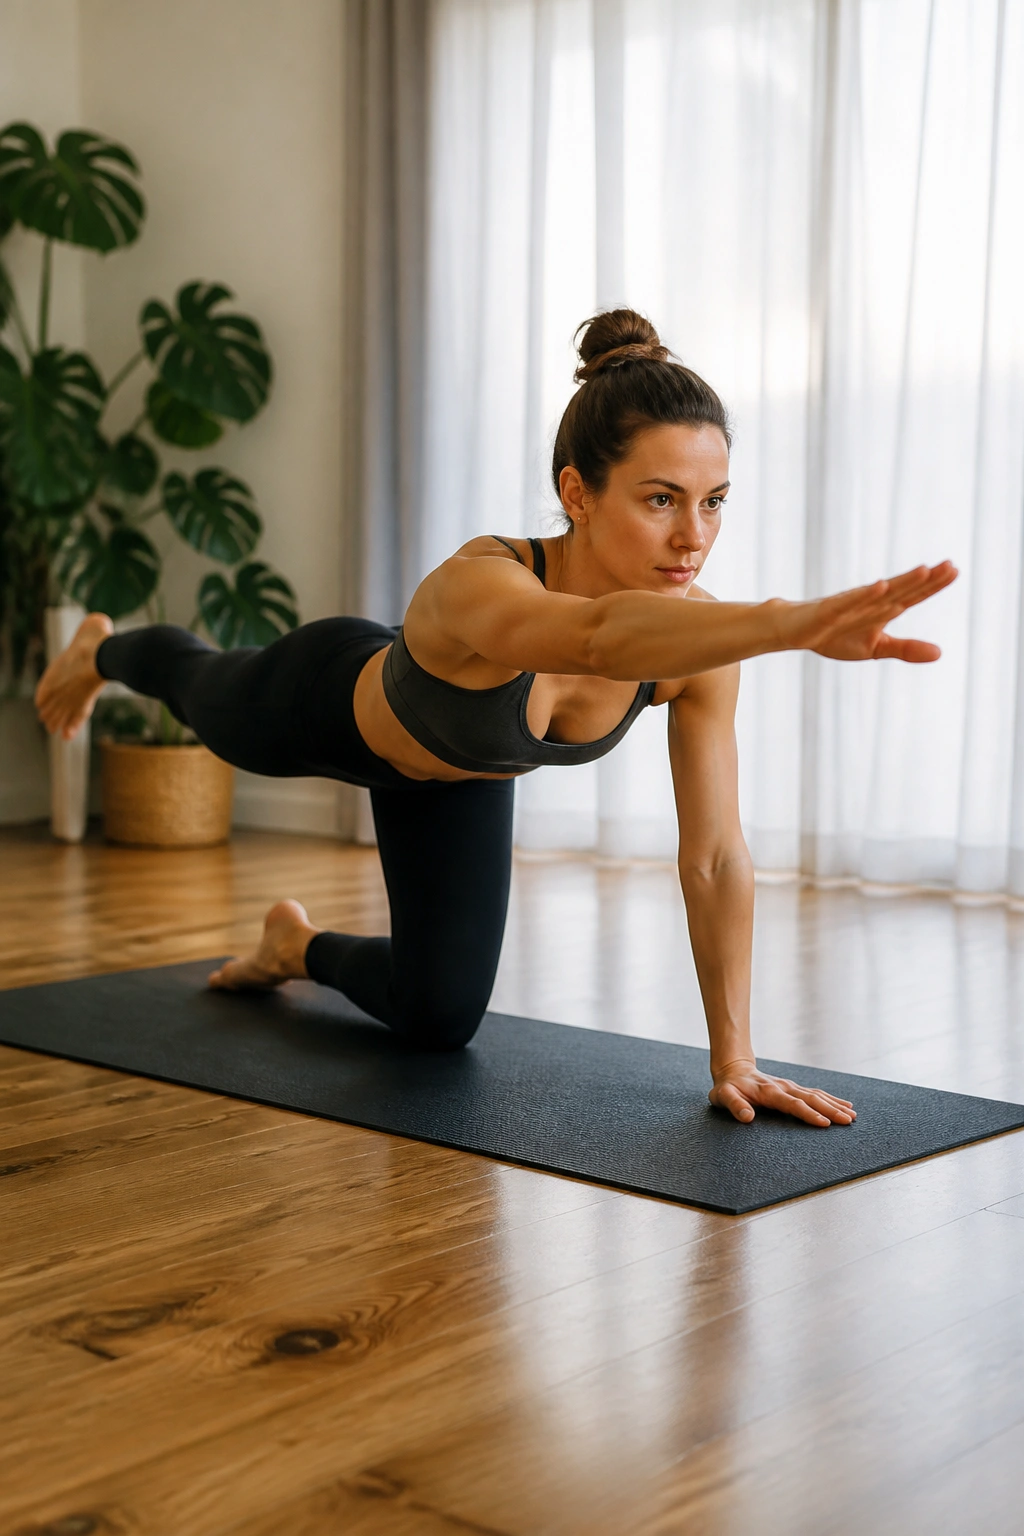
Can a move this plain really help posture? Yes. Bird dog does one thing very well: it teaches your spine and pelvis to stay quiet while your arms and legs move. That’s useful if you tend to twist, sway, or lean when you sit, stand, or reach.
Start on hands and knees. Reach one leg back and the opposite arm forward, then pause while keeping the hips square to the floor. The trick is not making the extension huge. The trick is staying level. If your back wobbles, the rep is too big.
What to watch for
- Hips staying parallel to the floor.
- Ribs not flaring.
- Neck long, eyes down.
- Slow return to the start.
Do 2 to 3 sets of 6 reps per side, holding each rep for 3 to 5 seconds. You can make it harder by sliding the hand and foot a little farther, but only if the torso stays still. Shaky is fine. Twisty is not.
8. Seated Towel Rows
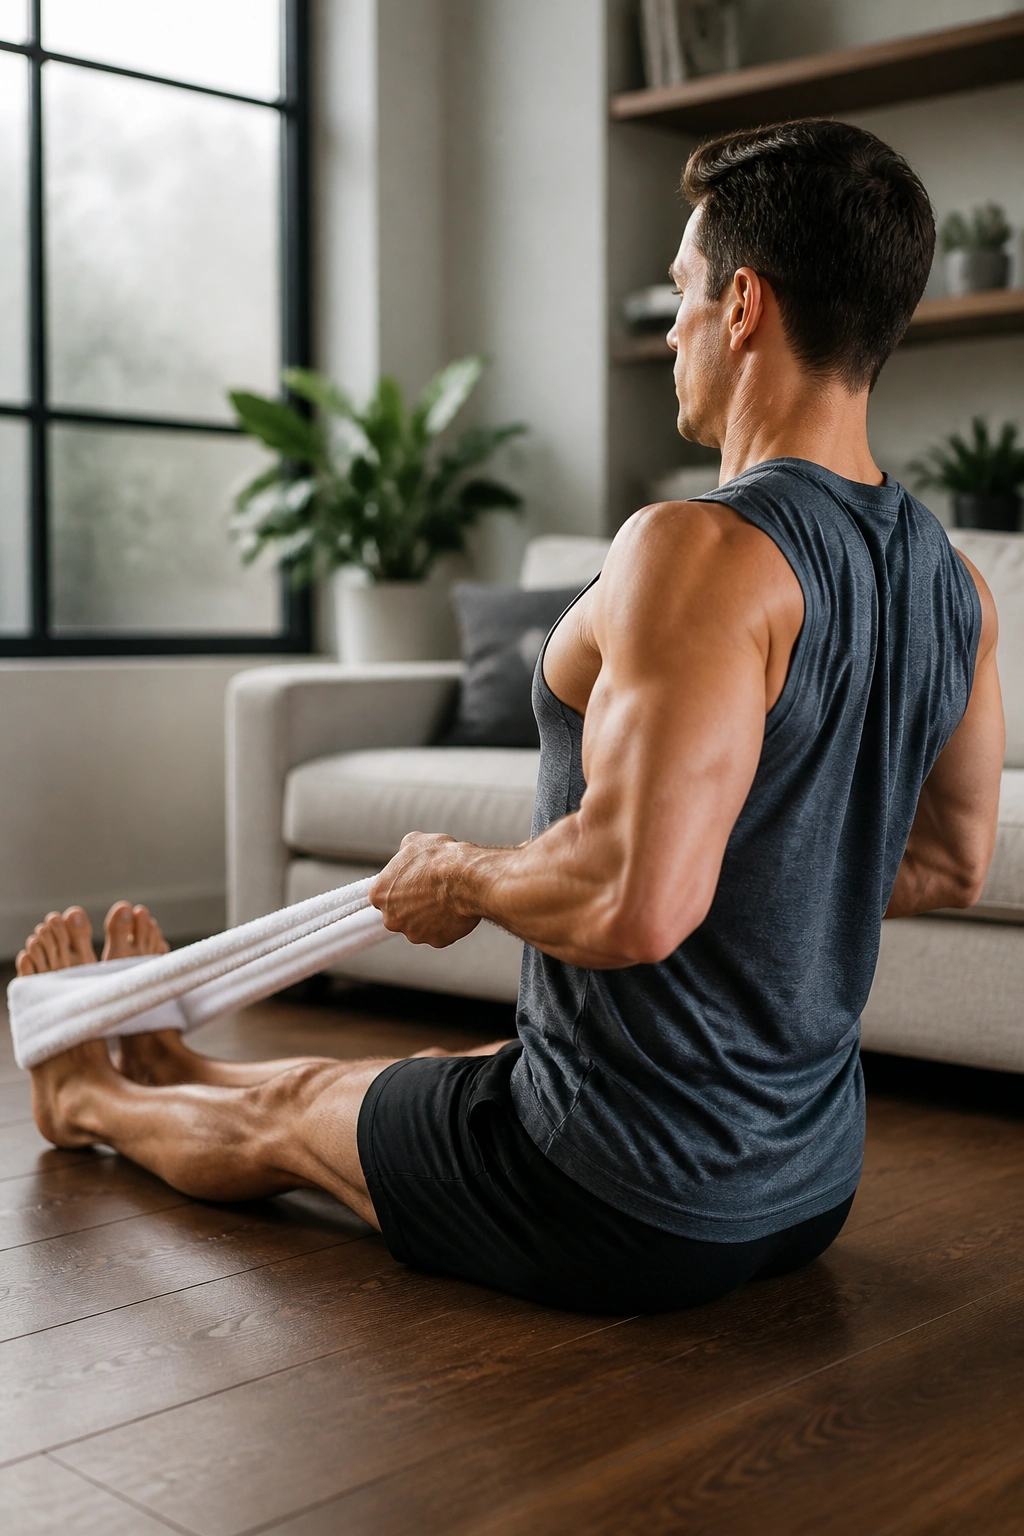
If you’ve got a towel and a sturdy place to brace your feet, you’ve got a row. Sit on the floor with your legs out, loop a towel around the soles of your feet, and hold both ends. Pull your elbows back while squeezing the shoulder blades together, then slowly let the tension out.
I like this because it gives you the row pattern without needing a dumbbell or machine. It also reminds you what a proper pulling motion feels like. The chest stays tall. The neck stays relaxed. The pull comes from the back, not the hands.
Setup that matters
- Sit tall before the first rep.
- Keep the knees softly bent if hamstrings are tight.
- Pull until the elbows pass the ribs.
- Pause for 1 second at the end of each pull.
Do 3 sets of 10 to 15 reps or 3 holds of 20 seconds if you prefer isometrics. Pull hard enough to feel your upper back wake up, but not so hard that your shoulders creep up. That shrug is the enemy here.
9. Backpack Bent-Over Rows
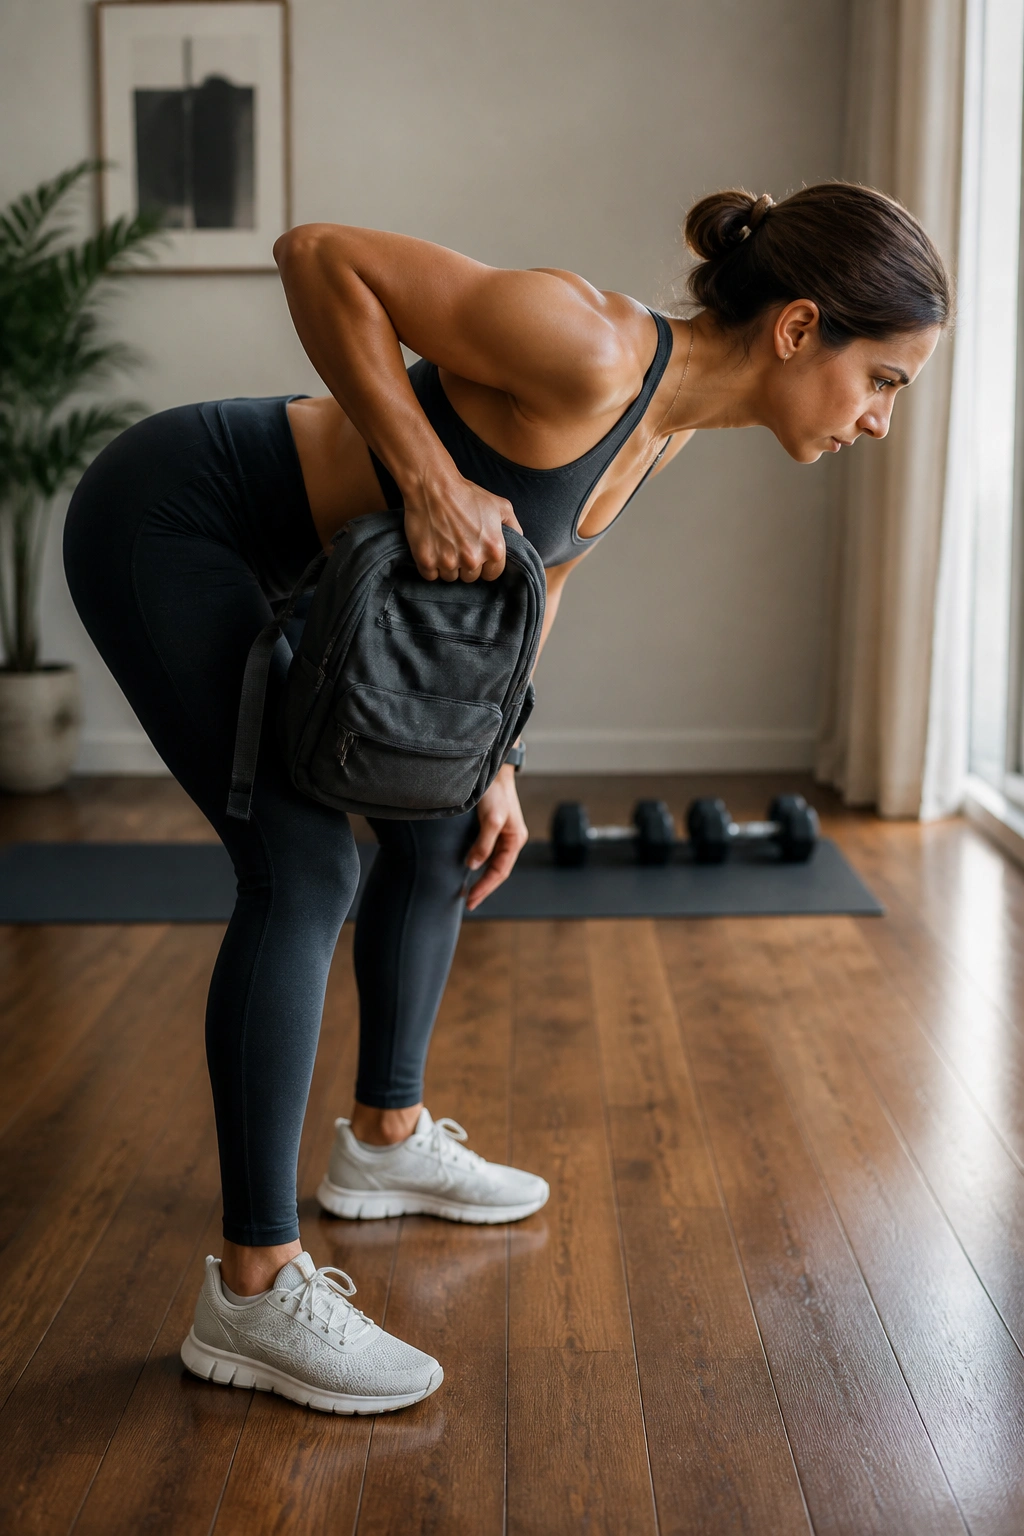
A backpack row is a plain-looking move that punches above its weight. Fill a backpack with books, a water bottle, or canned food, then hinge at the hips with a flat back and pull the bag toward your lower ribs. One arm at a time works best, since it keeps the torso honest.
The hinge matters. If you round through the upper back just to get the bag moving, the exercise turns into a bad habit factory. Keep a soft bend in the knees, brace the belly, and let the elbow drive back beside the body. The lower back should feel steady, not strained.
Do 3 sets of 8 to 12 reps per side. If the bag swings, it’s too heavy or you’re rushing. A slower row with a one-second squeeze is usually better than a sloppy heavy one. You want your posture to improve when you’re done, not become more crooked.
10. Resistance Band Pull-Aparts
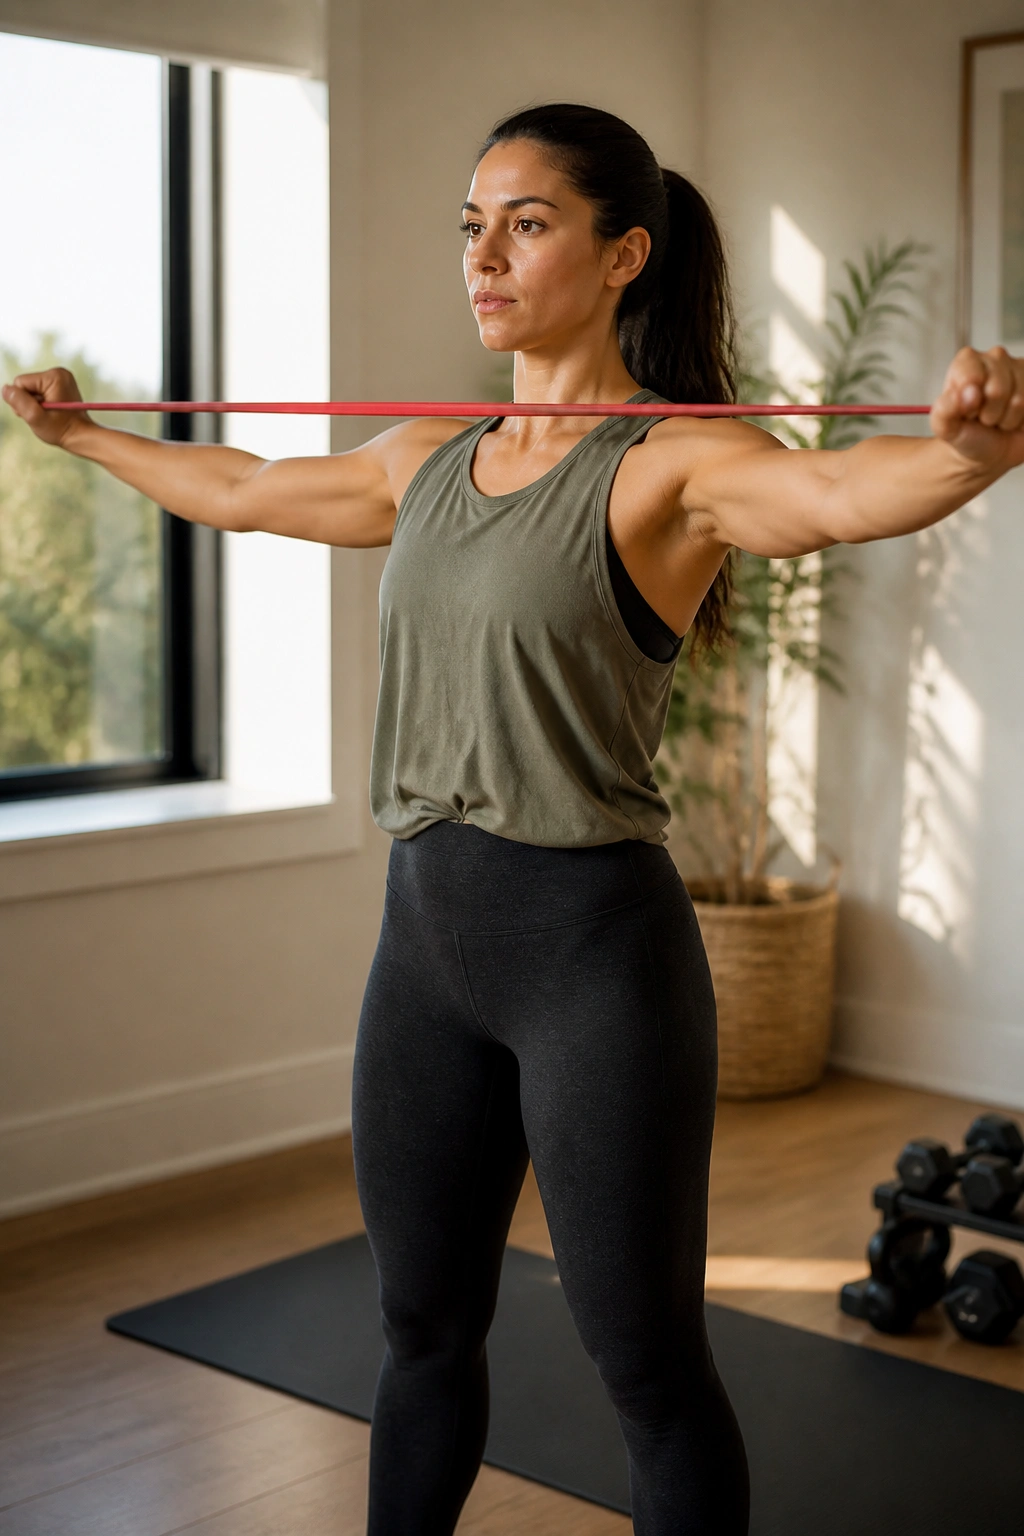
If you own one light band, this is the move to keep close. Hold the band at shoulder height, arms straight, and pull it apart until your hands move wide and your shoulder blades come together. Then come back with control, not a snap.
Pull-aparts train the rear delts and upper back in a way that feels almost impossible to cheat. The band gets harder as you open it, so the end range does the real work. That’s useful for posture, because the weak spot is often right where your shoulders want to round in.
Good versions to try
- Palms up for a little more external rotation.
- Palms down for a simpler pull.
- Slight bend in the elbows if your shoulders prefer it.
- Chest level, not high over your head.
Use 2 to 4 sets of 12 to 20 reps. Keep the ribs from flaring and the chin level. A light band done well beats a heavy band done badly. Every time.
11. Resistance Band Face Pulls
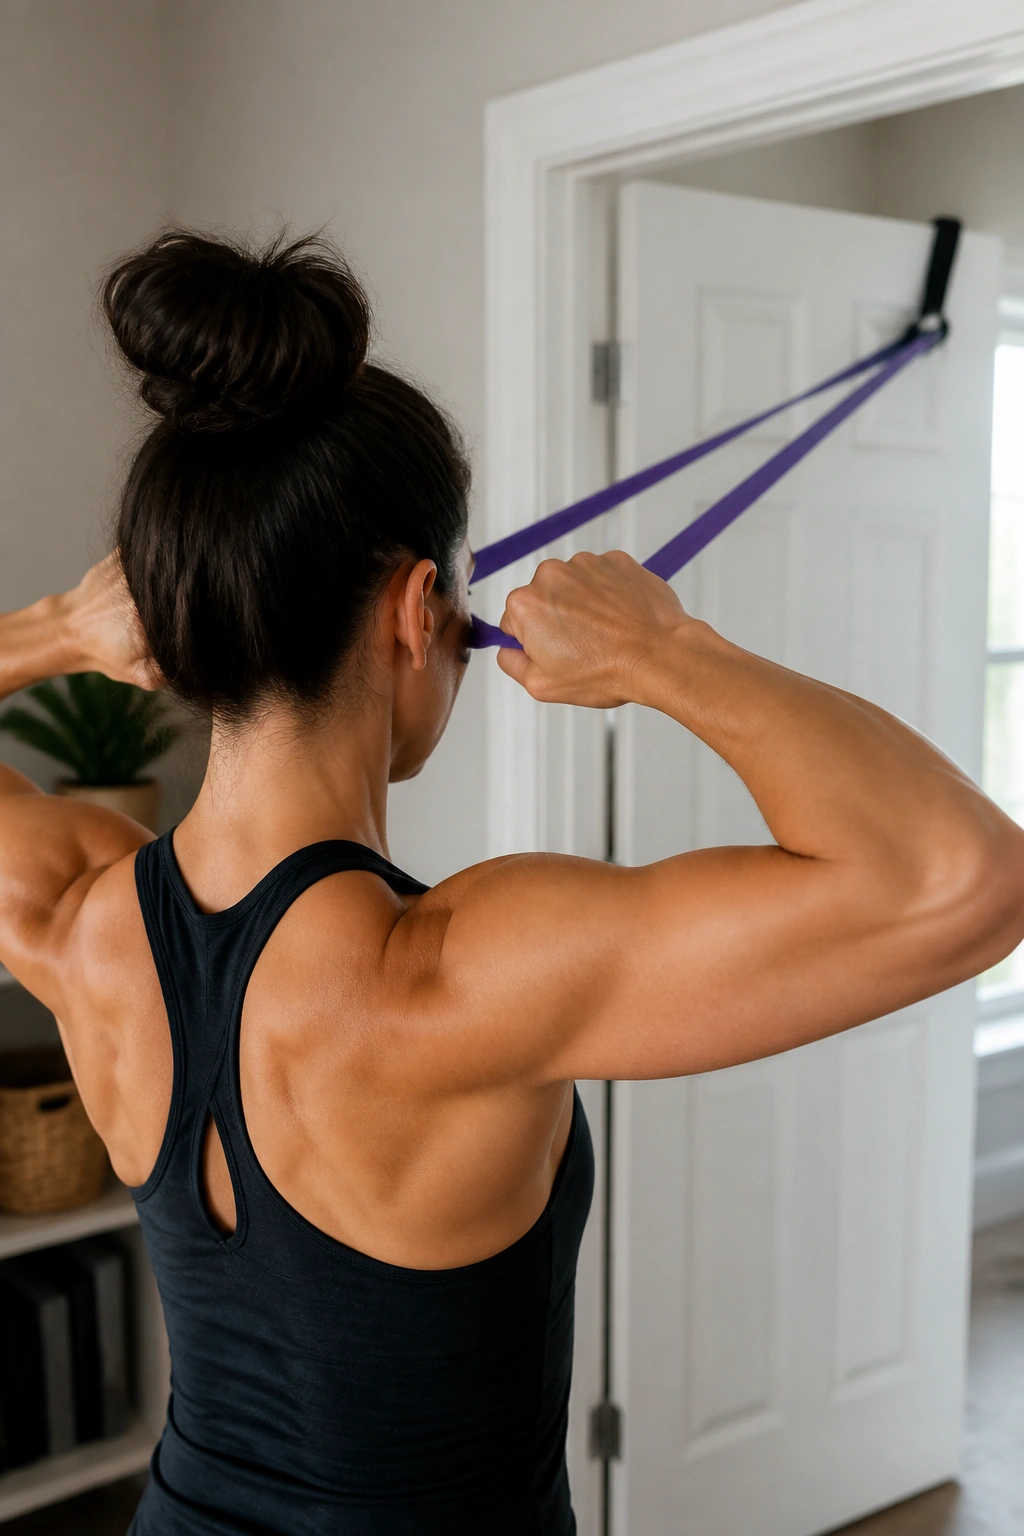
Face pulls look a bit like pull-aparts at first glance, but the line of pull is different, and that changes everything. Anchor a band at eye level, pull toward your face, and finish with your elbows high and your hands near your temples or cheekbones. The shoulders should feel open, not jammed.
This movement is one of my favorites for people whose posture starts to collapse as soon as they get tired. It hits the upper back and the smaller rotator muscles that help the shoulders sit back and down. The key is a light band. Too much resistance turns the rep into a neck-and-trap fight.
Best cues
- Pull the band toward the bridge of the nose or forehead.
- Separate the hands at the end.
- Keep the chest still.
- Finish with a controlled squeeze, not a yank.
Do 2 to 3 sets of 12 to 15 reps. If your elbows drop, lower the band resistance and clean up the form. This move should look smooth. If it looks ugly, it usually is.
12. Scapular Push-Ups
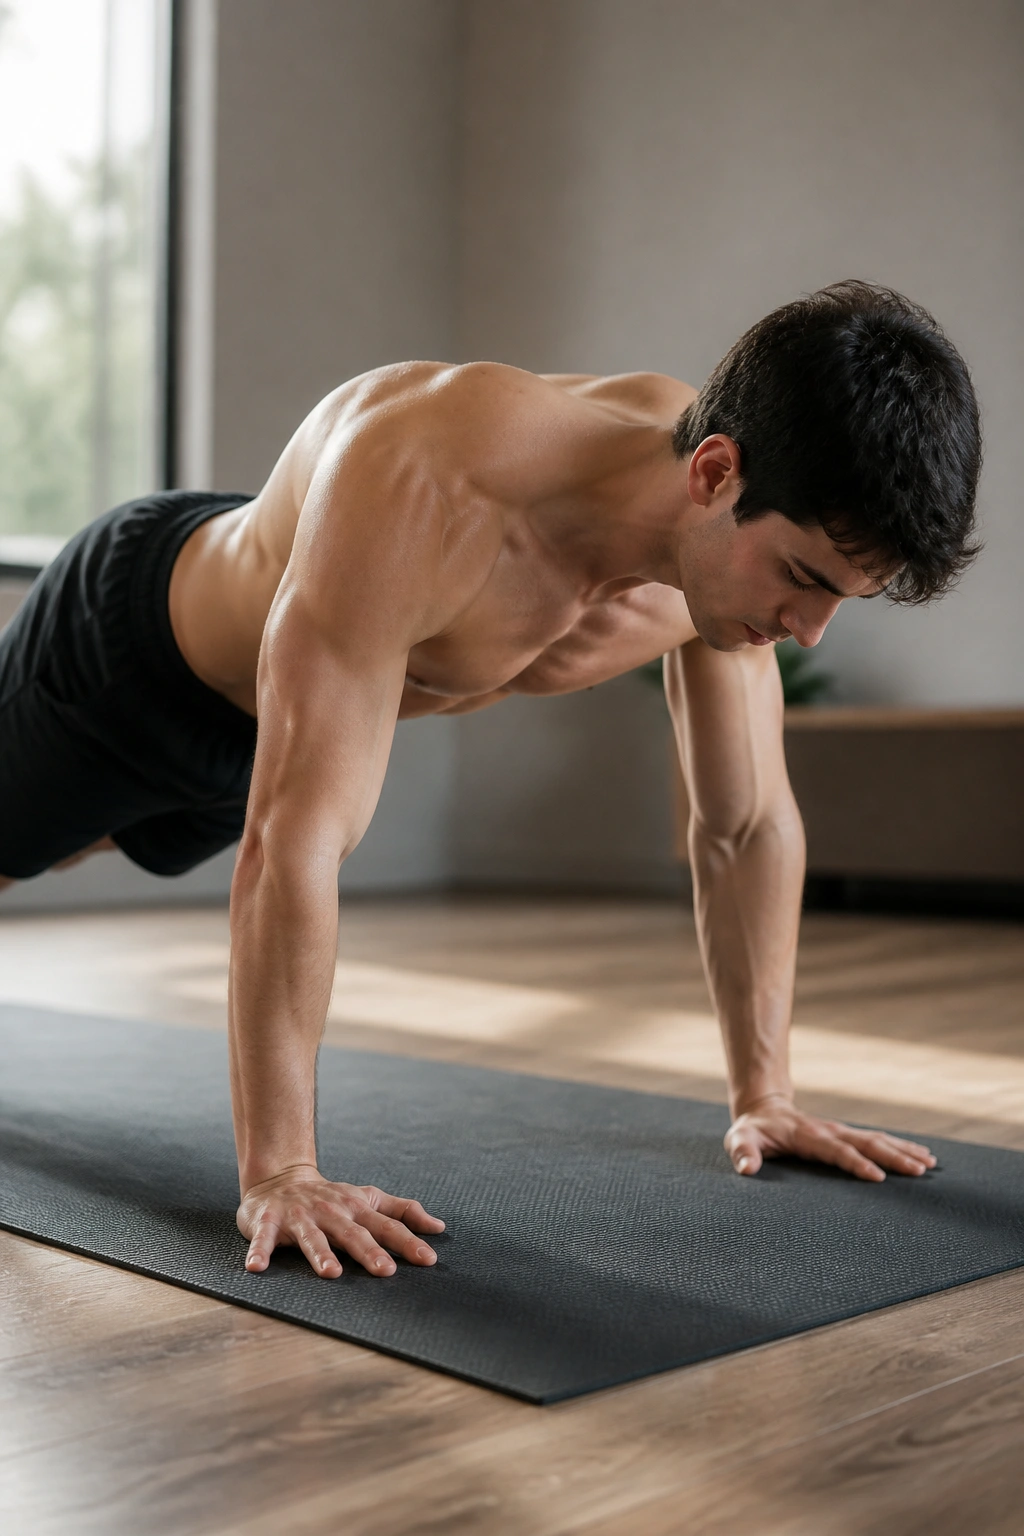
Can a push-up help your back posture? Absolutely, if you do it as a shoulder-blade drill instead of a chest exercise. In plank position, keep your arms straight and let your chest sink slightly between the shoulders, then push the floor away so the shoulder blades spread apart.
That protraction-retraction motion wakes up the serratus anterior, a muscle that gets ignored far too often. When it works well, the upper back has less job to do all by itself. The shoulder blades glide instead of locking up like rusty hinges.
How to keep it clean
- Arms stay straight the whole time.
- Hips stay level.
- Range stays small and controlled.
- Neck stays long, eyes down.
Try 2 sets of 10 to 15 reps from a high plank. If that’s too much, do it against a wall or with your hands on a counter. The smaller version still teaches the same shape. The shape is the point.
13. Reverse Plank
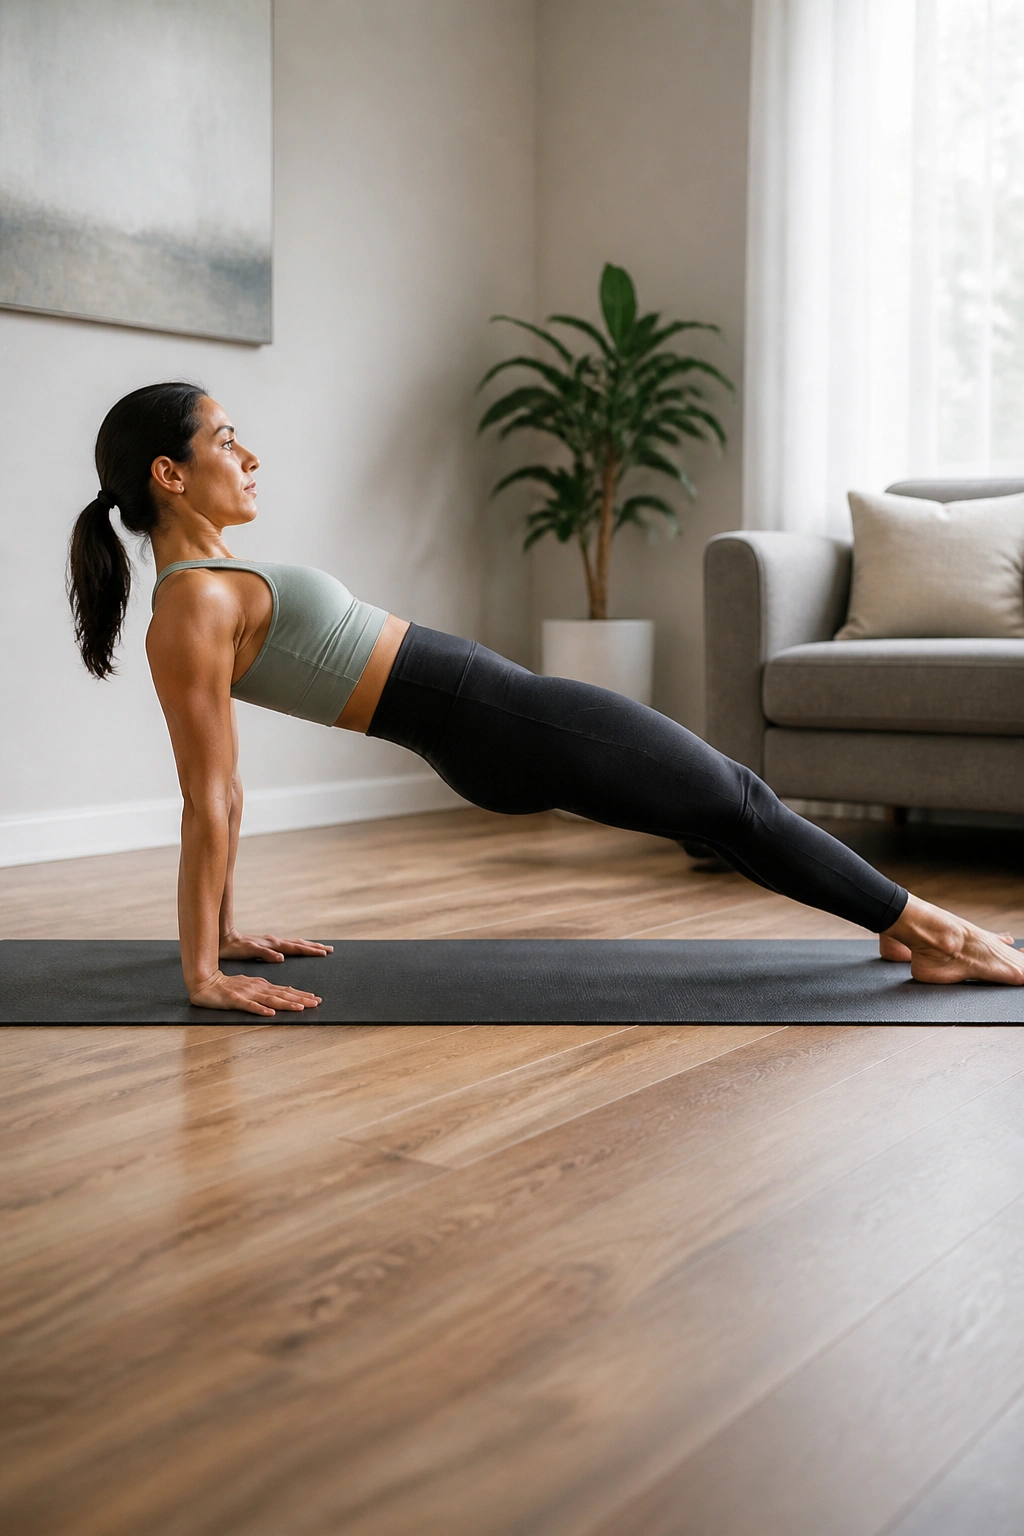
Reverse plank is one of those holds that feels calm right up until it doesn’t. Sit with your hands behind you, fingers pointed forward or slightly out, then lift your hips until your body forms a long line from shoulders to heels. The chest opens, the back of the shoulders work, and the glutes have to show up too.
I like this move for posture because it does more than strengthen. It also reminds the front of the body that it can open up without turning into a sloppy backbend. If your shoulders live in a forward position, the stretch across the chest can feel almost rude at first.
Hold for 15 to 30 seconds for 3 rounds. If your wrists complain, turn the hands out a little or place the palms on blocks, books, or a low bench. Keep the chin slightly tucked. A clean straight line beats a bigger arch.
14. Backpack Romanian Deadlifts
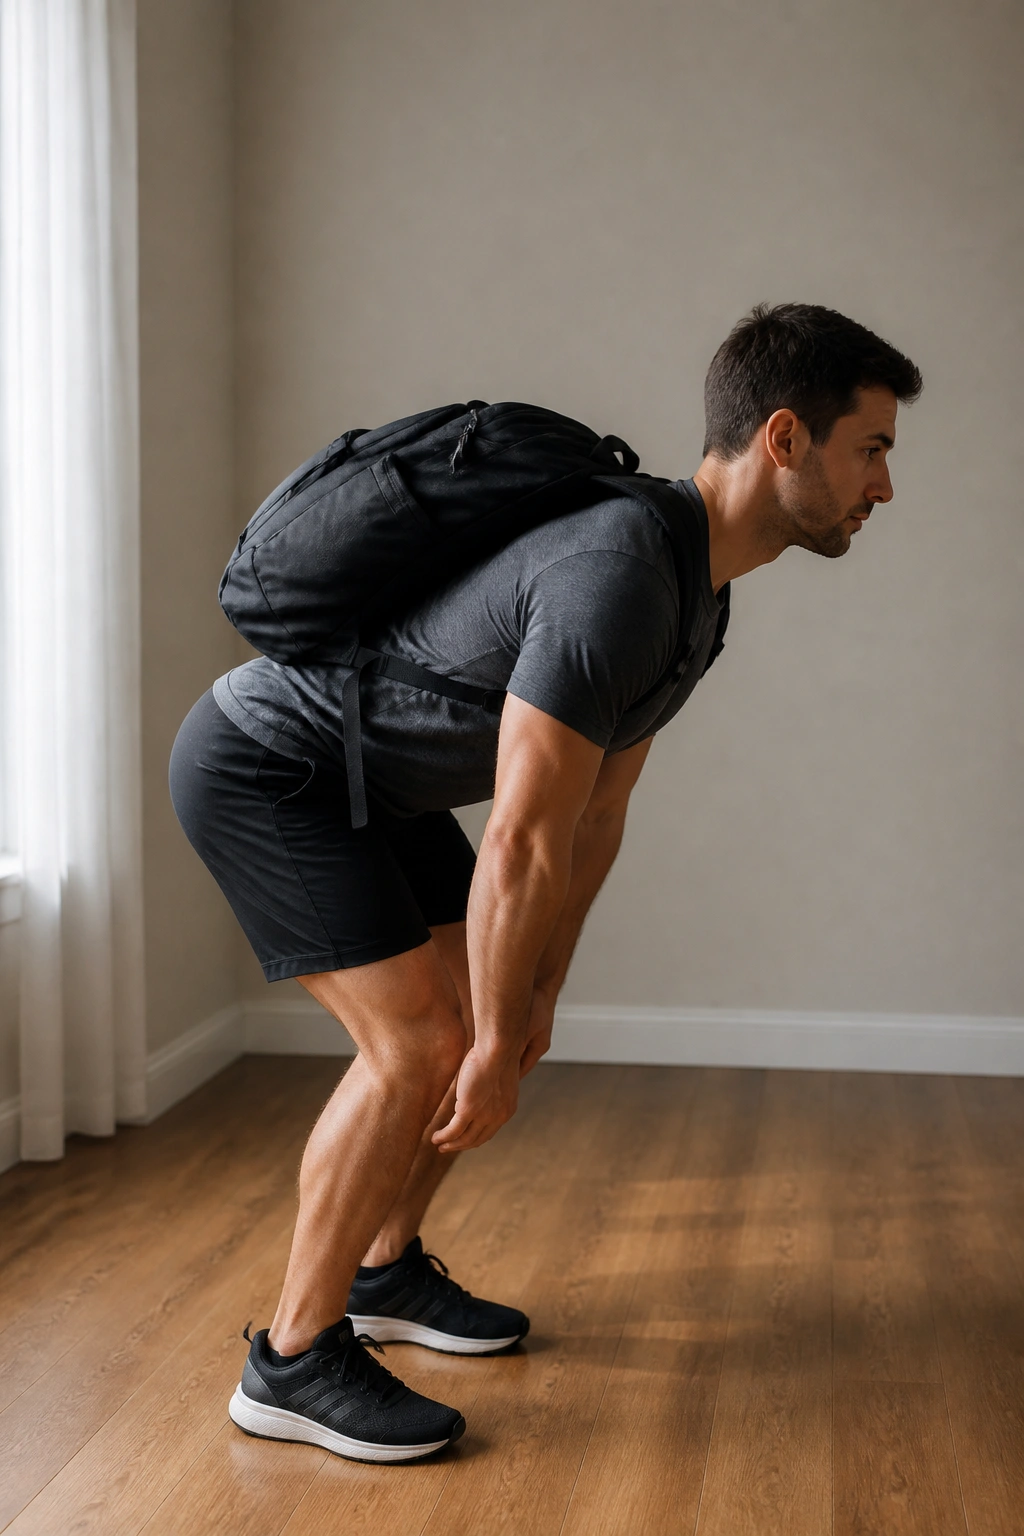
Posture is not only an upper-back problem. If your hips and hamstrings are weak, your torso tends to lean forward and your lower back starts doing work it was never meant to do all day. A Romanian deadlift with a backpack can help fix that pattern at home.
Stand tall with the backpack held close to your body or worn on your back, then hinge at the hips by sending the hips backward. Keep the spine long, knees soft, and weight close. Lower until you feel a stretch in the hamstrings, then stand back up by driving through the heels and squeezing the glutes.
What makes it useful
- Teaches a strong hip hinge.
- Trains the spinal erectors to stay braced.
- Helps the pelvis stay in a better position.
- Makes standing and walking feel less slouched.
Use 3 sets of 8 to 10 reps. The bag should stay under control the whole time. If your lower back rounds, stop the descent earlier. That small adjustment matters more than depth.
15. Prone Cobra Hold
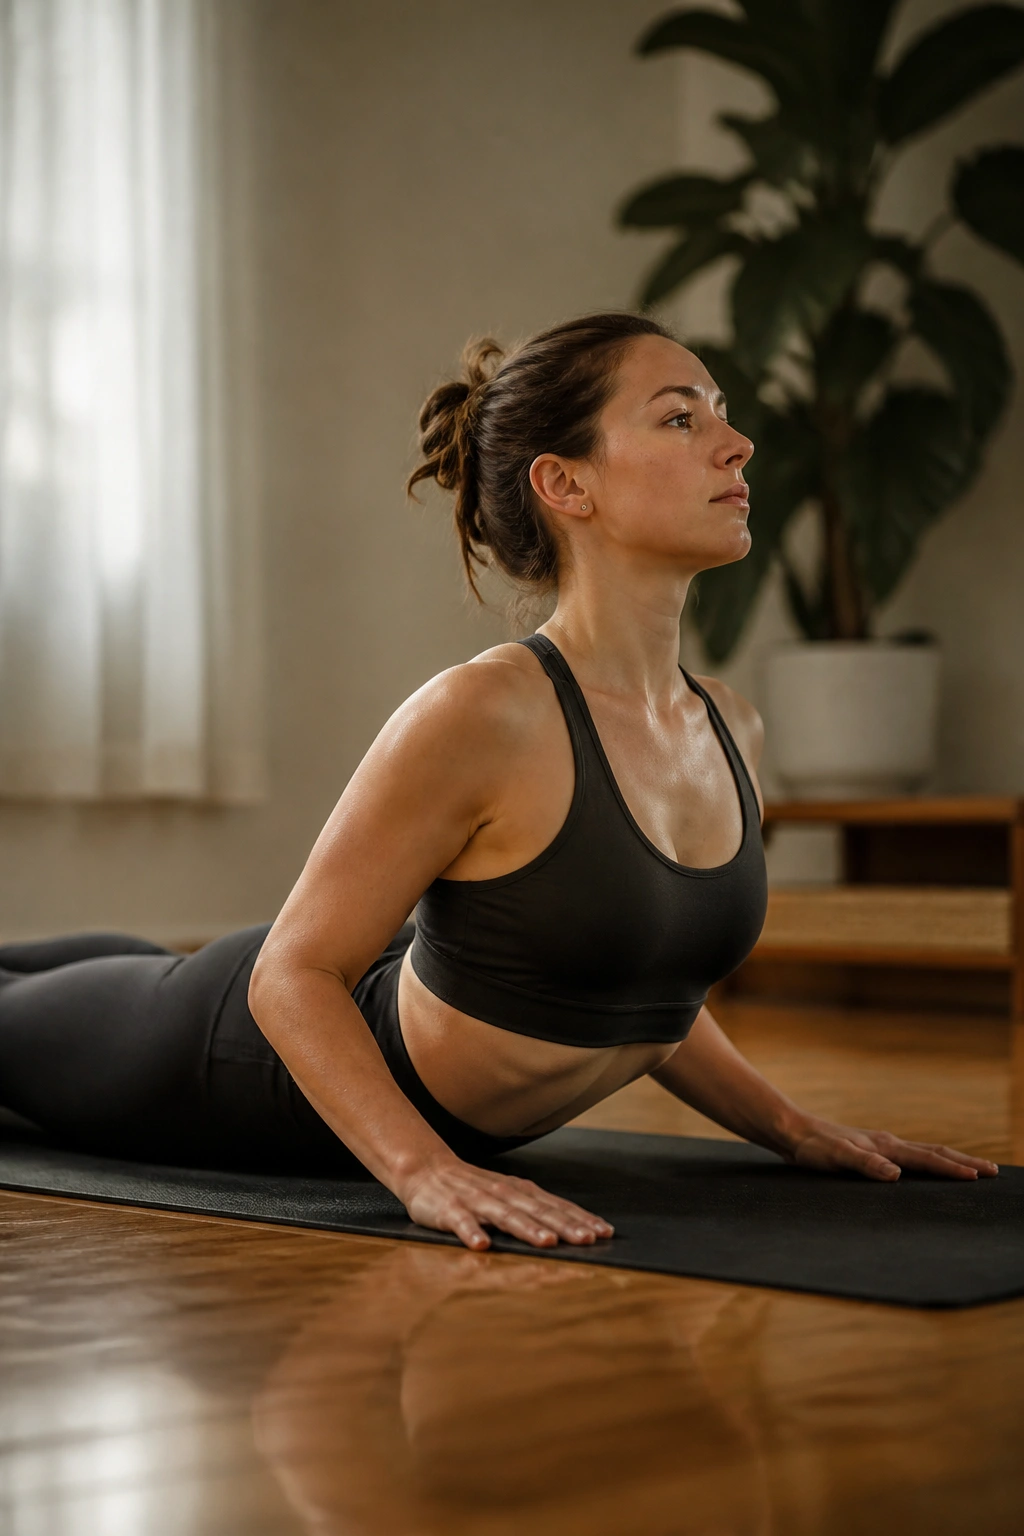
Prone cobra is a posture drill with teeth. Lie face down, tuck the chin slightly, rotate the thumbs out, and lift the chest just enough to hover the hands and feet lightly off the floor. The shoulders draw down and back without pinching, and the back of the neck stays long.
This is the one I reach for when someone needs endurance in the muscles that hold the upper body open. It’s not flashy. It burns in a quiet, stubborn way. That makes it useful. The hold teaches you how to stay tall without over-muscling the movement.
A good cobra feels like this
- Gentle work between the shoulder blades.
- Glutes engaged.
- Neck calm.
- Low back active, but not jammed.
Start with 3 holds of 10 to 15 seconds. Build toward 20 to 30 seconds only if the shape stays clean. If your head cranes up or your low back takes over, shorten the hold. Precision beats bravado here.
Final Thoughts
A better posture routine does not need to be long. It needs to be consistent, and it needs to cover the jobs that matter: upper-back strength, shoulder-blade control, spinal stability, and a little hip work so your torso stops doing everything alone.
Pick 4 to 6 moves from this list and run them as a circuit three times a week. One day can lean more on rows and holds, another can lean on floor work and mobility. That keeps the body from getting bored, and boredom is often where half-hearted training starts.
If you only remember one thing, make it this: good posture comes from endurance, not just position. You can stand tall for ten seconds by force. You need stronger back muscles to do it for the rest of the day.
