



Most of us approach home exercise with a binary mindset: we either go for a heavy lift or we do nothing at all. That’s a mistake. Your body isn’t a machine that only functions when you’re pushing a barbell to failure; it’s a living, breathing structure that craves movement variety, joint lubrication, and positional awareness. You feel “stiff” not because you are getting older, but because your nervous system has forgotten how to access certain ranges of motion.
The following routines aren’t about burning calories or hitting a one-rep max. They are about earning the right to move well. If you can move through a full range of motion under control, you are inherently stronger than someone who can lift heavy weights but can’t reach over their head without arching their lower back. These routines are designed to be standalone sessions or warm-ups for your heavier days. They require nothing but floor space and, occasionally, a light weight or a sturdy wall.
1. The Morning Spine Decompression Sequence
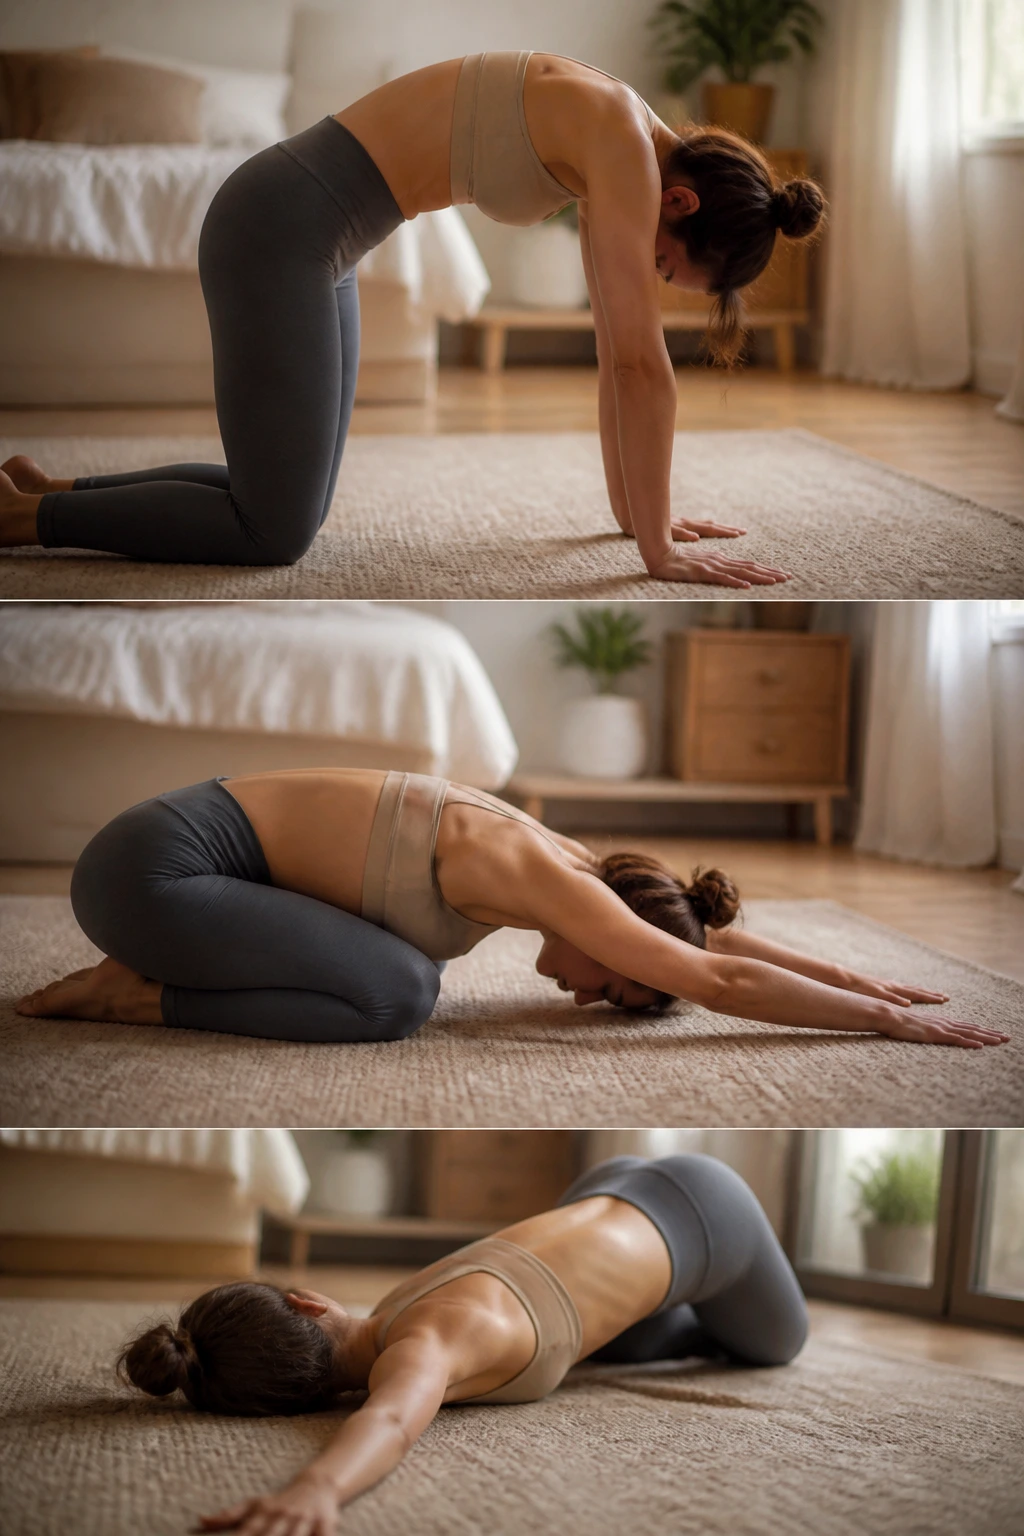
When you wake up, your spinal discs have been rehydrating for hours, making them slightly swollen and less pliable. This is why bending over to put on socks feels precarious in the morning. This routine focuses on gentle flexion and extension to wake up the stabilizers along your vertebrae without forcing a hard stretch.
The Flow
Start on all fours. Slowly move into a Cat-Cow pattern, but don’t just flop your back. Imagine your spine is a string of pearls; articulate one bead at a time. Move from your tailbone up to your neck, then reverse it. After ten cycles, shift back into a child’s pose, reaching your fingertips as far forward as possible to stretch the lats. Return to all fours and perform “thread the needle,” rotating your torso to reach one arm under your body, touching your shoulder to the floor.
The goal here is not intensity. You are simply waking up the nervous system. Perform this for about five minutes. If you hear a few pops or cracks, that’s just your joints finding their natural alignment. Don’t force them. Focus on the breath—inhale as you expand your chest, exhale as you contract your core.
2. The Ankle and Calf Primer
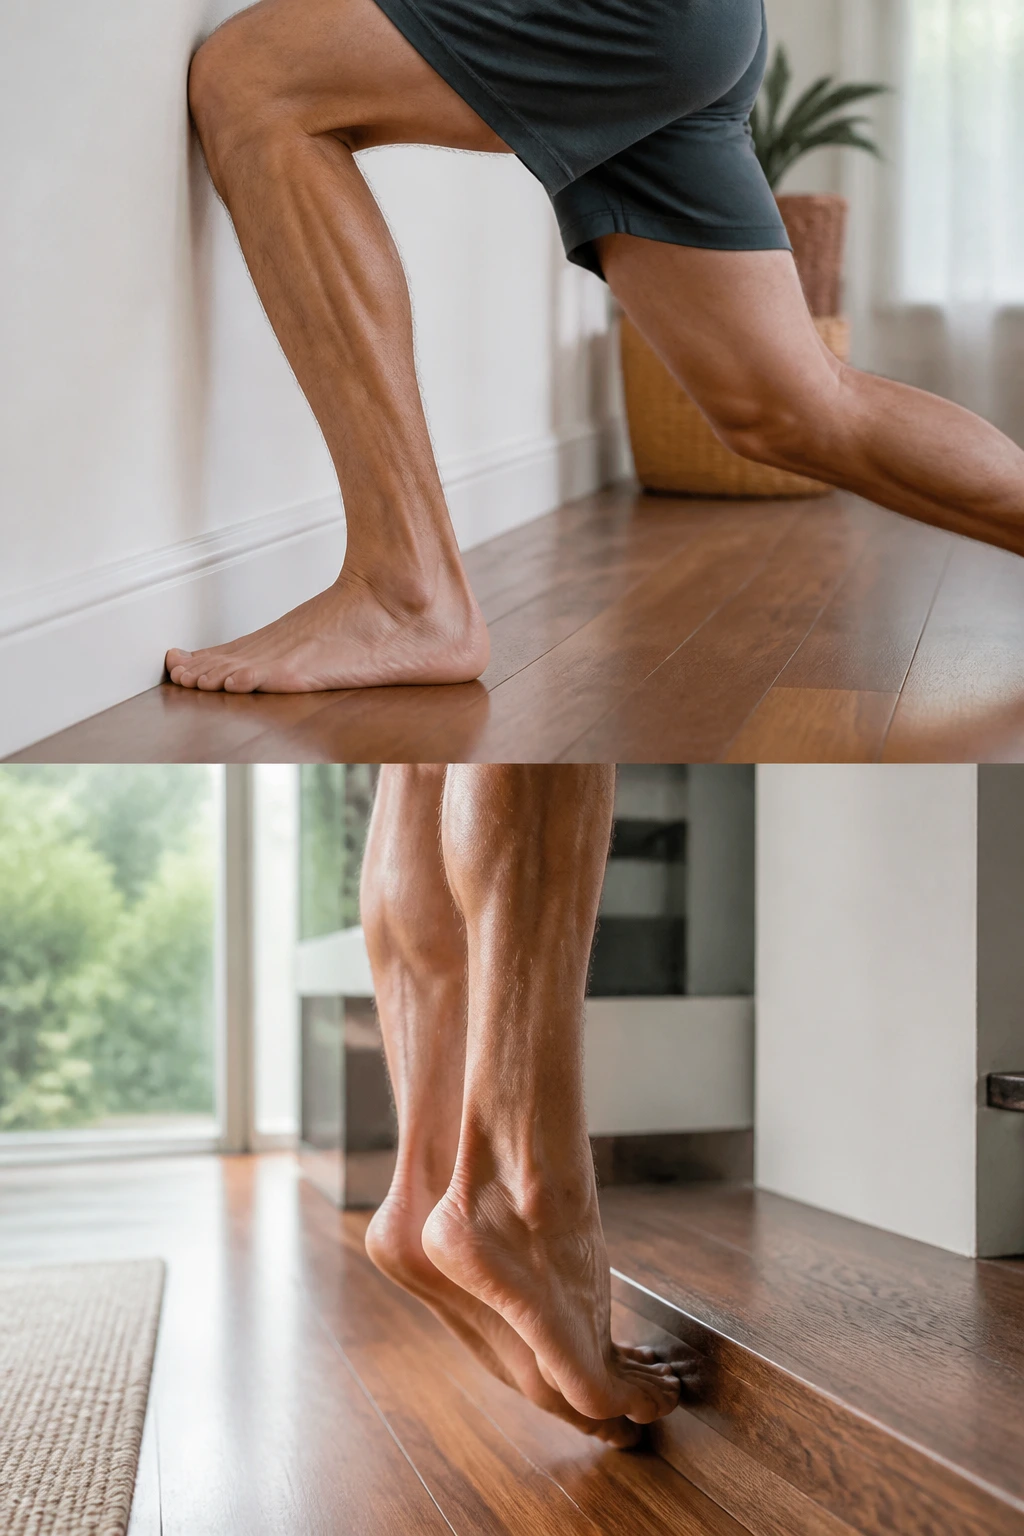
Ankle dorsiflexion—the ability to pull your toes toward your shin—is the single most overlooked factor in a deep squat. If your ankles are tight, your body will compensate by rounding your lower back, leading to inevitable pain. This routine fixes that bottleneck.
How to execute the ankle rock
Stand facing a wall with one foot about three inches away. Drive your knee forward until it touches the wall, keeping your heel glued to the floor. If the heel lifts, move your foot closer to the wall. This is your anchor point. Perform fifteen controlled rocks on each side.
Why this works
This is a mobility-strength hybrid. By holding the end range, you are forcing the muscles around the ankle joint to fire and create stability. Follow this with ten calf raises on a step, focusing on a slow, three-second descent. Your calves have to be strong to handle the load of your body weight when you land or squat. A strong calf is a stable base for the knee.
3. The Hip Capsule Unlocker
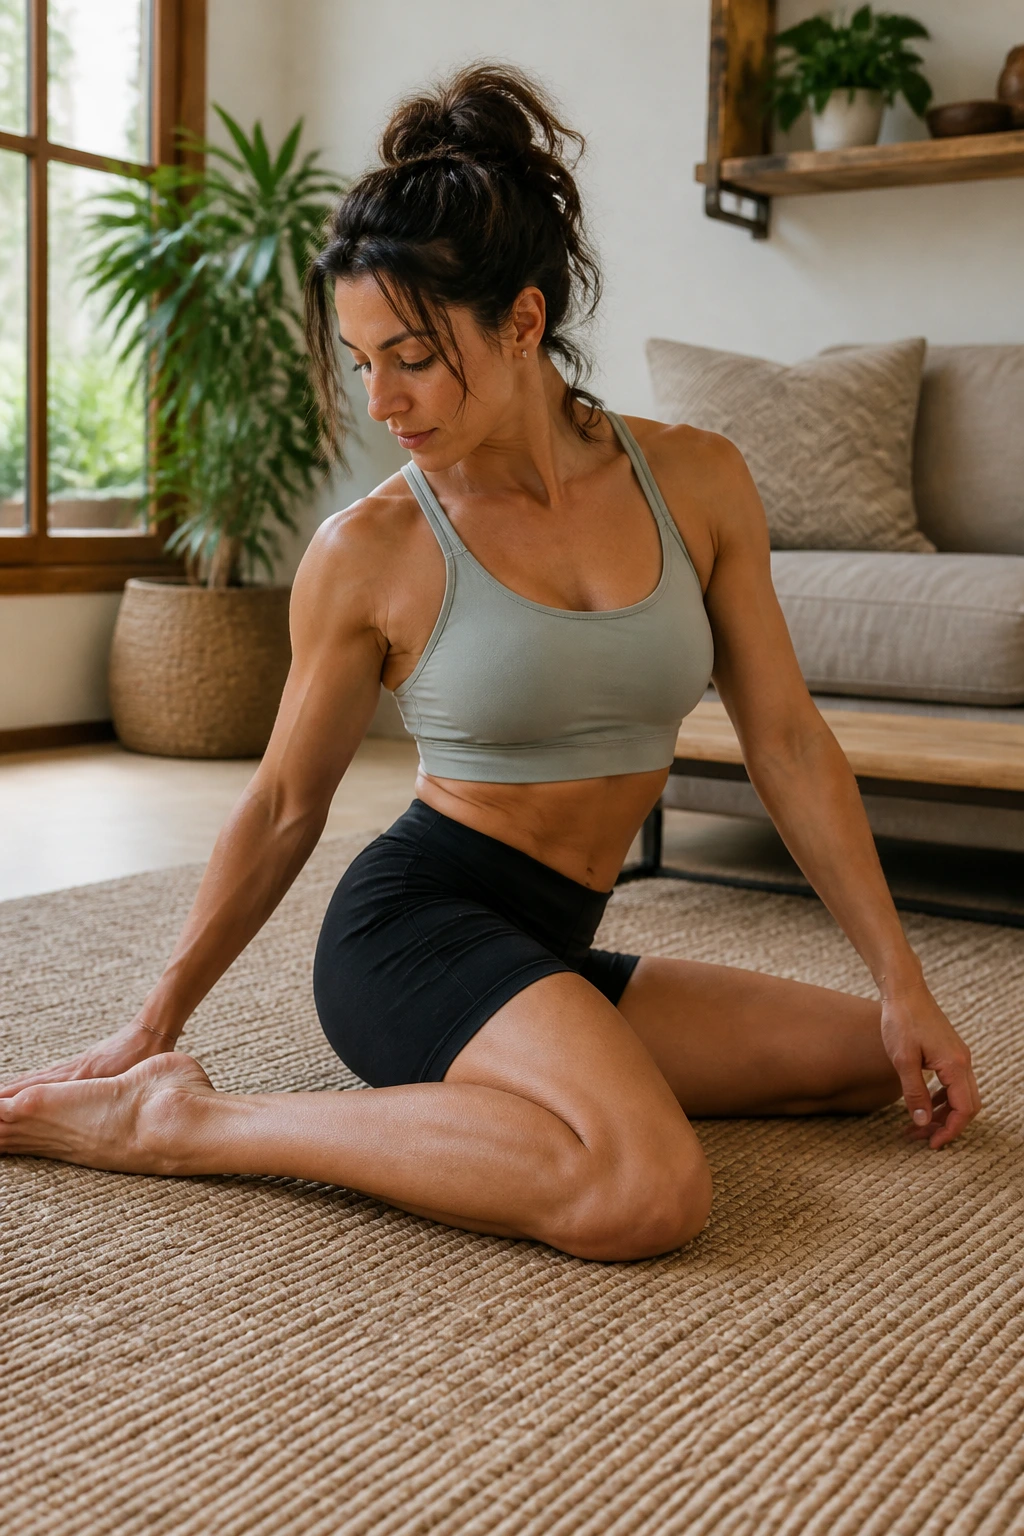
If you sit for a living, your hip flexors are chronically short, and your glutes are perpetually asleep. This creates a tug-of-war in your pelvis that usually results in anterior pelvic tilt—a swayback posture that wreaks havoc on your lumbar spine.
The 90/90 movement pattern
Sit on the floor with your knees bent to 90 degrees, one leg in front of you and one to the side. Without using your hands, rotate your legs to the other side. If you feel stuck, use your hands to prop yourself up, but slowly remove them over time.
This movement teaches your hips how to rotate internally and externally under their own power. Spend six minutes alternating sides. Once you feel comfortable, start adding a forward fold over the front shin. You will feel a deep, localized stretch in the glute. This is your body telling you exactly where the tension is held. Respect it.
4. The Shoulder Stability Reset
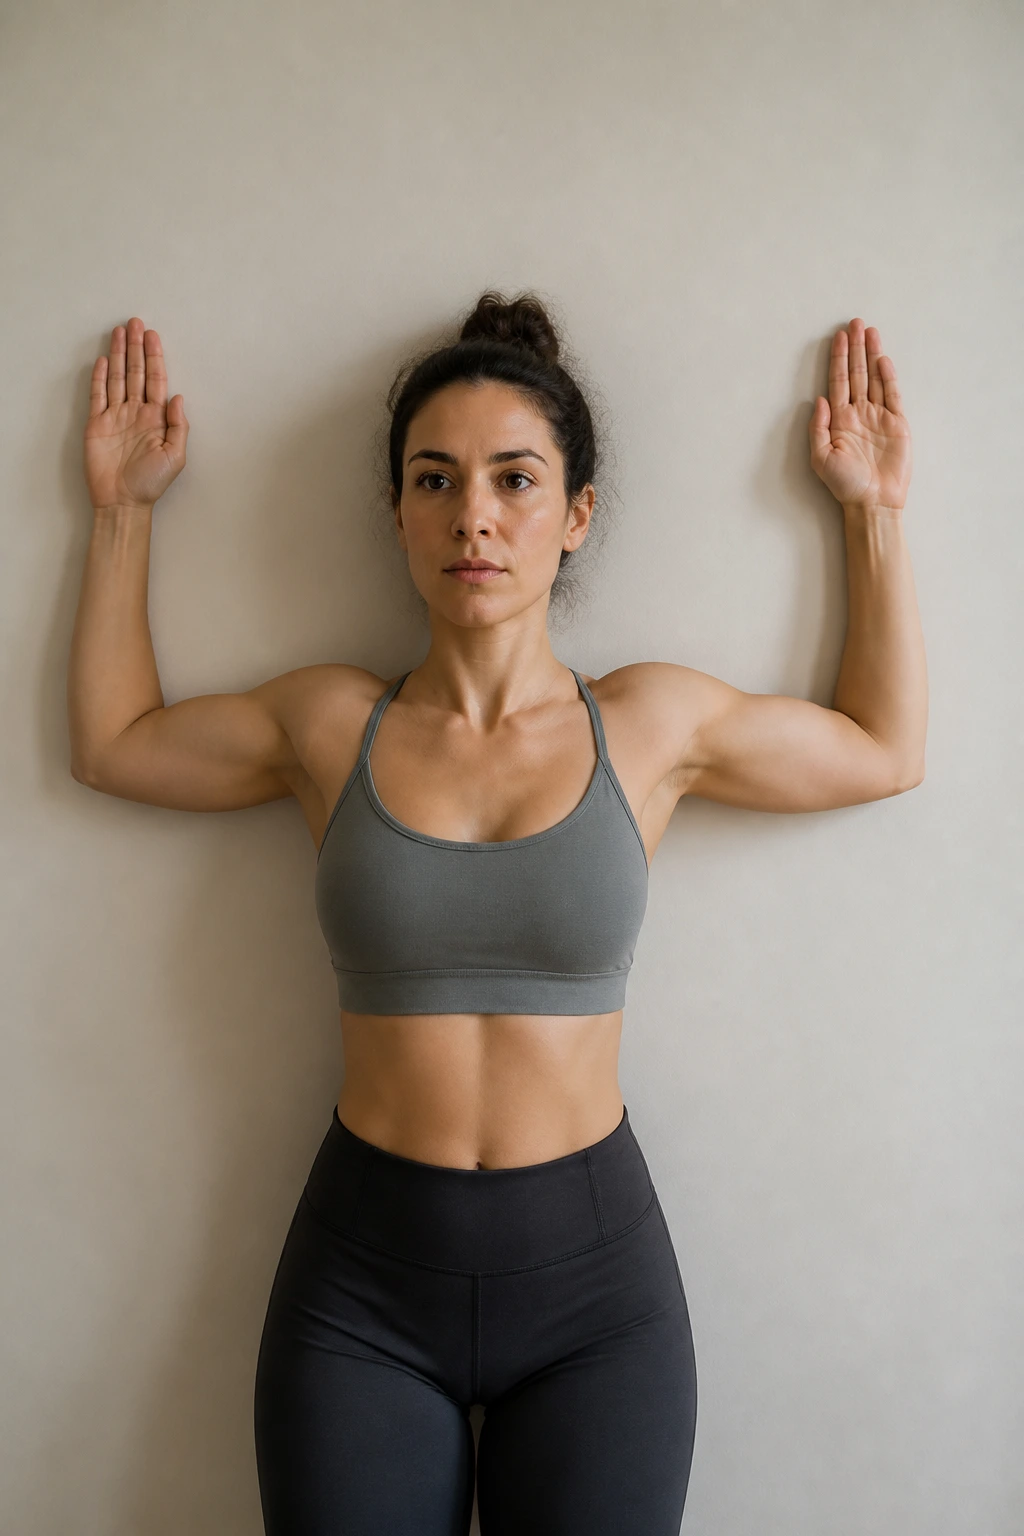
We live in a world of forward-facing posture—typing, driving, scrolling. Your shoulders are likely rotated forward, shortening your chest and weakening your upper back. This routine forces the shoulder blades to retract and rotate downward.
The Wall Slide
Stand with your back, head, and heels against a wall. Raise your arms so your elbows and wrists are touching the wall at shoulder height. Slide your arms up and down, keeping contact with the wall the entire time.
Pro tip: If your elbows leave the wall, you’ve gone too high or your chest is too tight. Lower your arms until you can maintain full contact. Do three sets of twelve. Follow this with “Y-W-T” raises, lying face down on the floor and lifting your arms in those shapes. You don’t need weights. Gravity is enough. You will feel a burn in the traps and rhomboids—that’s the feeling of postural correction.
5. The T-Spine Rotation Routine
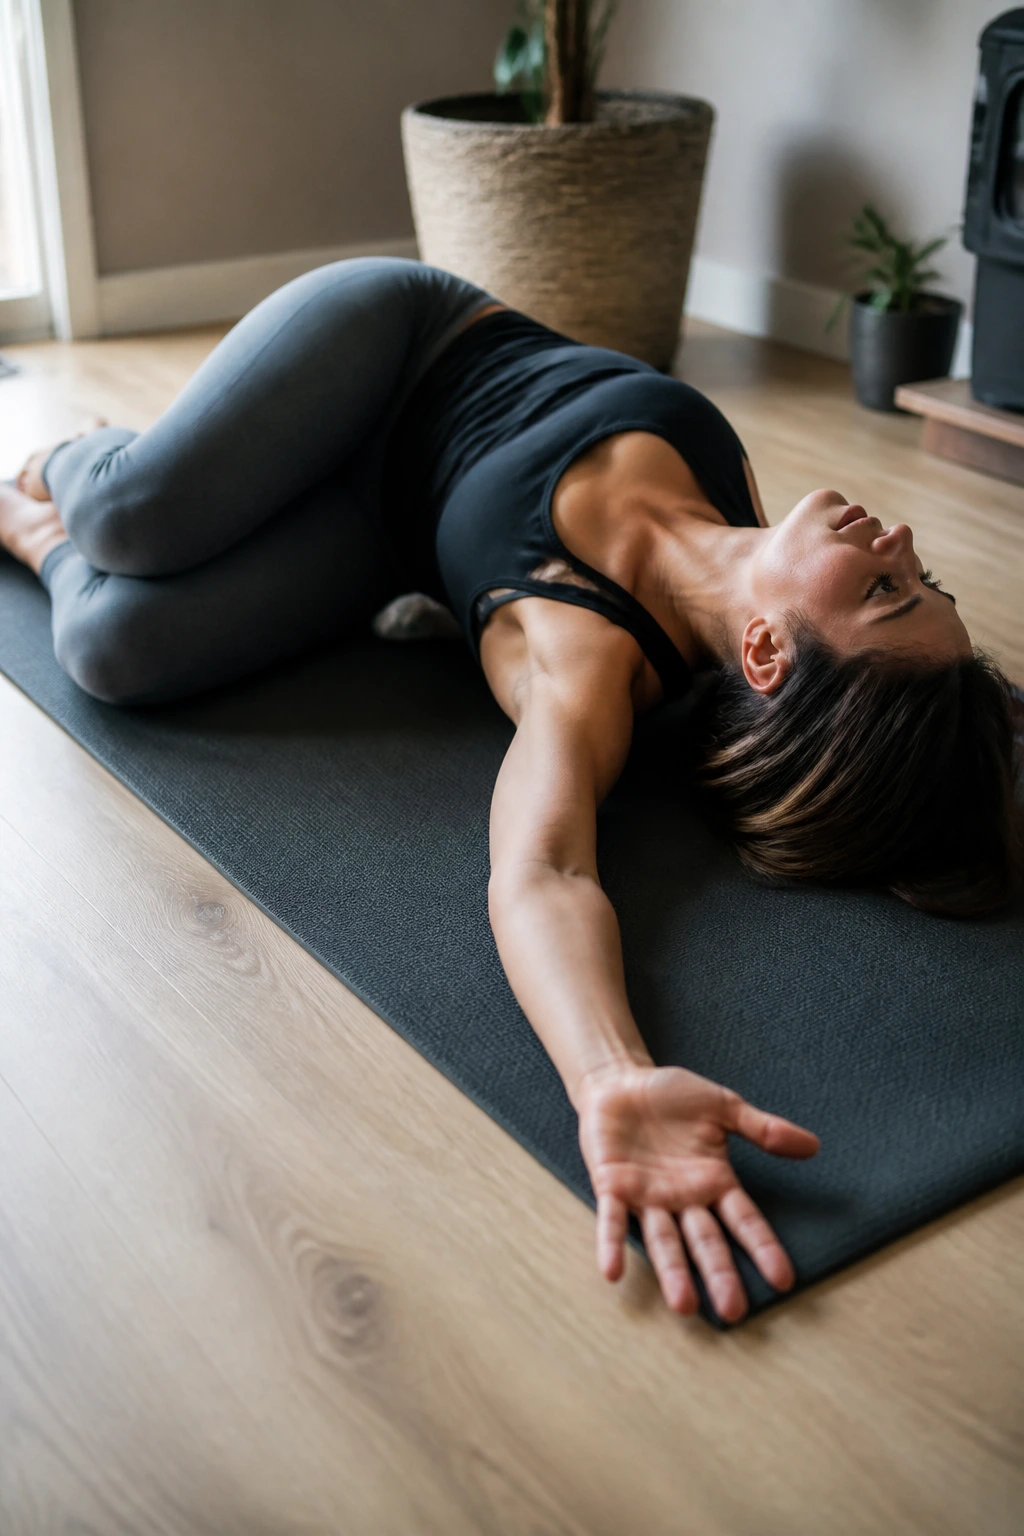
Your thoracic spine—the upper and middle part of your back—is meant to rotate. Your lumbar spine (lower back) is meant to stabilize. When your T-spine gets locked up, your lower back tries to do the rotating, which is exactly why so many people have back spasms.
The Open Book
Lie on your side with your knees tucked to your chest. Keep your knees together, pinned to the floor. Reach your top hand across your body, opening your chest toward the ceiling as if you are opening a book. Follow your hand with your eyes.
This isn’t about how far your hand gets to the floor; it’s about how far your ribcage rotates. Do not let your knees slide apart. If they do, put a foam roller or a pillow between them to keep your hips locked. Ten rotations per side, moving slowly.
6. The Posterior Chain Wake-up
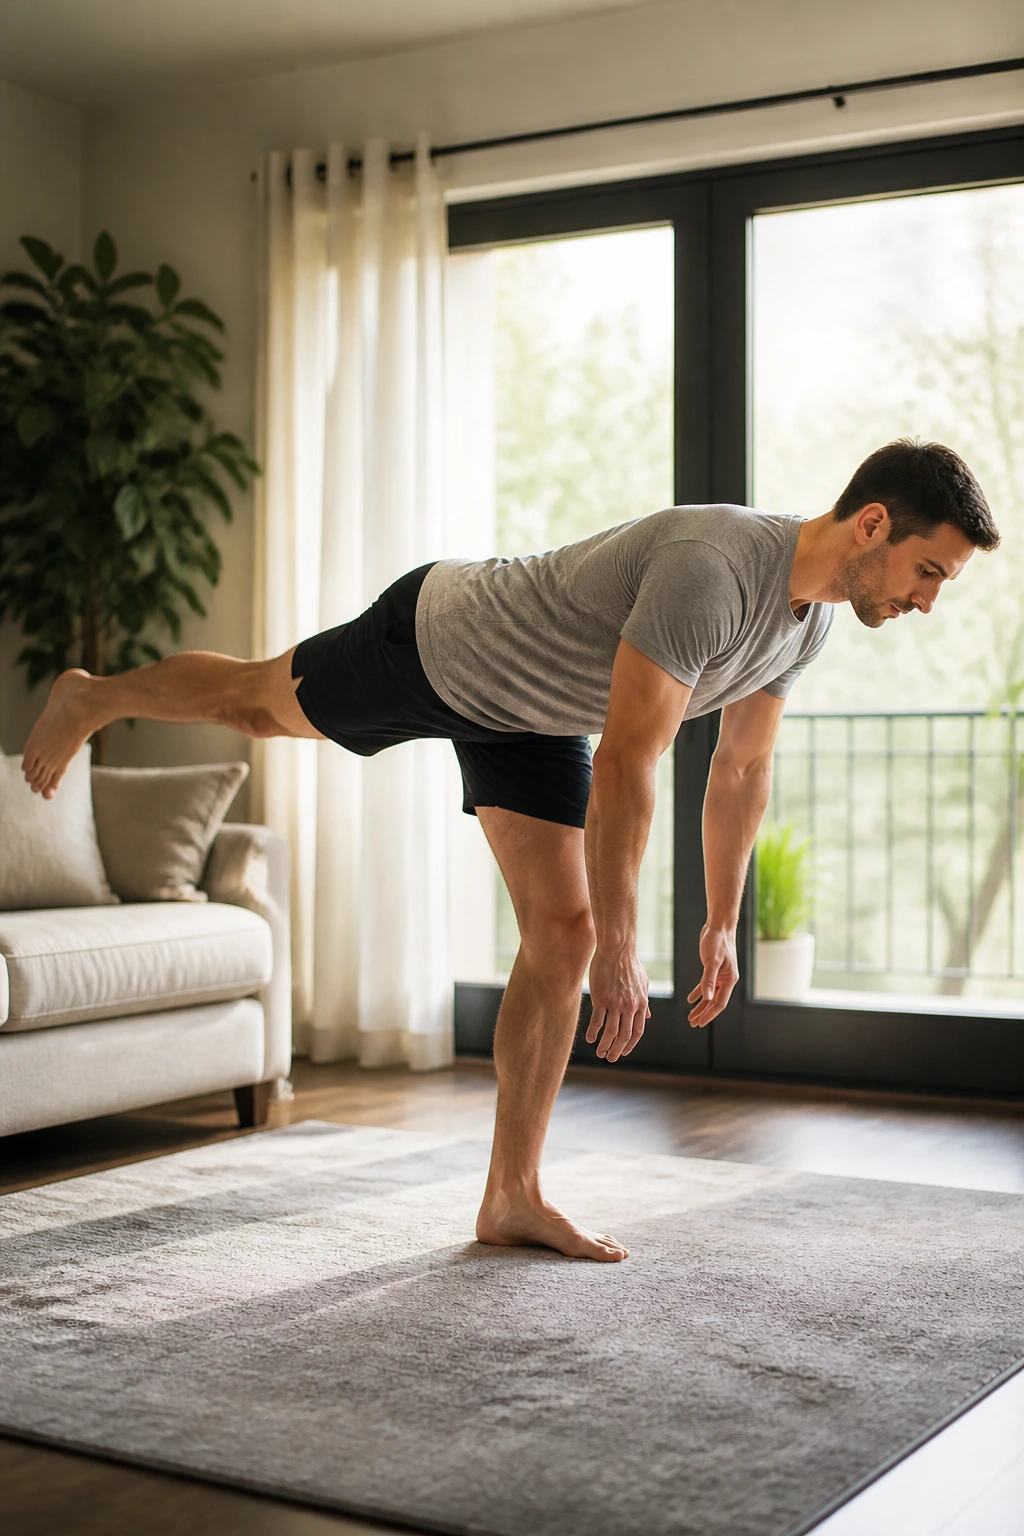
The posterior chain—your hamstrings, glutes, and lower back—is the powerhouse of human movement. If these muscles are dormant, your knees and lower back take the brunt of every step you take.
The Single-Leg Romanian Deadlift (Bodyweight)
Stand on one leg. Hinge at your hips, keeping your back flat, and reach your other leg back behind you. You don’t need a weight. The goal is balance and control. Reach until your torso is roughly parallel to the floor, then squeeze your glute to stand back up.
Do ten reps per side. If you are wobbling, that’s good. Wobbling is just your brain learning to coordinate with your ankle and hip stabilizers. Once you master the bodyweight version, you can hold a household object, like a gallon jug of water, to add a bit of load. This builds reactive strength, which is vital for preventing trips and falls in daily life.
7. The Lateral Movement Flow
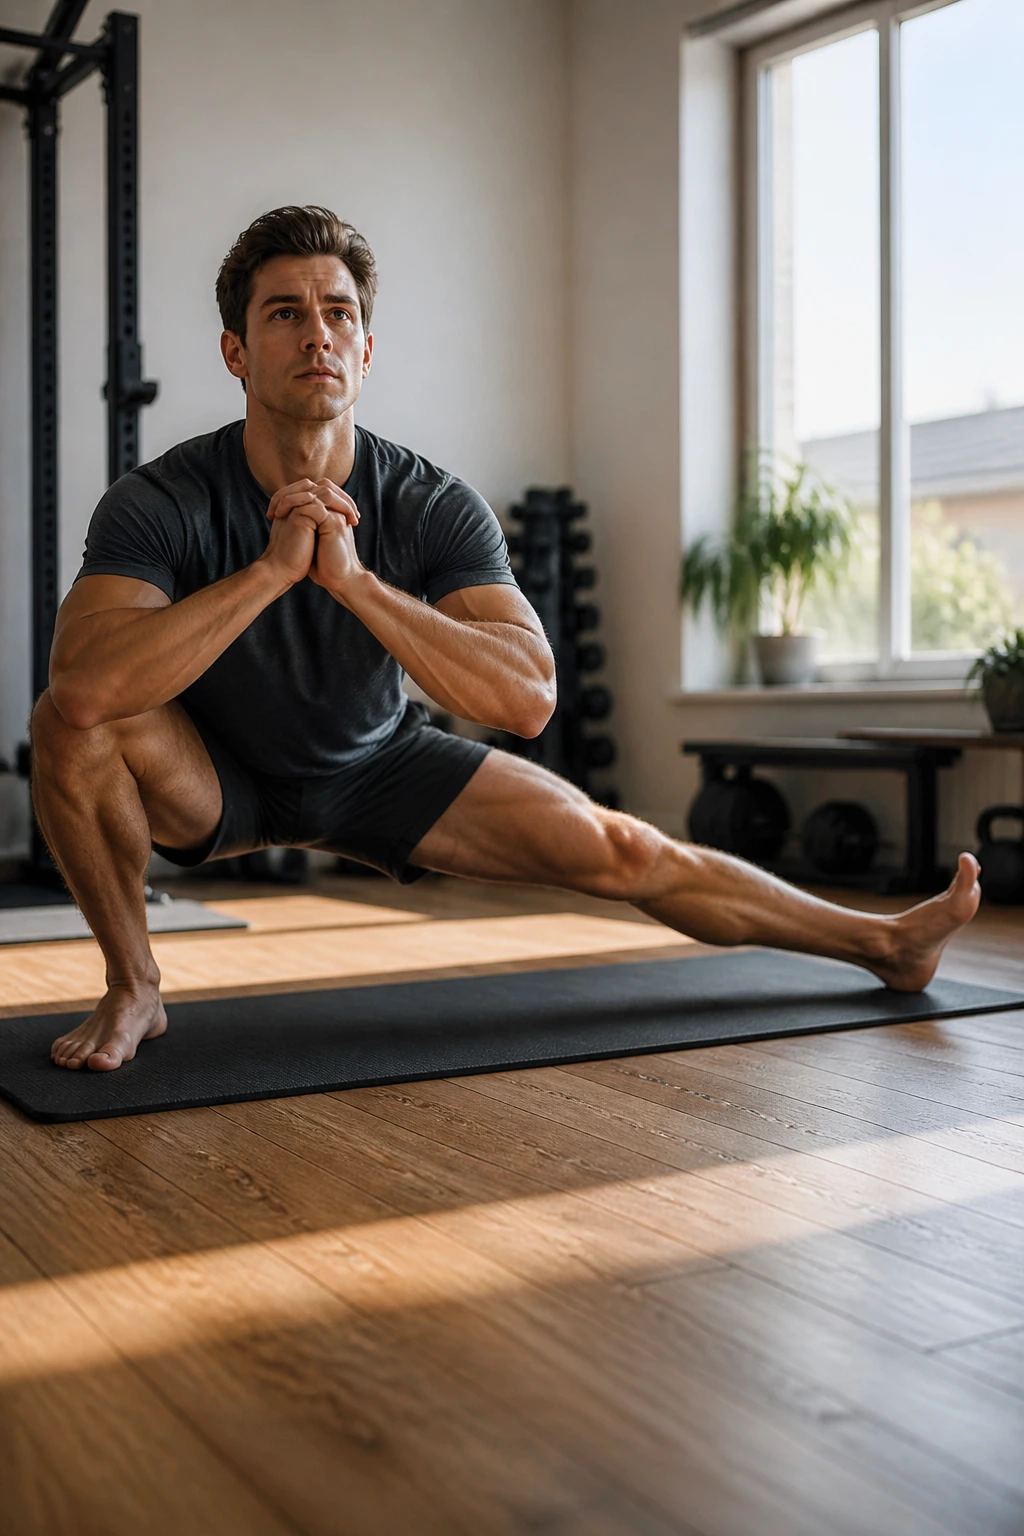
Most people only move forward and backward. We walk forward, we squat forward, we lunge forward. But life happens in the frontal plane—dodging a puddle, stepping sideways to avoid someone on the sidewalk, changing direction on a sports field.
The Cossack Squat
Take a very wide stance. Shift your weight entirely to one side, bending that knee while keeping the other leg completely straight. Keep your chest up. Push through the heel of the bent leg to return to center, then switch.
This is brutal for the adductors (inner thighs) if you aren’t used to it. Start with a shallower depth. As your mobility improves, you will be able to sink lower until your thigh is parallel to the ground. This isn’t just a stretch; it’s a strength movement. Your glute medius—the muscle that stabilizes your hip from the side—will be screaming by the end of the second set.
8. The Core Stability Anchor
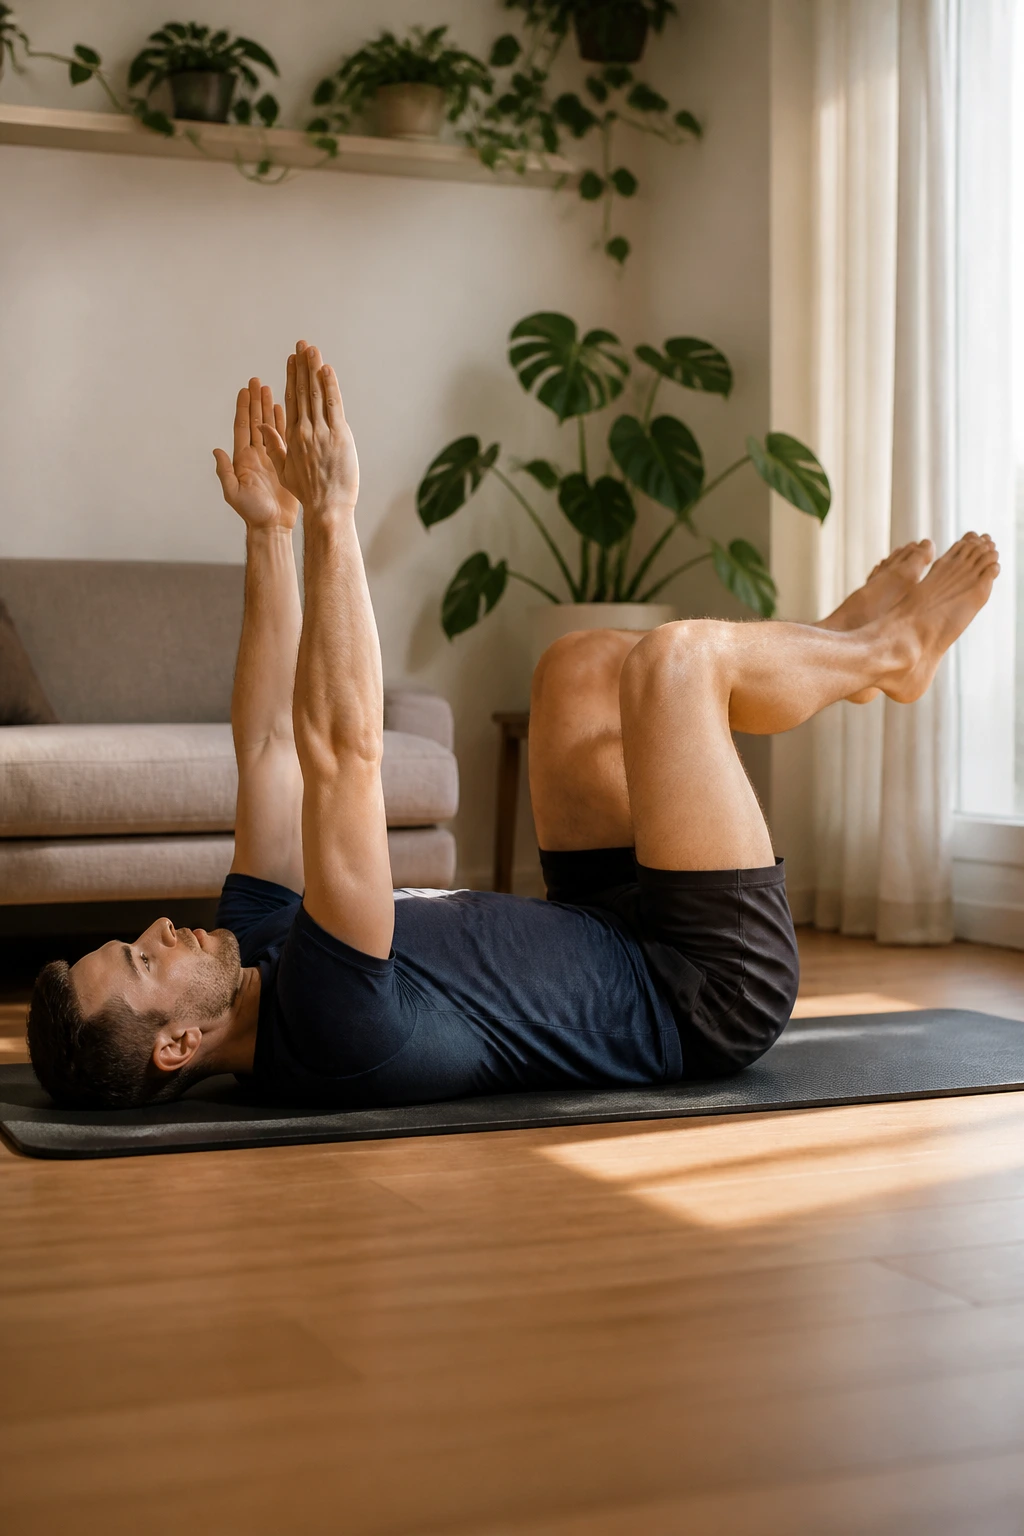
A strong core isn’t about six-pack abs; it’s about the ability to brace your spine against external forces. If you can’t stabilize your trunk, you can’t transfer power from your legs to your arms.
The Dead Bug
Lie on your back, arms extended toward the ceiling, knees bent at 90 degrees in the air. Press your lower back firmly into the floor. Lower your right arm and left leg simultaneously, hovering them just above the ground. Return to center and switch sides.
The key is keeping the lower back glued to the floor. If your back arches, stop. The moment your spine disconnects from the floor, you’ve lost the core engagement. This is a deliberate, slow movement. Moving fast here is a cheat code that lets momentum do the work your abs should be doing.
9. The Wrist and Forearm Health Circuit
We ignore our wrists until they hurt from overuse. If you plan on doing push-ups, planks, or holding weights, your wrists need to be able to handle extension.
The Wrist Stretch
Get on your hands and knees. Turn your hands so your fingers point back toward your knees. Slowly rock your hips backward. You should feel a stretch through your forearms. Hold for 30 seconds. Then, flip your hands over so the backs of your hands are on the floor, fingers still pointing toward your knees. Gently press down.
These movements are essential for anyone who spends their day typing. Follow this with “wrist circles” for two minutes, clenching and unclenching your fists to flush blood into the forearm muscles. Healthy wrists make for a stronger grip and a more stable upper body.
10. The Deep Squat Progression
The squat is a human resting position. If you can’t sit in a deep squat for more than a minute, you have lost a functional range of motion that you had when you were a toddler.
The Assisted Deep Squat
Find a door frame or a sturdy pole. Grab onto it and sink into a squat. The support allows you to sit back into your heels rather than falling forward. Once you are down there, spend time wiggling around—shift weight from left to right, open your hips by pushing your knees out with your elbows.
This is the ultimate hip opener. Don’t worry about keeping your heels down initially; they will come down as your ankle mobility improves. Aim to accumulate five minutes in this position throughout the day. It sounds long, but break it up into one-minute chunks. Your hips will thank you.
11. The Single-Leg Balance Challenge
Balance is the primary predictor of longevity. If you cannot stand on one leg for 30 seconds with your eyes closed, your proprioception—your body’s ability to sense where it is in space—needs work.
The Flamingo Hold
Stand on one leg, lifting the other foot behind you. Close your eyes. Try to hold for 30 seconds. Your ankle will wiggle, your brain will scramble to adjust, and you will feel fatigued. That is exactly the point.
This is a neurological workout, not just a physical one. If you want to make it harder, try doing it on a slightly uneven surface, like a thick carpet or a folded towel. This forces the small stabilizer muscles in your foot and ankle to engage in ways they never do on flat, hard ground.
12. The Overhead Reach Sequence
Most people think of shoulders as just the deltoids. But overhead mobility is about the lats, the serratus, and the thoracic spine working in harmony.
The Overhead Wall Reach
Stand facing a wall, hands resting on it at chest height. Step back into a hinge position, so your torso is parallel to the ground and your arms are extended overhead against the wall. Think about “hiding” your ears behind your biceps.
Push your hands into the wall and sink your chest toward the floor. This is a tremendous stretch for the lats, which are the widest muscles in your back and often the primary culprit for limited overhead range. Hold this for 45 seconds. You’ll feel a huge difference in your ability to reach overhead immediately afterward.
13. The Glute Activation Suite
Your glutes are the biggest muscles in your body, yet they are often the most inactive because of chair-sitting. You need to “switch them on” before you ask them to lift anything heavy.
The Fire Hydrant to Kick-Back
On all fours, lift your knee out to the side like a dog at a fire hydrant. Don’t rotate your whole body; keep your hips square to the floor. From the top position, extend your leg straight back, squeezing your glute as hard as you can.
Perform fifteen reps per side. This is an isolation movement for the glute medius and maximus. It’s not flashy, but it’s foundational. If you feel this in your lower back, you are lifting your leg too high. Focus on the contraction in the butt cheek, not the height of the leg.
14. The Scapular Control Series
The scapulae (shoulder blades) should glide smoothly over your ribcage. If they are “winged” or locked, you will have shoulder pain. This movement teaches you how to control them.
The Scapular Push-Up
Get into a standard push-up position. Keep your arms perfectly straight—do not bend your elbows. Squeeze your shoulder blades together as if you are trying to crush a walnut between them. Then, push the floor away, rounding your upper back and spreading your shoulder blades apart.
This is a tiny movement. It’s not a full push-up. It’s about learning to dissociate the movement of your shoulder blades from the movement of your elbows. Three sets of fifteen will tire out the muscles surrounding your shoulder blades, which are crucial for stable pushing and pulling mechanics.
15. The Full-Body Crawl Complex
Crawling is a primitive pattern that integrates the left side of your brain with the right side of your body. It is the ultimate test of coordination and total-body tension.
The Bear Crawl
Get on your hands and knees. Lift your knees two inches off the floor. Keep your back flat. Move your opposite hand and opposite leg forward at the same time. Keep your hips at the same height as your shoulders—don’t let your butt pike up in the air.
Do this for 30 seconds. You will feel this in your quads, your core, and your shoulders. It is deceptively difficult. The slow, controlled nature of the crawl makes it an incredible mobility-strength hybrid. It forces you to maintain stability while moving limbs independently.
16. The Rotational Power Flow
Rotational power is what allows us to throw, swing a racket, or even just turn around quickly without tweaking a muscle. This routine introduces a bit of dynamic movement.
The Rotational Lunge
Step back into a reverse lunge. As you sink into the lunge, rotate your torso toward the front leg. Keep your hips stable; the rotation should come from your ribcage.
This is a complex movement. If you lose your balance, shorten your lunge. The focus is on decoupling the hips (which stay forward) from the torso (which rotates). This is excellent for spine health and teaches you how to brace your core while your body is twisting.
17. The Pelvic Floor and Core Integration
Many people have strong abs but weak pelvic floors, leading to hip instability or back pain. This routine bridges the gap between deep core and the pelvic region.
The Bridge March
Lie on your back, knees bent, feet flat. Lift your hips into a bridge, squeezing your glutes. While holding this position, lift one foot off the floor, bringing your knee toward your chest. Lower it and switch.
Keep your hips perfectly level. They shouldn’t drop when you lift a foot. This is an anti-rotation movement. It forces your pelvic floor, deep abs, and glutes to fire in unison to prevent your pelvis from twisting. It’s slow, deliberate, and tough.
18. The Hamstring Lengthening Session
Tight hamstrings are rarely just “tight muscles”—often, they are chronically tight because they are weak and stuck in a protective, lengthened position.
The Inchworm
Stand tall. Reach for your toes. Once your hands touch the floor, walk them out until you are in a high plank. Pause, then walk your feet toward your hands, keeping your knees as straight as possible.
This combines a dynamic stretch for the hamstrings with a static hold for the core. Do not bounce. Use your muscles to pull yourself into the stretch. Walk back and forth for three minutes. You will feel the tension in the back of your legs melt away as you get warmer.
19. The Neck and Upper Trap Release
If you carry your stress in your shoulders, this section is for you. Most neck pain stems from tight traps and a weak deep neck flexor system.
The Chin Tuck and Tilt
Sit upright. Pull your chin straight back, giving yourself a double chin. Hold for three seconds. Then, slowly tilt your head toward your shoulder, aiming to get your ear to touch your shoulder without lifting the shoulder.
This is not a violent stretch. It is a controlled lengthening. Perform this slowly. The muscles of the neck are small and sensitive; they respond better to consistent, gentle tension than to forceful pulling. Do this for a few minutes while you are watching something or taking a break.
20. The Foot and Arch Strengthening Plan
Your feet are your only point of contact with the ground. If your arches collapse, your knees roll inward, and your hips tilt. It’s a chain reaction.
The Towel Scrunches
Sit in a chair with a hand towel on the floor. Use your toes to scrunch the towel toward you. Then, push it away. This strengthens the small intrinsic muscles of the foot.
Follow this with “toe spreads”—try to spread your toes as wide as possible. It sounds easy, but most people can’t do it. This builds the foundation for your balance. Strong feet provide a stable platform for every single exercise you do.
21. The Mid-Back Posture Fix
The rhomboids and middle traps are responsible for keeping your shoulders back. When these muscles are weak, you get that “hunched over” look.
The Prone Cobra
Lie face down on the floor. Reach your arms out to the sides in a ‘T’ shape. Lift your chest and arms off the floor, squeezing your shoulder blades together. Keep your gaze toward the floor to protect your neck.
Hold for 10 seconds. Relax. Repeat 10 times. This is purely for postural endurance. You are training these muscles to hold your shoulders back for the entire day. By the end of the 10th rep, you should feel a deep fatigue in the center of your back.
22. The Explosive Hip Extension Set
Mobility is useless if you don’t have the strength to use it. This exercise teaches you how to use your glutes to create power.
The Kettlebell Swing (or Backpack Swing)
Stand with feet hip-width apart. Hinge at the hips—do not squat. Swing a weight (or a heavy bag) between your legs using the momentum generated by your hips, not your arms. Snap your hips forward at the top.
The movement is a “snap,” not a lift. Your arms are just ropes; they guide the weight. Your glutes and hamstrings do 100% of the work. If your arms are sore, you are doing it wrong. Focus on the glute squeeze. This is the best movement for building a fast, powerful posterior chain.
23. The Unilateral Strength & Stability Mix
Unilateral training (training one side at a time) is the ultimate diagnostic tool. It shows you exactly where your imbalances are.
The Split Squat
Take a long step back. Keep your torso upright—don’t lean forward. Sink your back knee toward the floor. The weight should be evenly distributed between both legs.
Do not let your front knee collapse inward. This is a common flaw. Your knee should track over your middle toe. By working one leg at a time, you eliminate the ability of your dominant leg to “carry” the weaker one. It’s a leveling process. If you can do 15 reps per side, you have a solid foundation of leg strength.
24. The Inversion/Crab Mobility Series
Moving on the floor in an inverted position is a great way to open up the chest and wrists. It’s also incredibly fun and forces you to move differently than you do in everyday life.
The Crab Walk Reach
Sit on the floor, hands behind you, fingers pointing away from you. Lift your hips into a bridge (the “crab” position). Lift one hand and reach across your body to touch the floor behind you.
This is a full-body movement. You are stretching your pecs, mobilizing your wrists, and activating your shoulders and glutes simultaneously. Don’t worry about speed. Focus on the range of motion. If this feels too intense for your wrists, just hold the crab bridge and breathe.
25. The Total Body Nervous System Reset
After all that work, your nervous system needs to settle down. This is not a stretch—it’s a recovery protocol.
The Legs-Up-the-Wall
Lie on your back, scoot your hips as close to a wall as possible, and rest your legs vertically against it. Arms out to your sides, palms up. Close your eyes.
Stay here for five to ten minutes. This position uses gravity to help drain fluid from your legs and gently realigns your pelvis. It is the perfect end to any mobility or strength routine. It tells your body that the work is done and it’s time to recover. Don’t check your phone. Just breathe and let your nervous system come back to equilibrium.
Final Thoughts
You don’t need a gym membership or a rack of expensive weights to build a resilient, capable body. Strength is not just about how much you can lift; it’s about your ability to control your body through space. By practicing these mobility-strength routines regularly, you are investing in the long-term health of your joints, your spine, and your posture.
Consistency matters more than intensity here. Five minutes every day is far better than an hour once a week. Start where you are, listen to your body’s signals, and don’t rush the process. Your body will reward that patience with a renewed sense of ease and capability.
