



By the time you reach the third trimester, your body is effectively a high-performance athlete carrying a load that changes daily. Your center of gravity has shifted forward, your ligaments are softening under the influence of relaxin, and your lower back is working overtime to compensate for the weight of your growing baby. It is not just about the bump; it is the ripple effect through your pelvis, your hips, and your entire spinal column that creates that familiar, aching fatigue. You might notice the “waddle” starting to set in or that specific burning sensation right at the base of your spine after standing for more than ten minutes.
This is not a time for intense powerlifting or complex gymnastics, but movement—specifically targeted, gentle movement—is often the only thing that offers real relief. When you stretch, you are not just trying to fix a muscle knot; you are creating space. You are giving your pelvis room to align, your diaphragm a chance to expand fully, and your nervous system a signal that it is okay to let go of that chronic tension. These movements are designed to be accessible, safe for your baby, and effective enough to actually change how you feel by the end of the day.
Consistency matters more than intensity here. You do not need an hour of dedicated time to get results. A few minutes scattered throughout your day, perhaps while waiting for the kettle to boil or during a work break, can be far more beneficial than a single, strenuous session that leaves you feeling more exhausted. Listen to your body, move with intention, and focus on the sensation of lengthening rather than forcing a stretch.
1. Cat-Cow Stretch
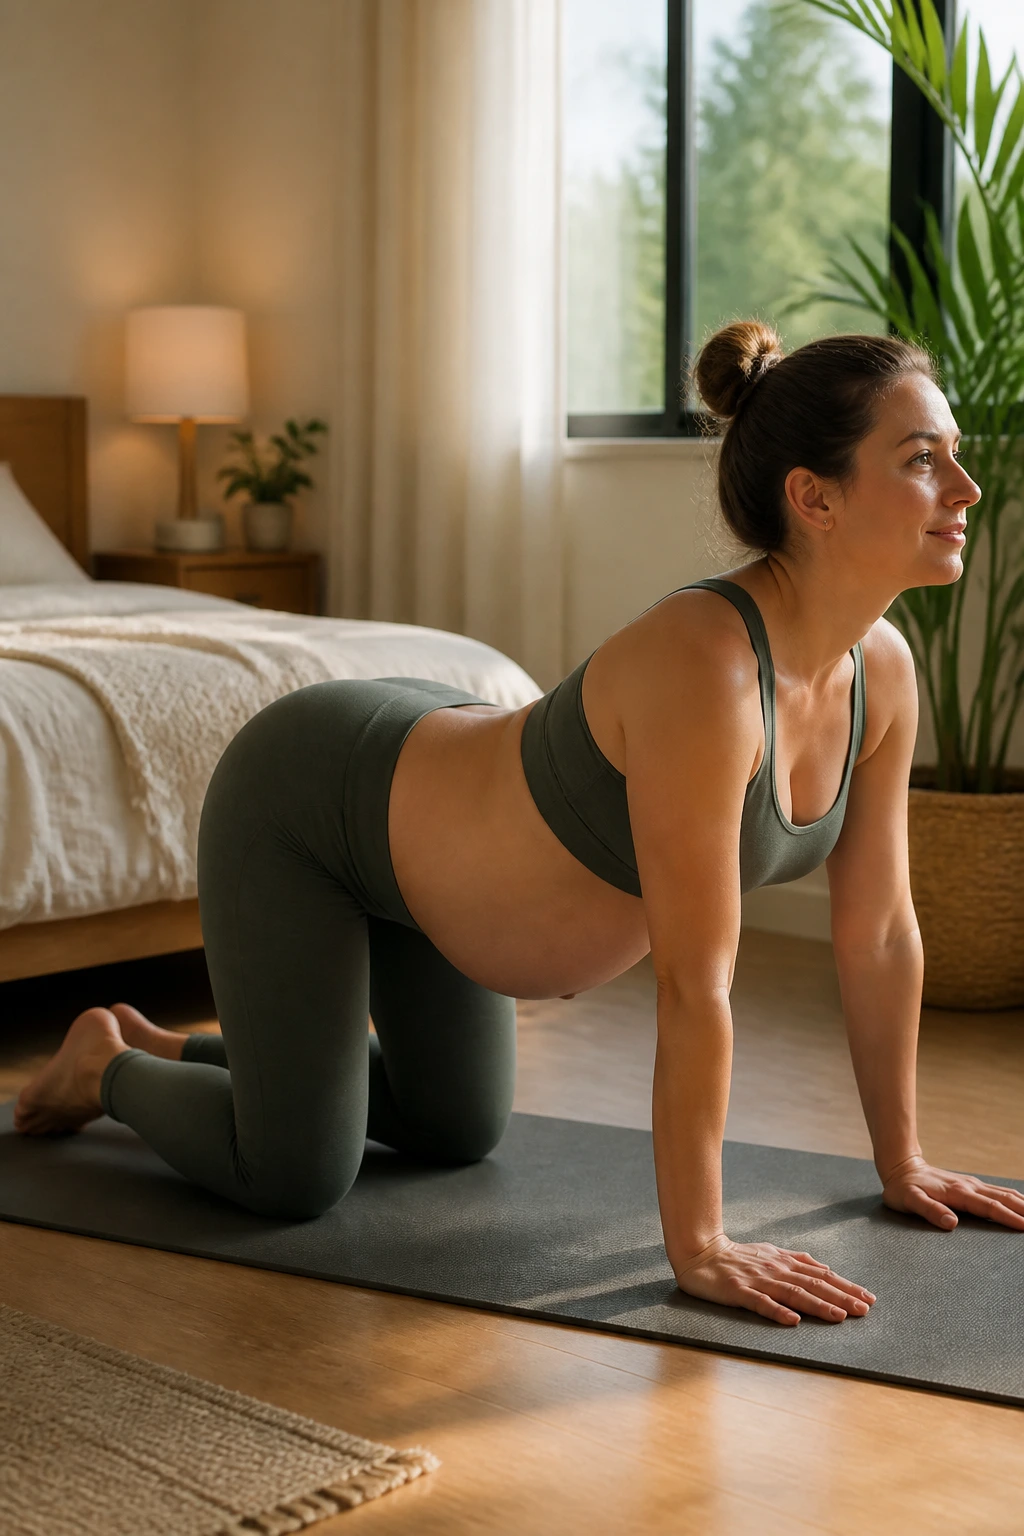
This is the gold standard for prenatal back relief. It gently articulates the spine, encourages the baby to move into an optimal position, and releases tension in the lower back and shoulders. You are essentially doing a rhythmic, synchronized dance with your breath.
How to Perform It Safely
Start on your hands and knees in a tabletop position. Make sure your hands are directly under your shoulders and your knees are hip-width apart. As you inhale, drop your belly toward the floor, lift your chest, and look forward—this is the cow pose. As you exhale, tuck your chin toward your chest, round your back toward the ceiling, and pull your belly button in gently—this is the cat pose. Move slowly and focus on the wave-like motion of your spine.
Why It Works for the Third Trimester
- It relieves the pressure of the uterus on the spine.
- It helps move the pelvis through its full range of motion.
- It encourages better spinal alignment after sitting for long periods.
Pro tip: Do not push your belly down toward the floor too aggressively; focus on the lifting sensation in the chest and the rounding of the upper back.
2. Modified Child’s Pose
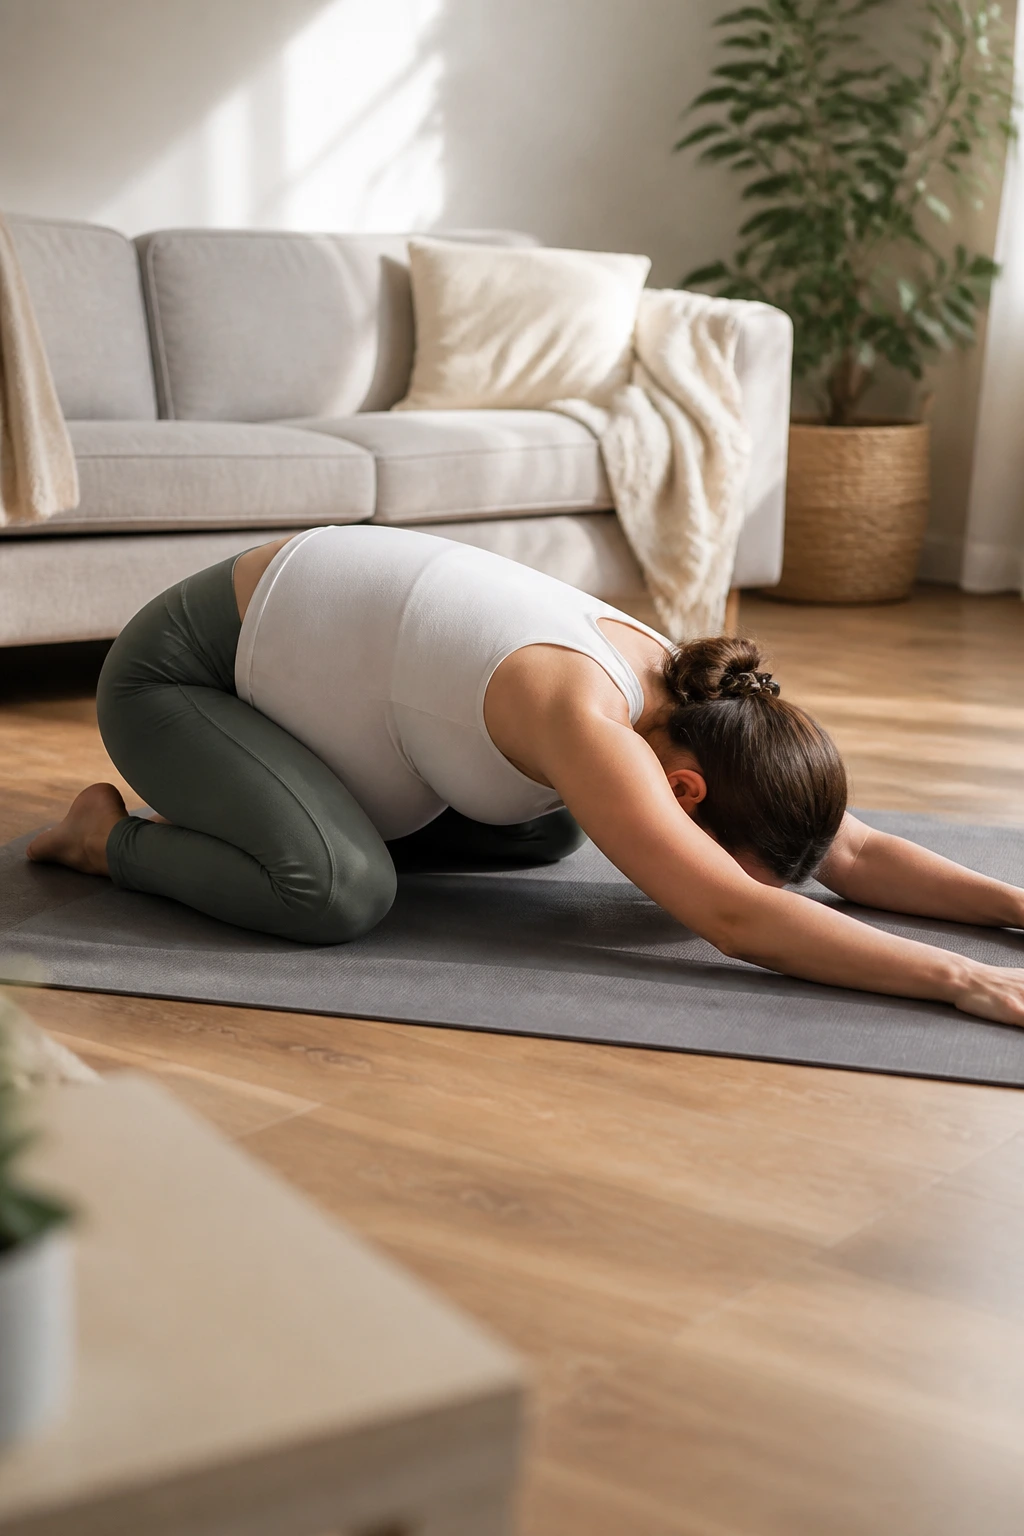
Traditional child’s pose can feel restrictive when you are further along in your pregnancy because your belly gets in the way. By modifying it, you get all the benefits of the shoulder and lower back release without the discomfort of compressing your abdomen.
Creating the Space
Kneel on the floor or a yoga mat. Instead of bringing your knees together, take them as wide as they need to be to accommodate your belly. Your big toes should still touch behind you. Lean forward, resting your forehead on your hands, a block, or a folded blanket. Reach your arms forward on the floor if your shoulders feel tight, or let them rest by your sides.
Benefits of the Wide-Knee Stance
This wider stance is crucial. It creates a dedicated pocket of space for your baby, allowing you to fold forward without restriction. As you sink your hips back toward your heels, you will feel a deep, gentle lengthening in your lumbar spine—exactly where that third-trimester ache tends to concentrate. Breathe deeply into your back ribs, imagining the space between each vertebrae expanding with every inhale.
3. Standing Wall Chest Stretch
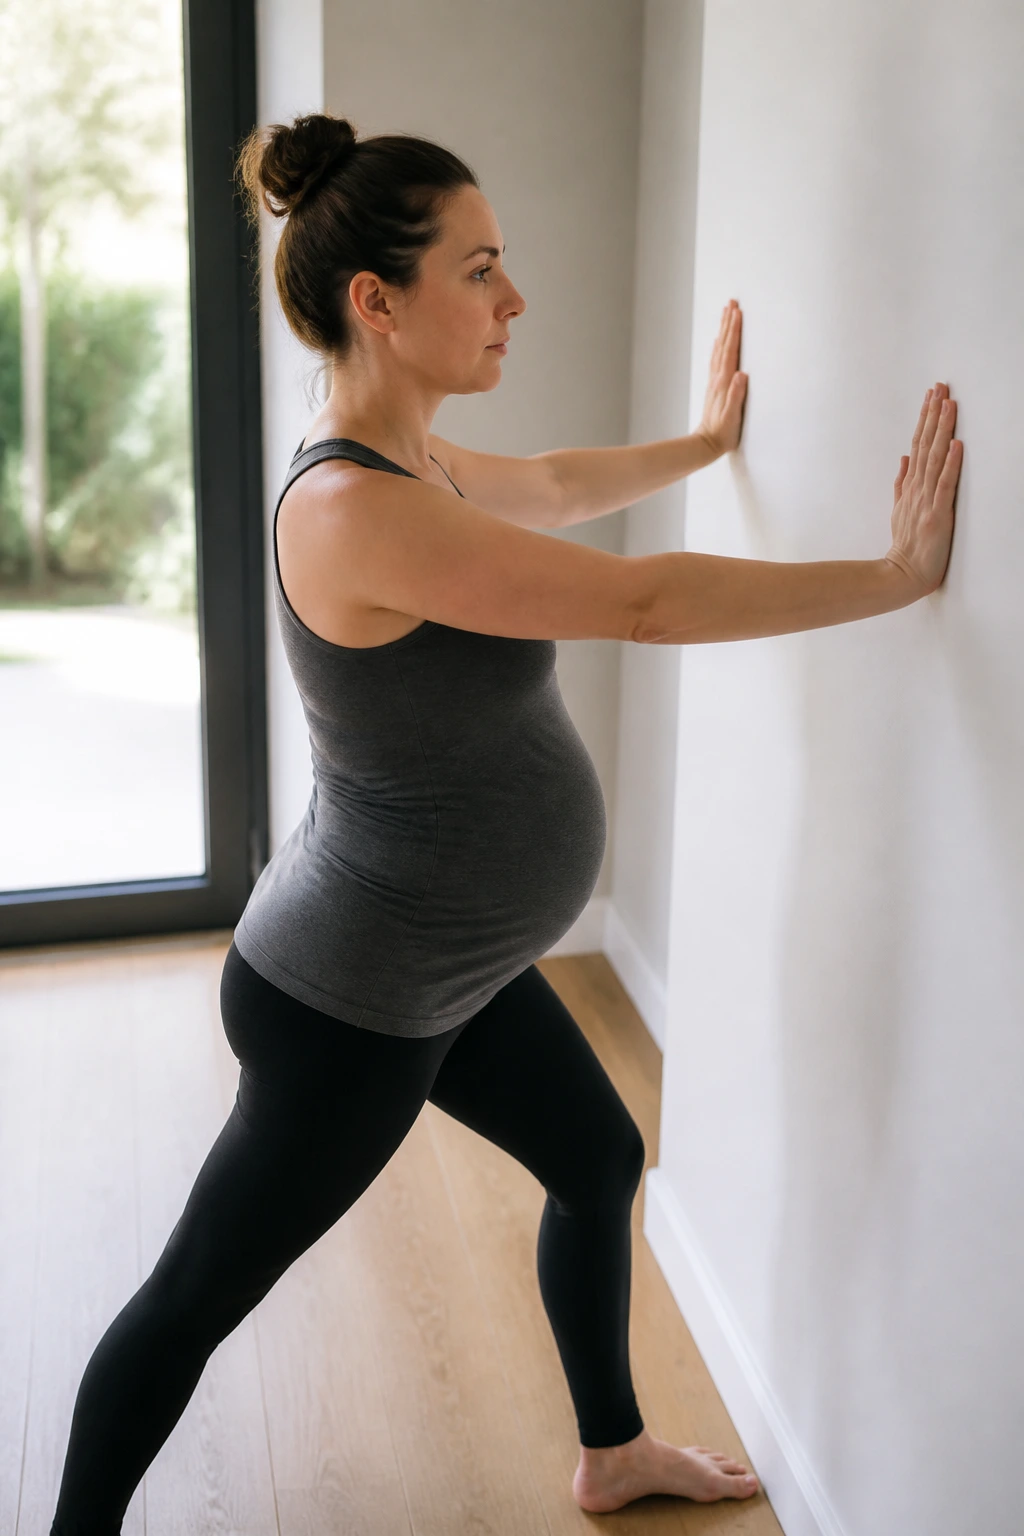
While your focus is often on your lower back, the upper back and chest play a huge role in your posture. As your breasts grow and your shoulders round forward to compensate for your belly, your upper back muscles become overstretched and weak, while your chest muscles tighten.
The Mechanism of Relief
Stand facing a corner or a door frame. Place your forearms on the wall or frame, creating a ninety-degree angle with your elbows at shoulder height. Step one foot slightly forward and lean into the opening, keeping your spine neutral. You are not trying to push your chest through the wall; you are simply allowing gravity and the wall to open up the pectorals.
Why This Matters for Back Pain
Tight chest muscles pull your shoulders forward, forcing your upper back to round. This postural change forces your lower back to overcompensate by arching even more. By opening the front of your body, you allow your shoulders to slide back into their natural, neutral position, which takes a significant load off your mid-back muscles.
4. Standing Pelvic Tilts

You do not need to be on the floor to get the benefits of pelvic health exercises. Standing pelvic tilts are perfect for when you are stuck in the kitchen or standing at a counter. They help mobilize the sacrum and reduce the “locked” feeling that often happens after standing for too long.
The Execution
Stand with your feet hip-width apart, knees slightly soft—never lock your knees during pregnancy, as your ligaments are more prone to hyperextension. Place your hands on your hips. Gently tuck your tailbone under as if you are trying to flatten your lower back against an imaginary wall behind you, then gently release and tilt your tailbone slightly back.
The Goal
The movement is subtle, almost invisible to an observer. You are focusing on the small, isolated rocking of your pelvis. This prevents the lower back from staying in a constant, tight, arched position. If you feel a mild release in the sacral area, you are doing it perfectly.
5. Seated Butterfly Stretch
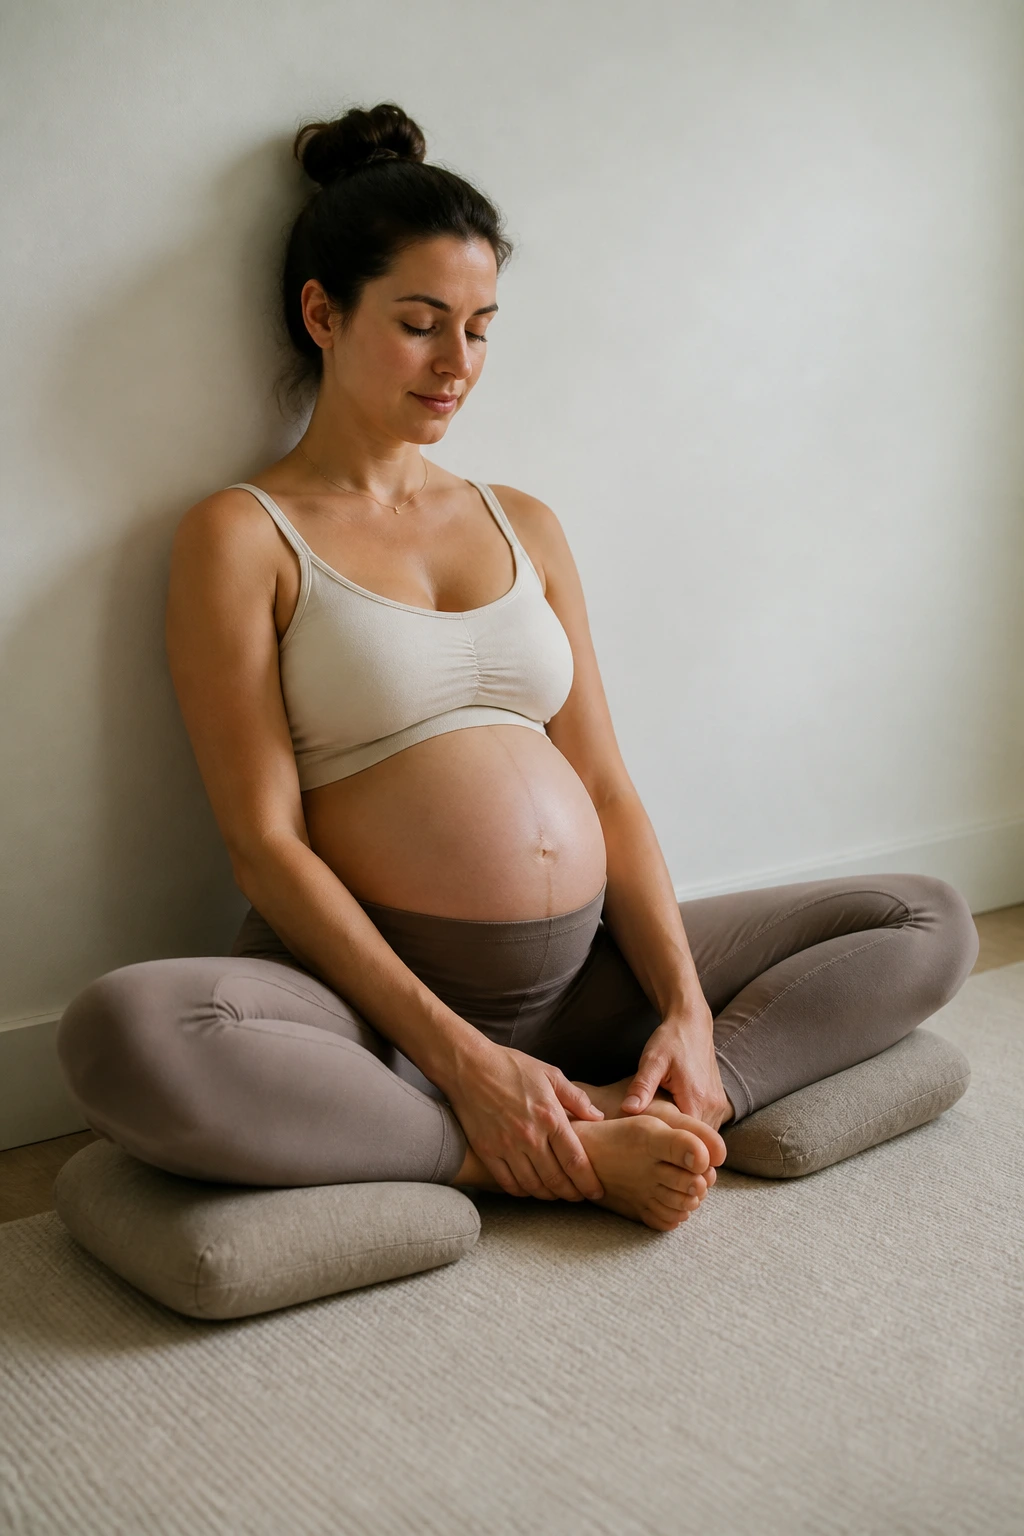
The inner thighs (adductors) and the pelvic floor are interconnected. When your hips are tight, your pelvic floor can hold onto that tension, radiating pain into the lower back and groin. The butterfly stretch is a classic, but how you do it matters.
Adjusting for Comfort
Sit on the floor with your back against a wall for support. Bring the soles of your feet together and let your knees fall gently toward the sides. If your knees are high off the ground, place a cushion or a block under each knee. Do not force them down.
Why This Helps the Third Trimester
Gravity is working against you during these months, and your pelvic floor muscles are carrying extra weight. By gently opening the hips, you help release the muscles that connect to the pelvis. Sitting against a wall ensures that you are not hunching over, which protects your lower back while you focus on opening your hips.
6. Prenatal Hip Circles
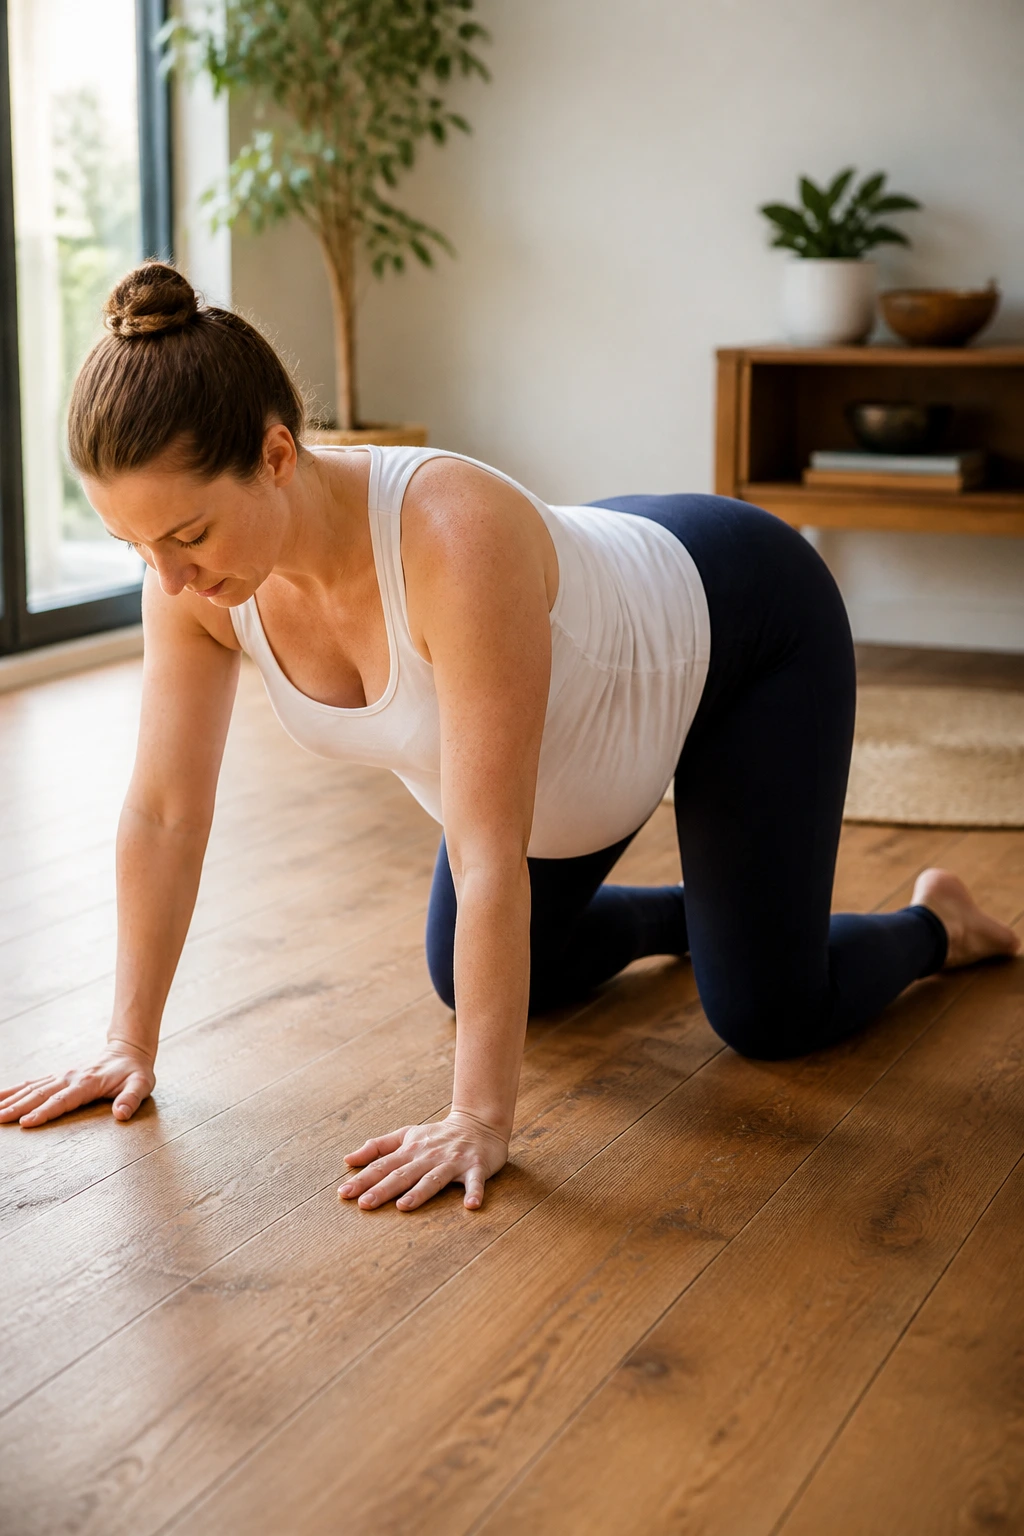
Static stretching is great, but circular, dynamic movement is often better for freeing up a stiff pelvic girdle. Hip circles are a favorite among childbirth educators because they encourage optimal fetal positioning while lubricating the hip joints.
How to Move
Return to your tabletop position on all fours. Ensure your weight is distributed evenly between your hands and knees. Instead of moving your spine, focus entirely on your hips. Start making slow, fluid circles with your pelvis—imagine you are drawing a circle on the floor with your tailbone.
Exploring the Range
Do five circles in one direction, then switch. Feel the shift of weight from one hip to the other. This movement helps relieve the pressure on the sacroiliac (SI) joints, which are common culprits for low back pain. If you find a “sticky” spot where it feels particularly tight, pause and gently sway back and forth in that range for a few seconds before continuing the circle.
7. Thread the Needle (Modified)
Shoulder and upper back tension can be just as debilitating as lower back pain. Thread the needle is an elegant way to rotate the thoracic spine—the middle part of your back—which often gets “stuck” when you are trying to stay upright.
The Modification
In your tabletop position, take your right hand and slide it under your left arm, reaching as far as you can while allowing your right shoulder and ear to gently rest on the floor. Keep your hips high and level. This is a rotation exercise, not a compression exercise.
Why Your Upper Back Needs This
In the third trimester, your ribcage expands and your thoracic spine stiffens. By rotating this section of the spine, you are breaking up that stiffness. This rotation allows you to breathe more deeply, which in turn reduces the need for your neck and trap muscles to “breathe” for you, preventing that common, tight-neck headache and back strain.
8. Bird-Dog (Modified for Stability)
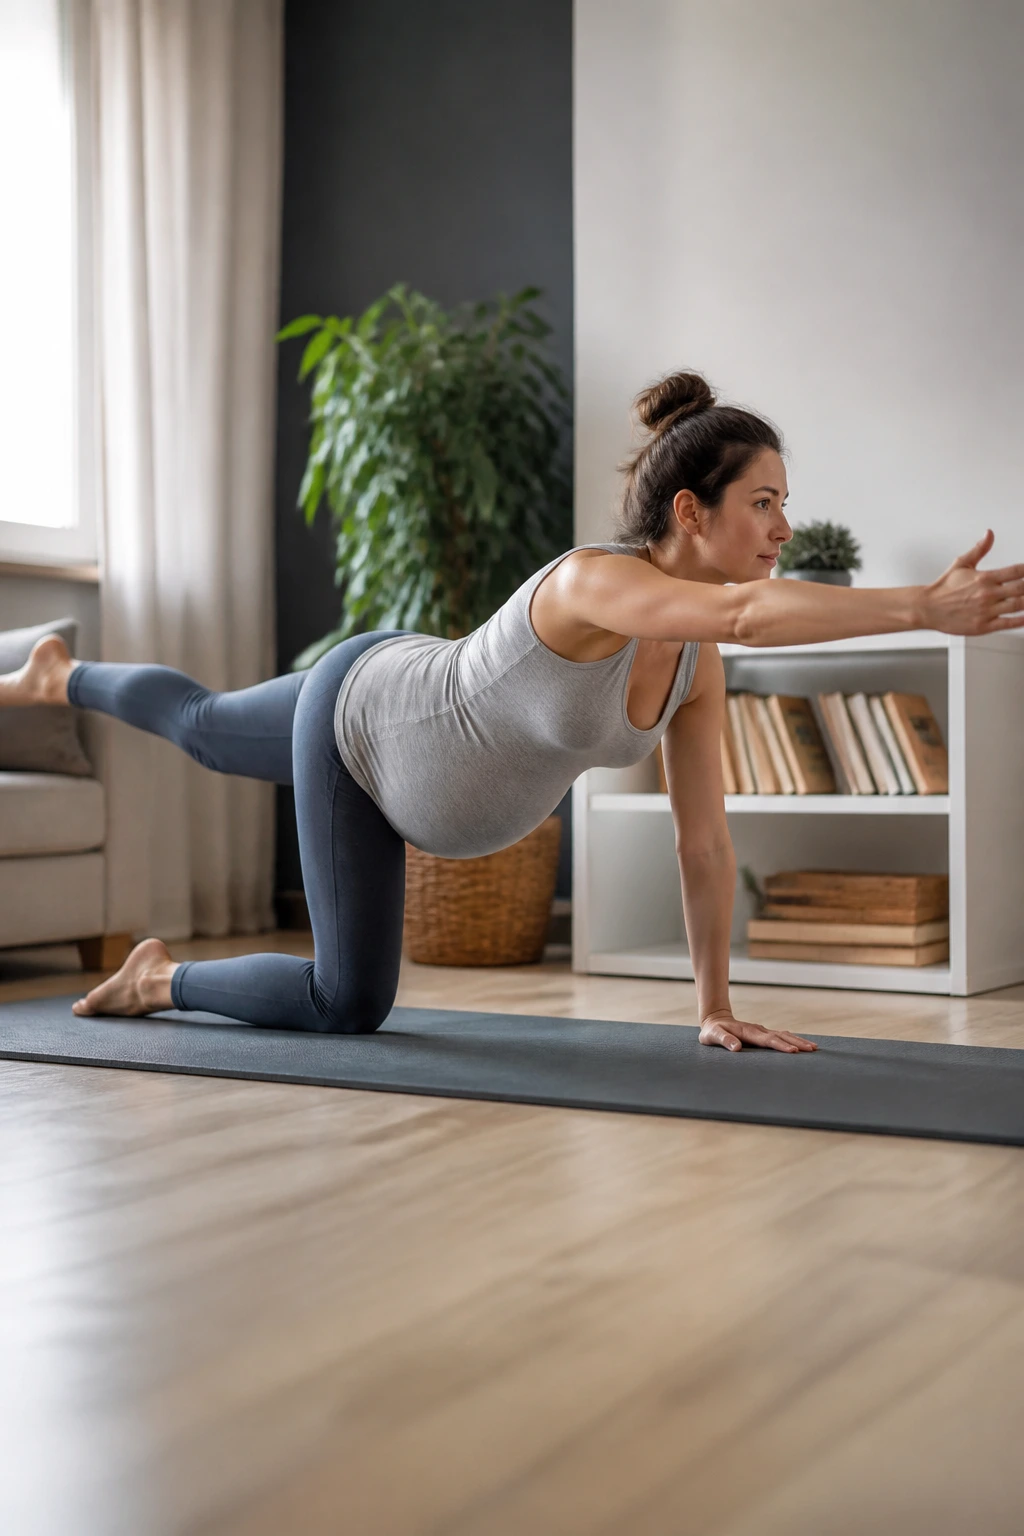
Core stability is still important in the third trimester, but you must be careful. Traditional crunches are out, but stability work is in. The bird-dog exercise trains the deep muscles of your back to support your spine while your limbs move.
Keeping It Safe
Start on all fours. Extend your right arm forward and your left leg back, just a few inches off the floor. You do not need to lift them high; the goal is to keep your back perfectly flat, like a tabletop. If you feel your lower back arching, reduce the range of motion.
The Focus
This is about control, not height. By keeping your spine steady against the movement of your limbs, you are engaging your transverse abdominis—your body’s natural corset. Strengthening these deep stabilizing muscles is one of the most effective ways to manage chronic lower back pain during pregnancy.
9. Seated Piriformis Stretch
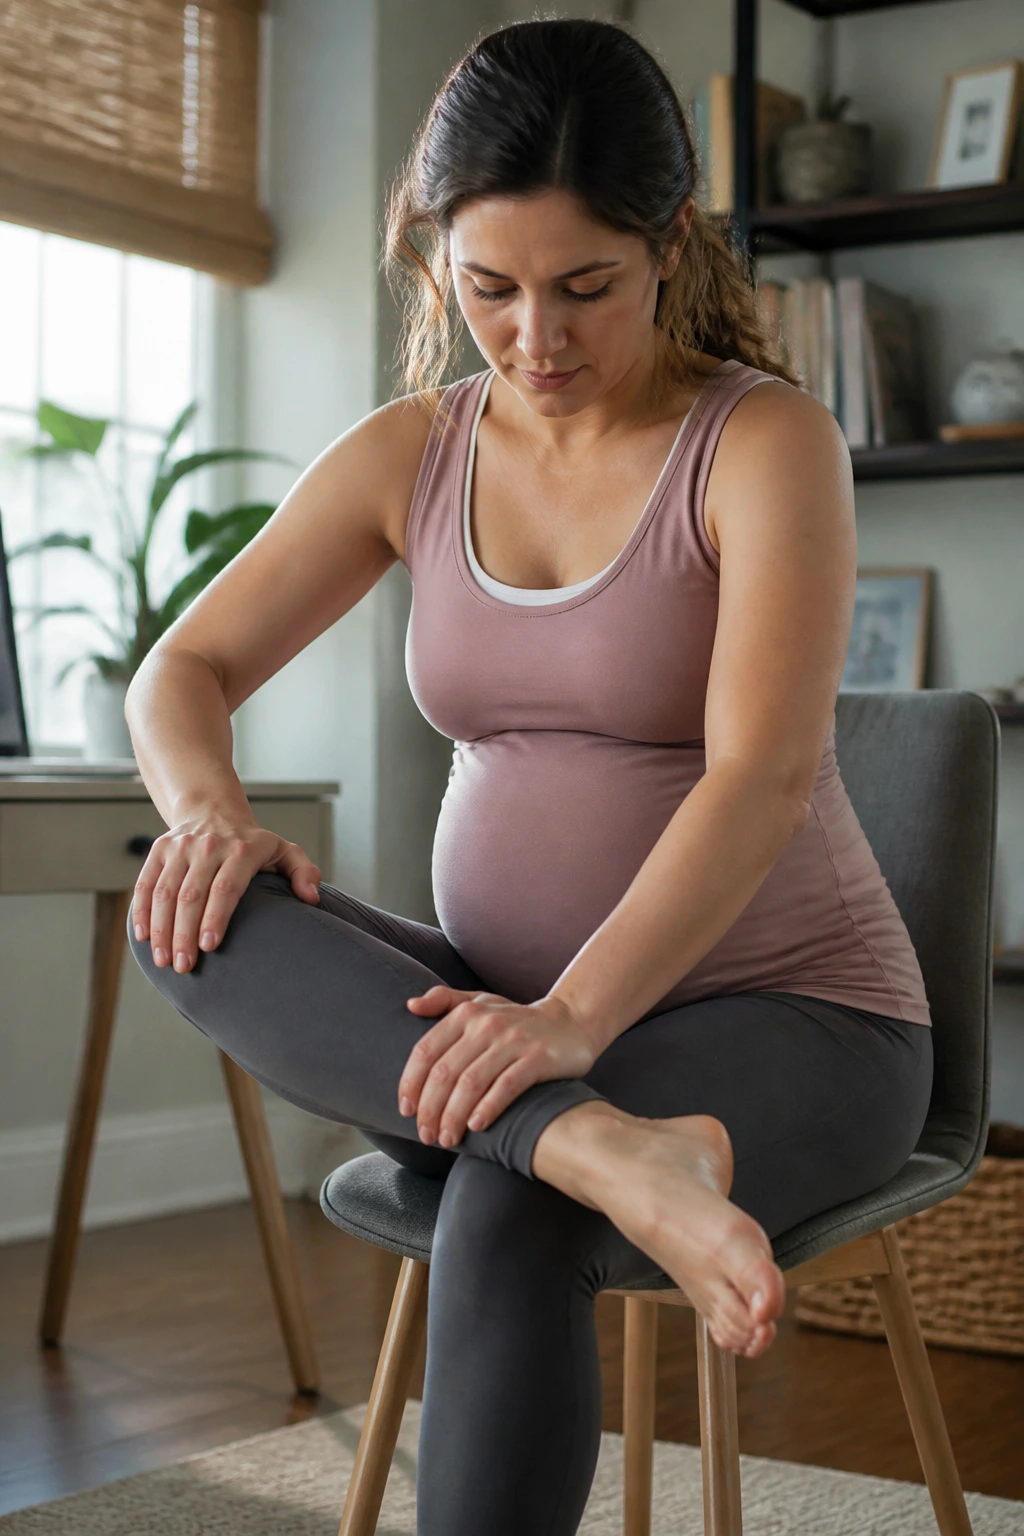
The piriformis is a small muscle deep in your glutes. When it gets tight, it can compress the sciatic nerve, leading to that sharp, radiating pain that travels down the back of your leg. A seated stretch is safe, effective, and easy to do at your desk or on the couch.
The Technique
Sit on the edge of a sturdy chair with your feet flat on the floor. Cross your right ankle over your left knee. Keeping your spine long, gently hinge forward at your hips—do not round your back. You should feel a stretch deep in your right glute.
Why This Is Effective
Because you are sitting, you are stable. You aren’t worried about losing your balance, which means you can focus entirely on the release in the gluteal muscle. If you feel a sharp, pinching pain, back out of the stretch slightly. You want to feel a dull, pulling sensation—that is the muscle beginning to release its grip on the nerve.
10. Neck and Shoulder Rolls

It sounds simple, but you would be surprised how much back pain is actually referred pain from a tight neck and shoulders. When your shoulders creep up toward your ears, your back muscles have to work harder to hold your head up.
The Motion
Sit comfortably in a chair or on the floor. Inhale and lift your shoulders up toward your ears. Exhale and roll them down and back, opening your chest. Repeat this five times. Then, slowly drop your chin to your chest and gently roll your ear toward your right shoulder, hold, then switch to the left.
Consistency is Key
Do these throughout the day. If you spend time on a computer or scrolling on your phone, you are likely holding tension in your traps. Releasing this tension prevents it from cascading down your spine, often alleviating mid-back tightness that people mistake for purely “back pain.”
11. Wide-Legged Forward Fold (Supportive)
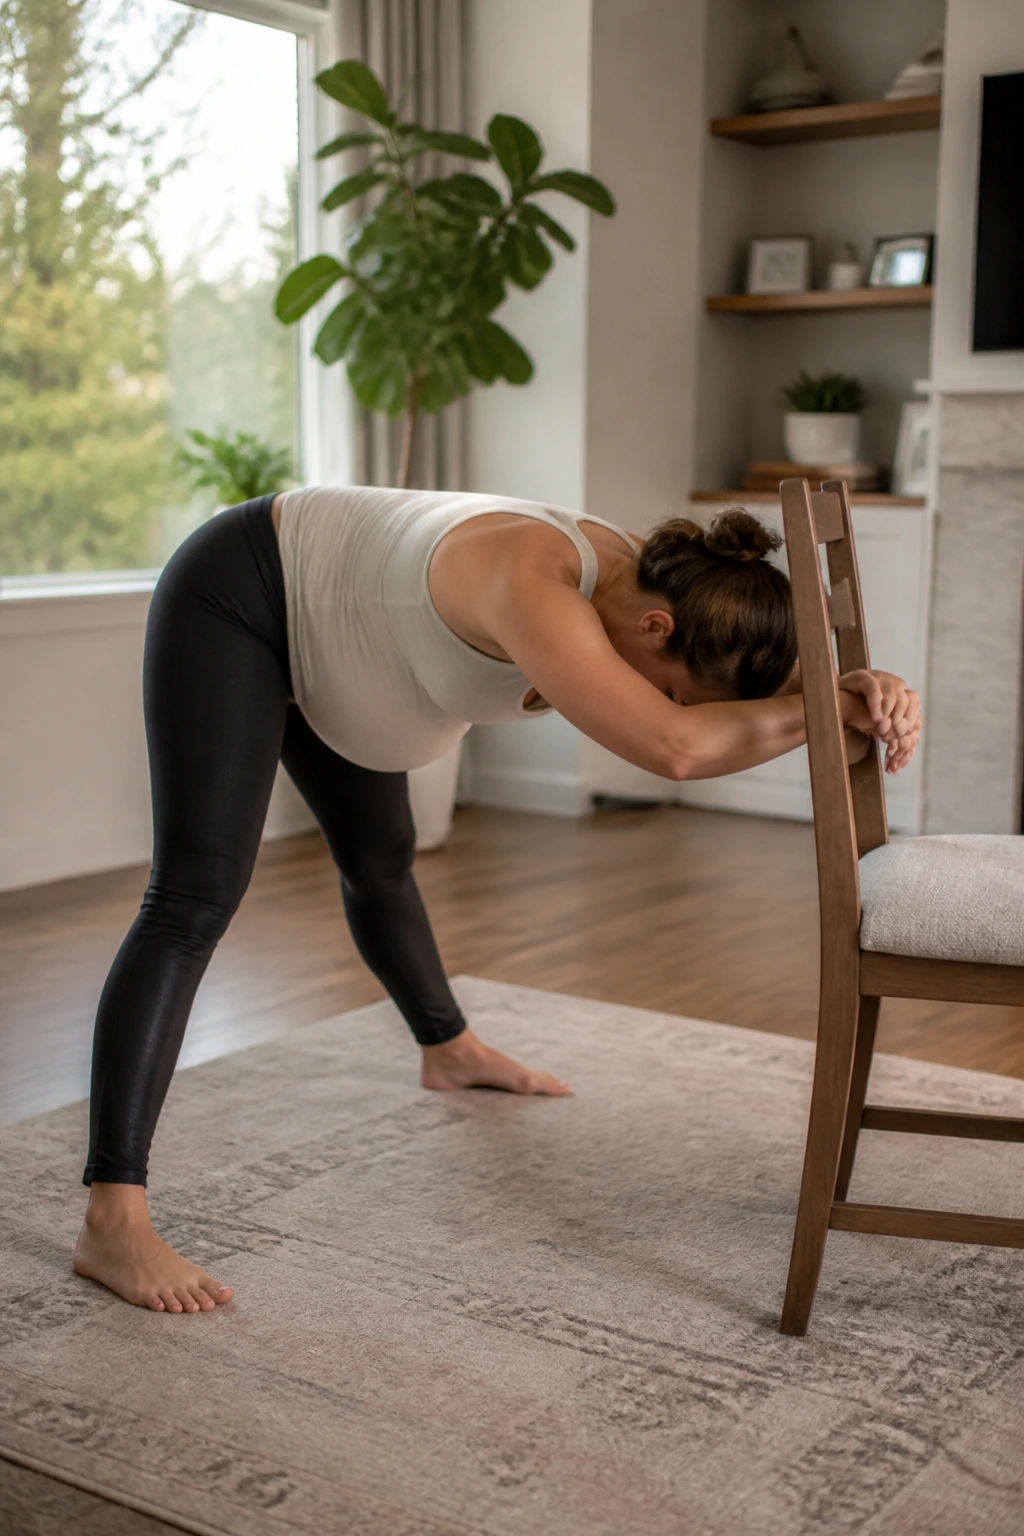
A standing forward fold can be tricky due to the belly and dizziness, but a supported wide-legged fold is a fantastic way to lengthen the entire posterior chain—the back of your body from heels to neck.
Using Props
Stand with your legs wider than hip-width. Place a sturdy chair or a stack of books in front of you. Fold forward at the hips, keeping your knees slightly bent. Rest your forearms or hands on the prop. The goal is to allow your head to hang heavy and your spine to lengthen toward the floor.
Understanding the Release
The decompression this provides for the lumbar spine is significant. By using the prop, you remove the strain of having to hold your upper body weight against gravity, allowing your back muscles to simply relax into the stretch. It is a passive release that feels incredibly restorative after a long day of walking.
12. Gate Pose (Modified)
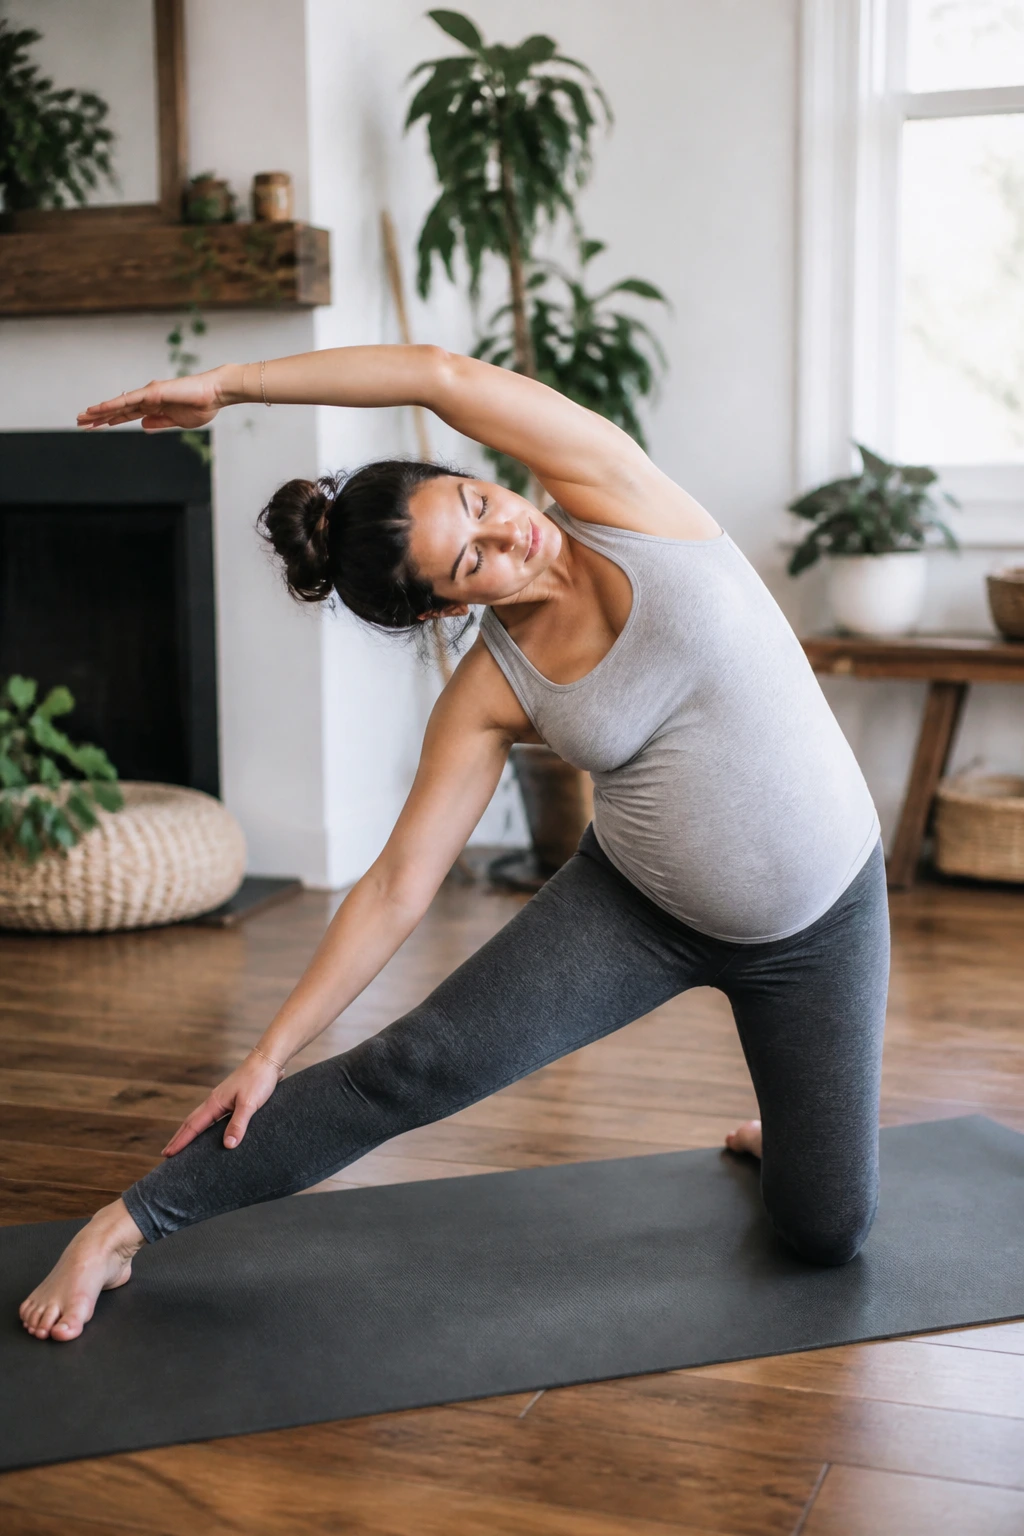
Gate pose provides a lovely stretch for the obliques and the side body. In the third trimester, your ribs are expanding, and the muscles between your ribs (intercostals) can become very tight, pulling on your back.
The Stretch
Kneel on the floor with your left knee down and extend your right leg out to the side. Reach your right arm up and over toward your right foot, feeling the stretch along the left side of your waist. Keep your chest open. If this feels unstable, stay in a seated cross-legged position and perform the side bend instead.
Why It Helps
Opening the side body creates room for your lungs to expand. When you can breathe better, you hold less tension in your back muscles. Furthermore, the obliques support your lower back. By gently stretching and waking up these muscles, you help them remain functional and less prone to cramping.
13. Wall-Supported Downward-Facing Dog
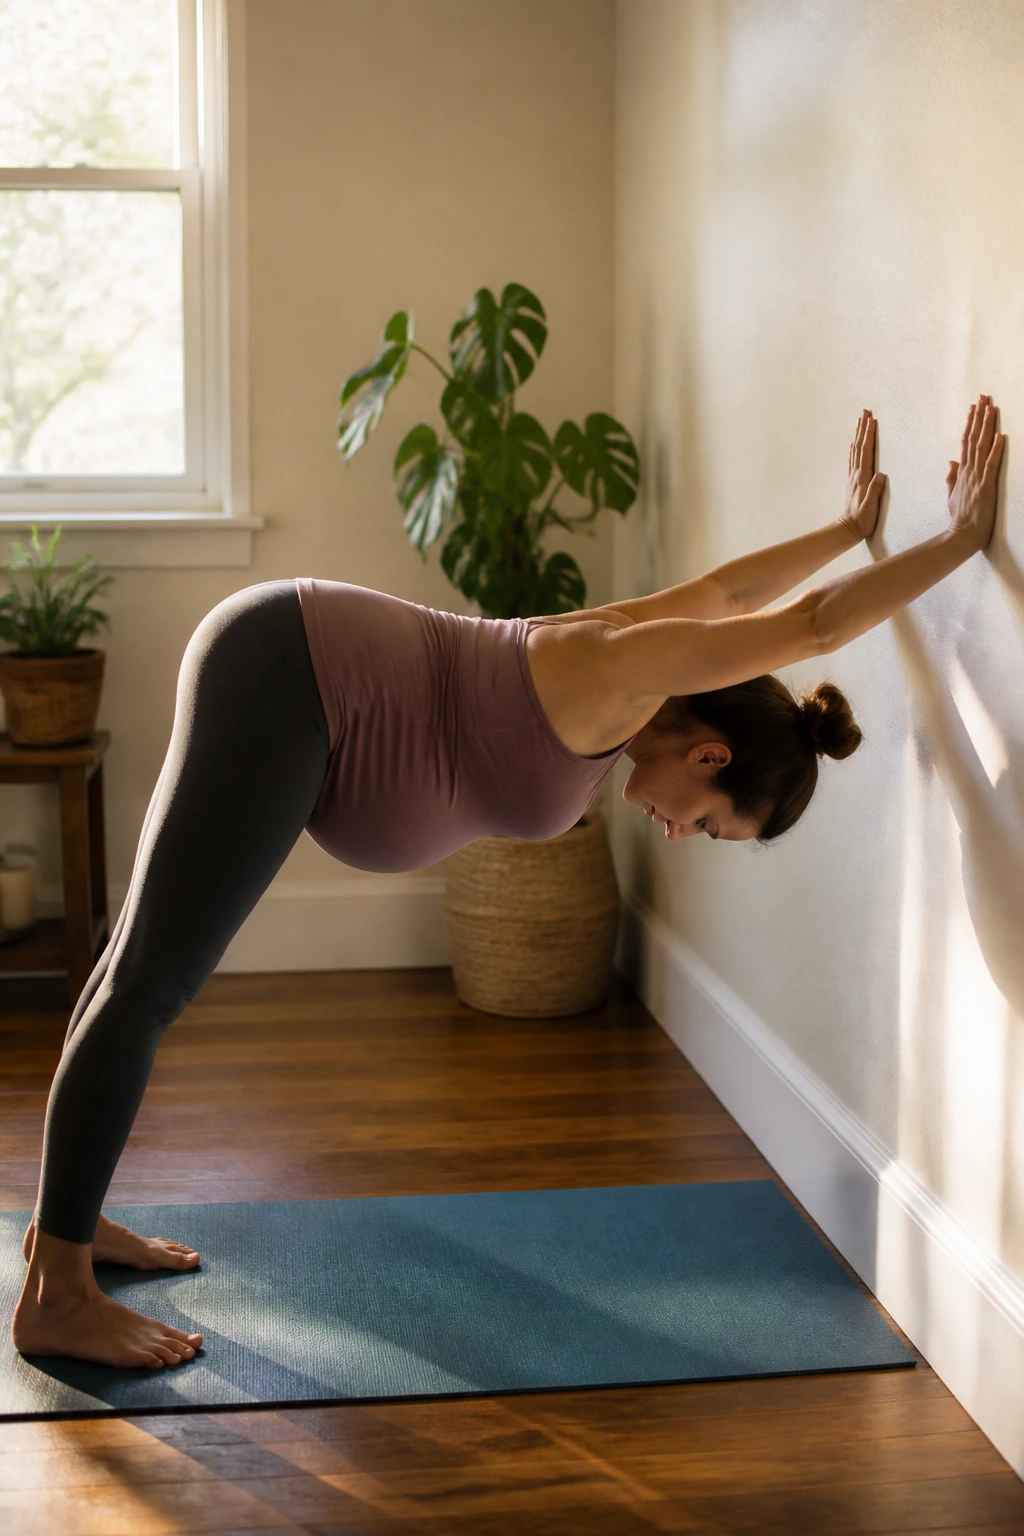
Traditional Downward Dog can be taxing on the wrists and shoulders in the third trimester. A wall-supported version gives you the same spinal lengthening benefits without the intensity or the risk of losing your balance.
Positioning
Stand facing a wall, about arm’s length away. Place your hands on the wall at shoulder height and walk your feet back until your body forms an “L” shape. Push your hips back and let your head rest between your arms.
The Spinal Decompression
This position is excellent for tractioning the spine. Because your feet are grounded and your hands are supported, you can safely sink your chest toward the wall, creating a deep, safe stretch through the lats and the length of the spine. It is one of the best ways to get that “popping” or lengthening sensation in the back that feels so good when you are carrying extra weight.
14. Seated Side Stretch
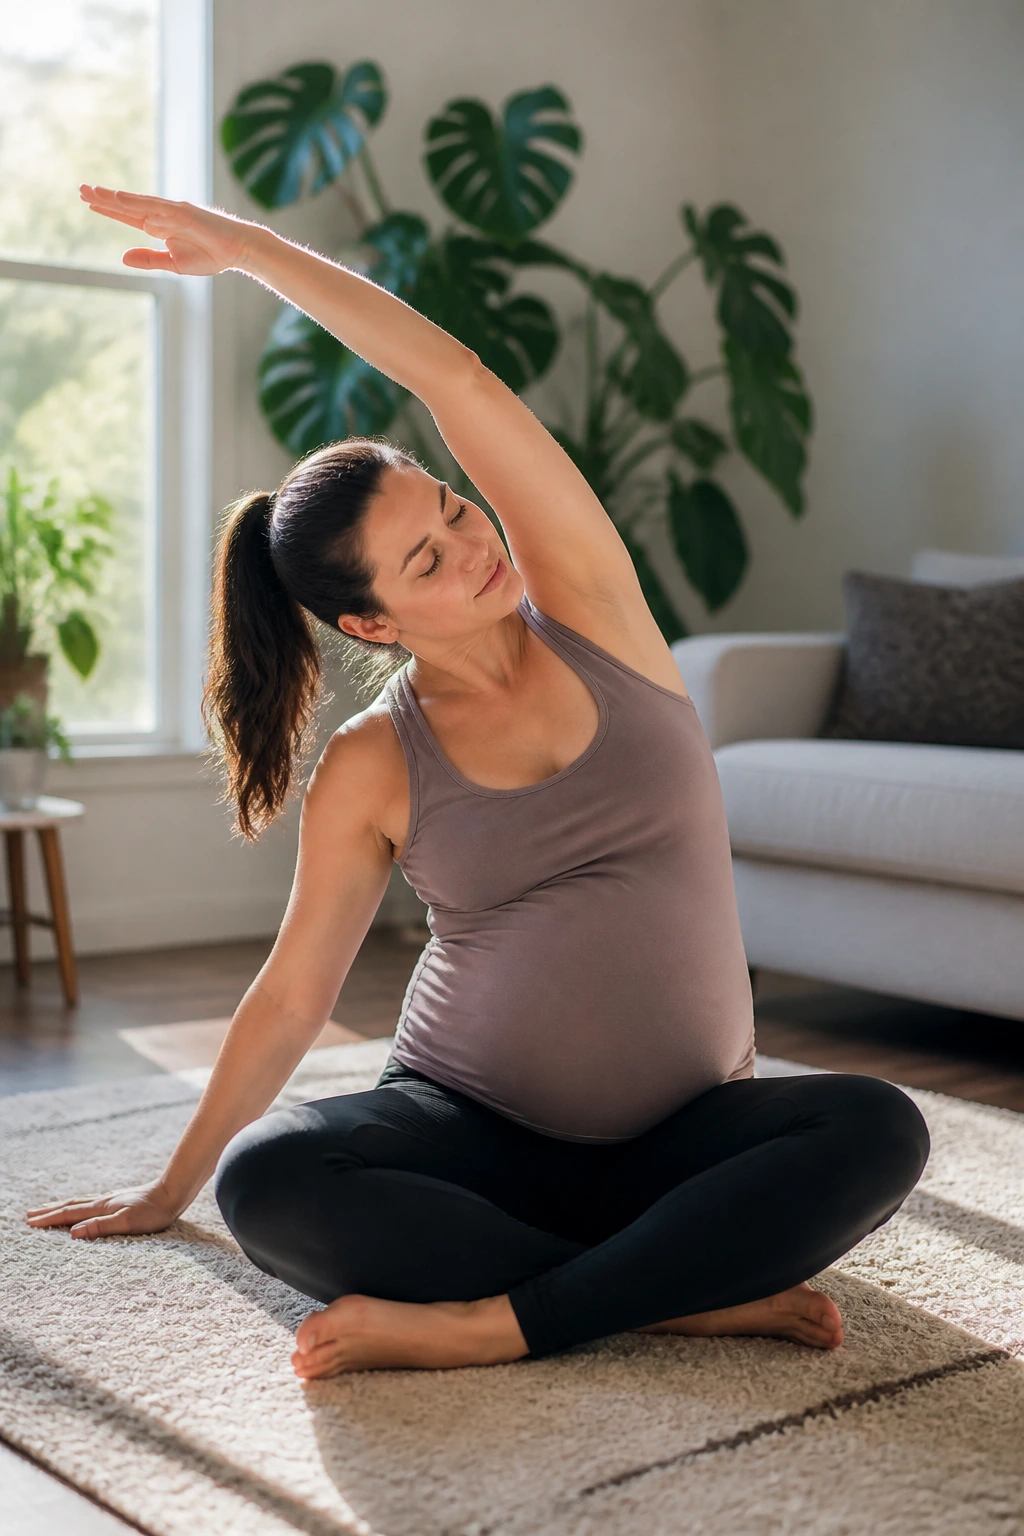
Sometimes, the simplest movements are the most effective. A seated side stretch is something you can do anywhere, and it directly addresses the side-waist tightness that often leads to lower back stiffness.
How to Execute
Sit cross-legged on the floor or on a chair. Place your right hand on the floor or the side of the chair. Inhale as you reach your left arm up toward the ceiling, then exhale as you reach it over to the right. Keep both sit-bones firmly rooted on the surface beneath you.
Why It Targets Back Pain
The fascia—the connective tissue—that runs along your sides connects your hips to your ribcage. When this tissue is tight, it acts like a corset that is too small, pulling your spine out of alignment. Stretching these tissues regularly keeps your torso mobile, meaning your lower back has to do less work to twist and turn throughout the day.
15. Tailor Pose (Cross-Legged)
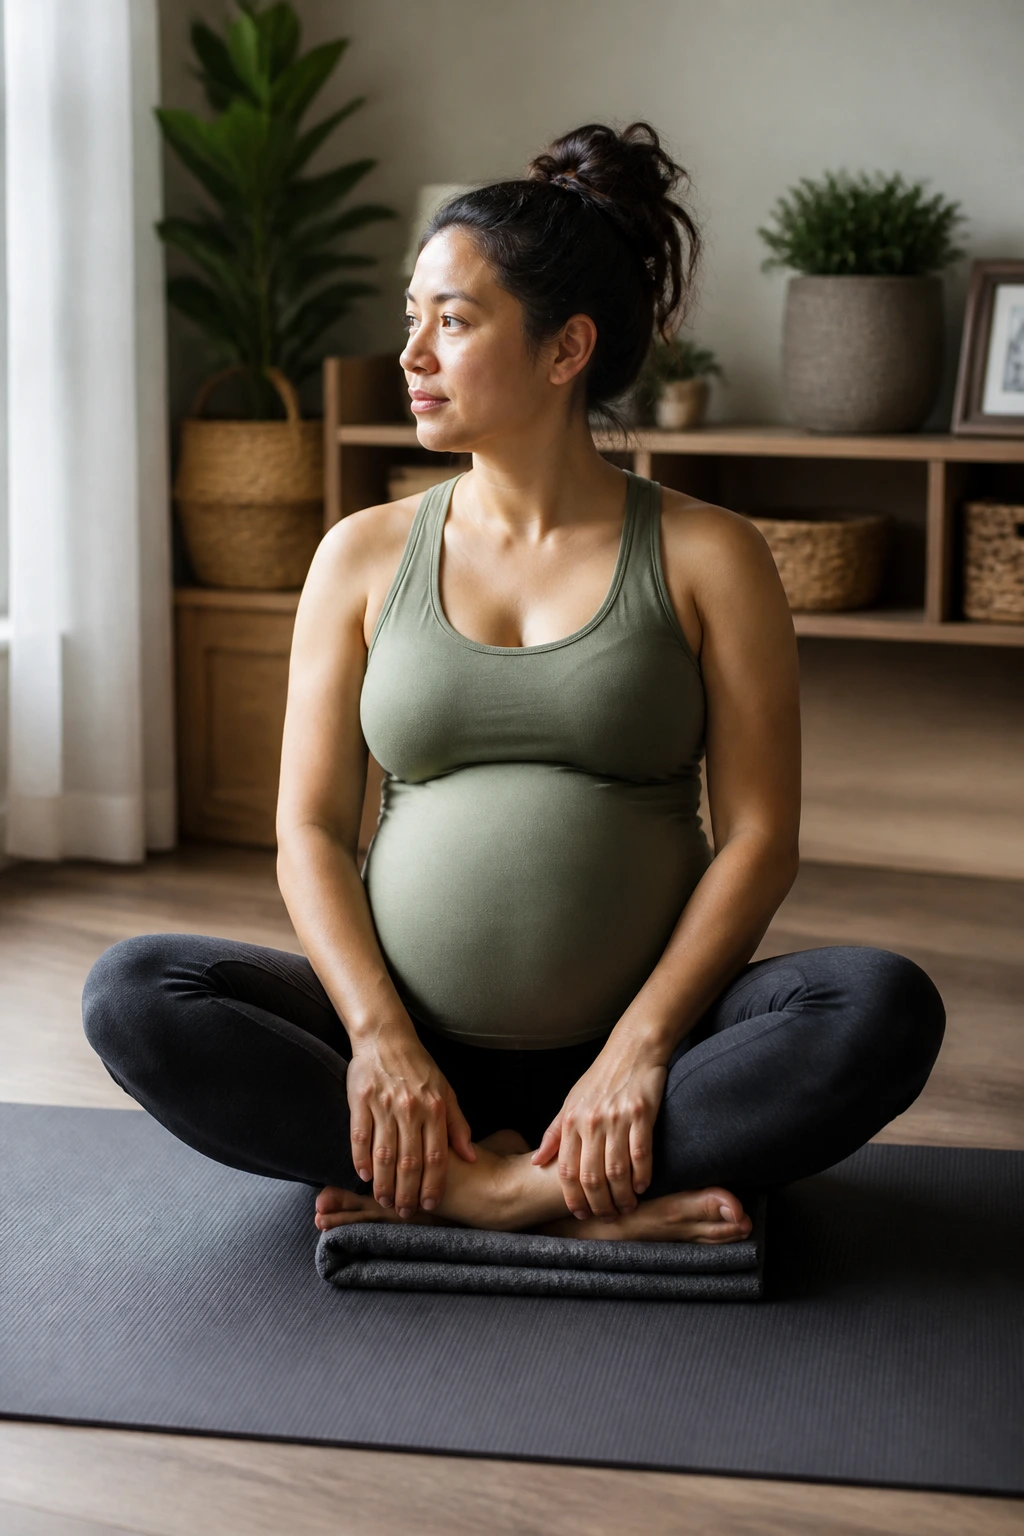
The tailor pose, or simple cross-legged sitting, is often overlooked as a “stretch,” but for a pregnant body, it is a functional corrective exercise. It helps open the pelvic floor and maintain mobility in the hip joints, which are essential for managing lower back discomfort.
The Detail
Sit on the floor with your legs crossed, but place a folded blanket or a thick cushion under your sit-bones. Elevating your hips above your knees allows your pelvis to tilt forward slightly, which is the natural, healthy position for your lower back.
Purposeful Sitting
If you just sit on the floor, you might round your back, putting more stress on the lumbar spine. Elevating your hips fixes this. This position creates a stable base that allows your lower back muscles to relax, while the gravity-assisted opening of the hips helps prevent the stiffness that accumulates during sedentary activities.
16. Hamstring Stretch (Heel-on-Chair)
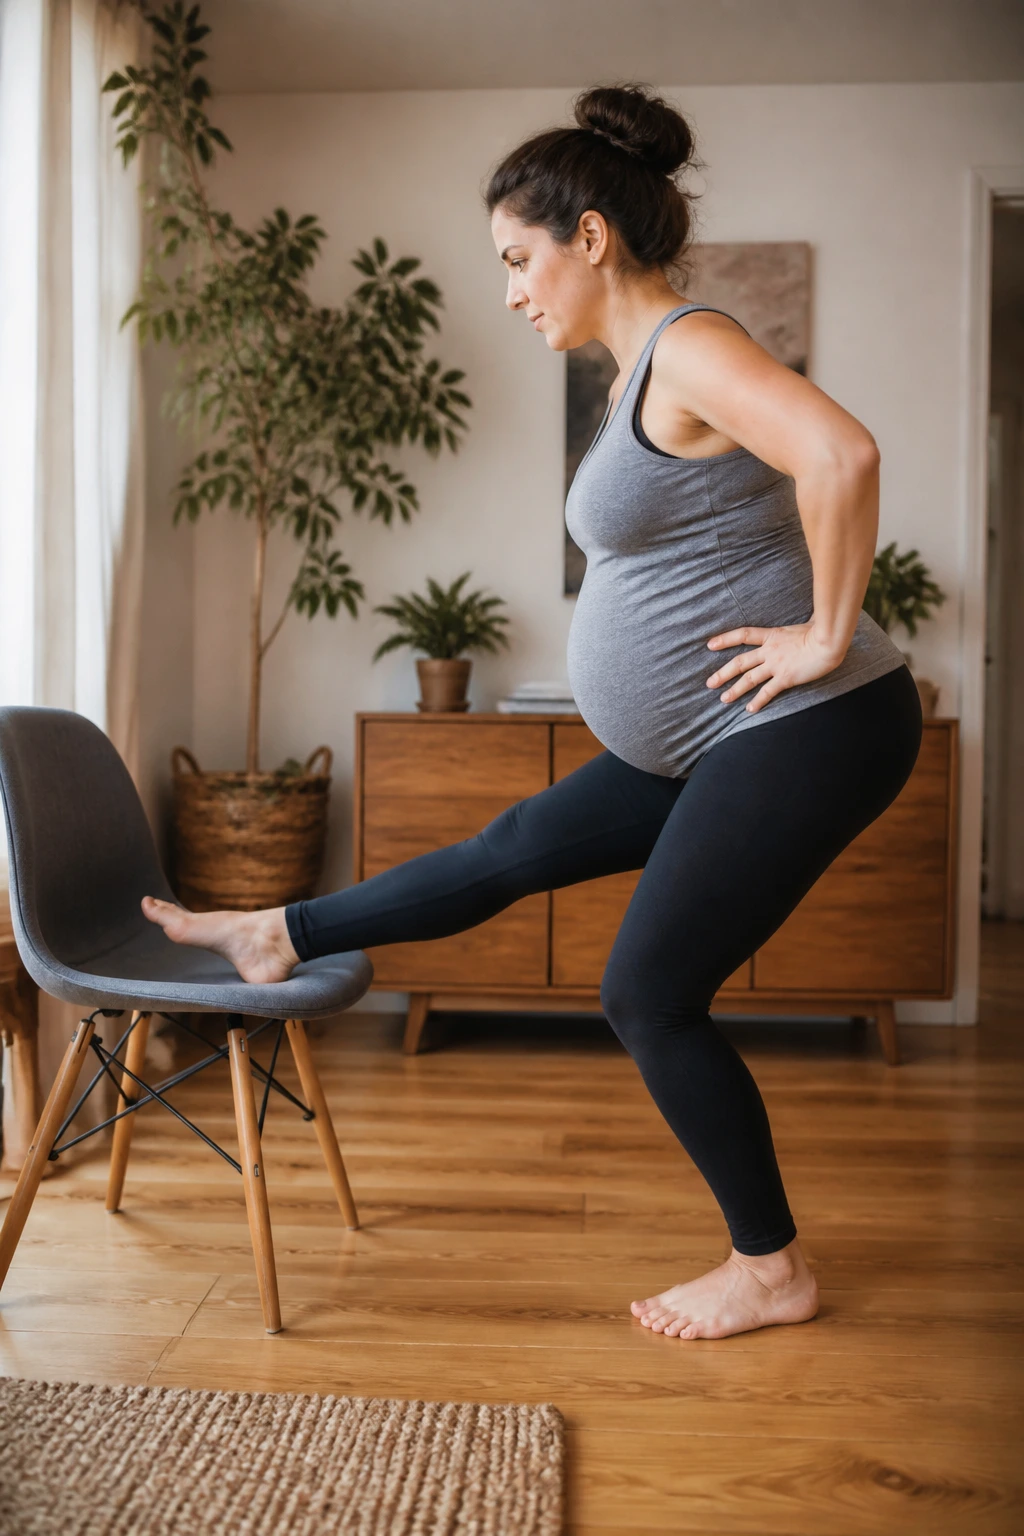
Tight hamstrings are a massive contributor to lower back pain. When your hamstrings are tight, they pull on your pelvis, tilting it backward and flattening the natural curve of your lower back. This puts a tremendous amount of stress on your lumbar discs.
Gentle Hamstring Release
Place one heel on a low chair or stool. Keep the supporting leg slightly bent. Keeping your back perfectly straight—imagine you are hinging at the hips like a door hinge—lean forward until you feel a gentle pull in the back of your elevated leg.
Safety First
Do not round your back to reach your toes. The goal is to lengthen the hamstring, not to touch your foot. If you feel a sharp pull behind the knee, lower your leg or bend your knee more. A soft, steady pull is what you are after. Stretching the hamstrings regularly will significantly reduce the “tug-of-war” your pelvis feels, leading to immediate lumbar relief.
17. Side-Lying Quadriceps Stretch

Quadriceps are often ignored in back pain discussions, but they are crucial. The quads attach to the pelvis; when they are tight, they pull the pelvis forward into an anterior tilt, which creates an exaggerated arch in the lower back.
How to Stretch
Lie on your side with both legs straight. Bend your top knee and reach back to hold your ankle. Gently pull your heel toward your glutes, feeling a stretch in the front of your thigh. If you cannot reach your ankle, use a towel or a strap wrapped around your ankle.
Why This Helps the Back
By releasing the tightness in the front of the hip (the quads and hip flexors), you allow the pelvis to return to a more neutral position. This neutral position is the most efficient spot for your back muscles to function, eliminating that constant arching tension that plagues so many in their third trimester.
18. Pelvic Floor Release (Squat)
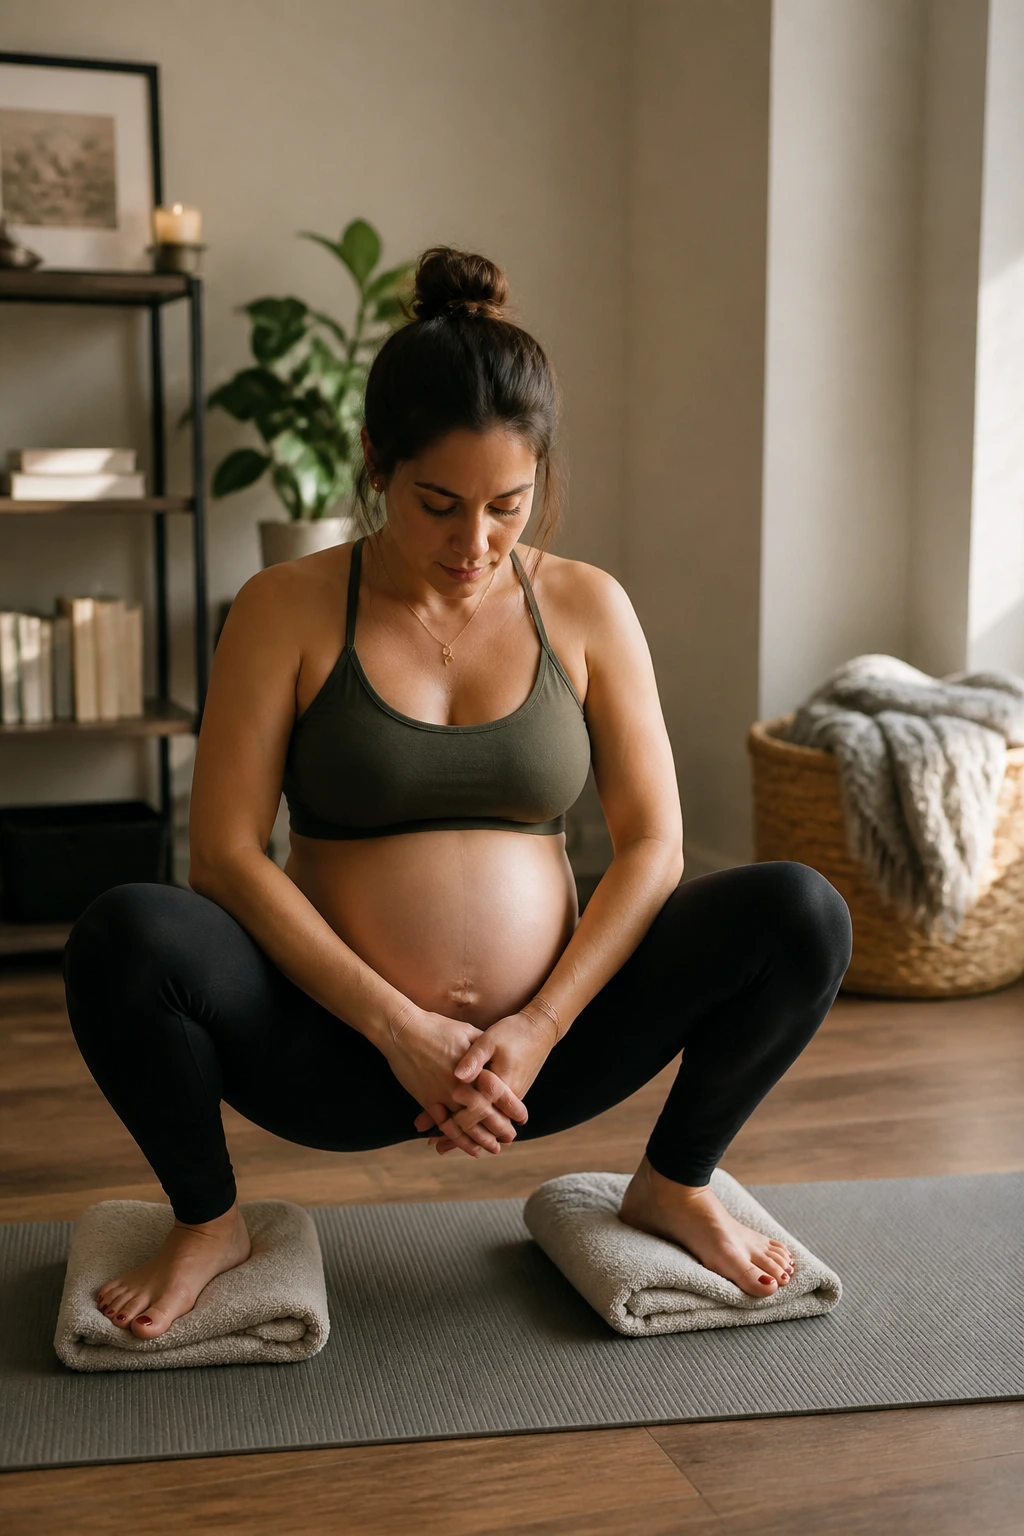
A deep, supported squat is one of the most effective ways to release the muscles of the pelvic floor and lower back simultaneously. Note that this is not a gym squat; it is a restorative, gravity-assisted position.
The Support
Stand with your feet wider than your hips. Slowly lower your hips toward the floor. If your heels lift off the ground, place a rolled-up towel under them for support. If you can’t get low without feeling unstable, sit on a yoga block or a stack of sturdy books.
The Sensation
In this position, the pelvic floor is allowed to lengthen and release. Because the pelvis is wide and open, the sacrum is also able to decompress. Stay here for as long as you feel comfortable—even just 30 to 60 seconds of this deep release can settle a restless, aching lower back.
19. Standing Calf Stretch
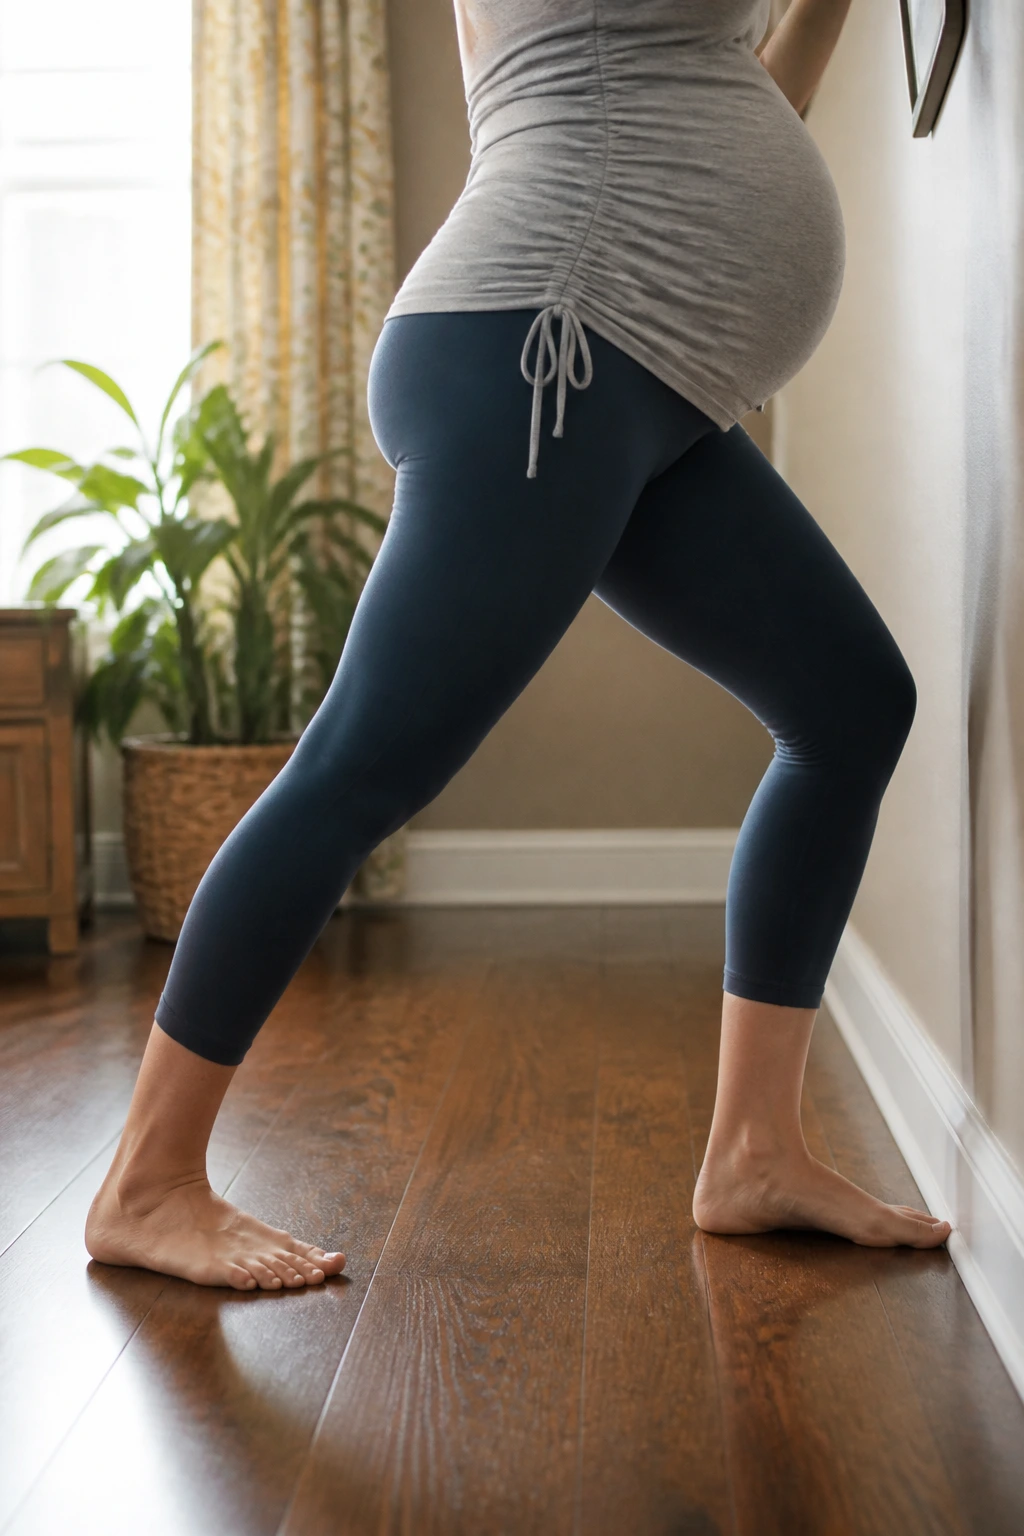
It might seem disconnected, but your calves are part of the posterior chain that dictates your posture. When your calves are tight, they change how you distribute your weight while standing, forcing your lower back to compensate for the imbalance.
How to Stretch
Stand facing a wall. Place your hands on the wall for balance. Step one foot back and press the heel into the ground, keeping the leg straight. You should feel a deep stretch in the calf. Switch sides after holding for 30 seconds.
Why It Matters
Pregnancy often leads to swollen ankles and tight calves. By stretching the calves, you encourage better circulation and prevent the muscle cramping that can occur at night. More importantly, it keeps your foundation stable. A stable foundation means you aren’t swaying your back to keep your balance, which ultimately saves your lower back from unnecessary strain.
20. Supported Bridge Pose
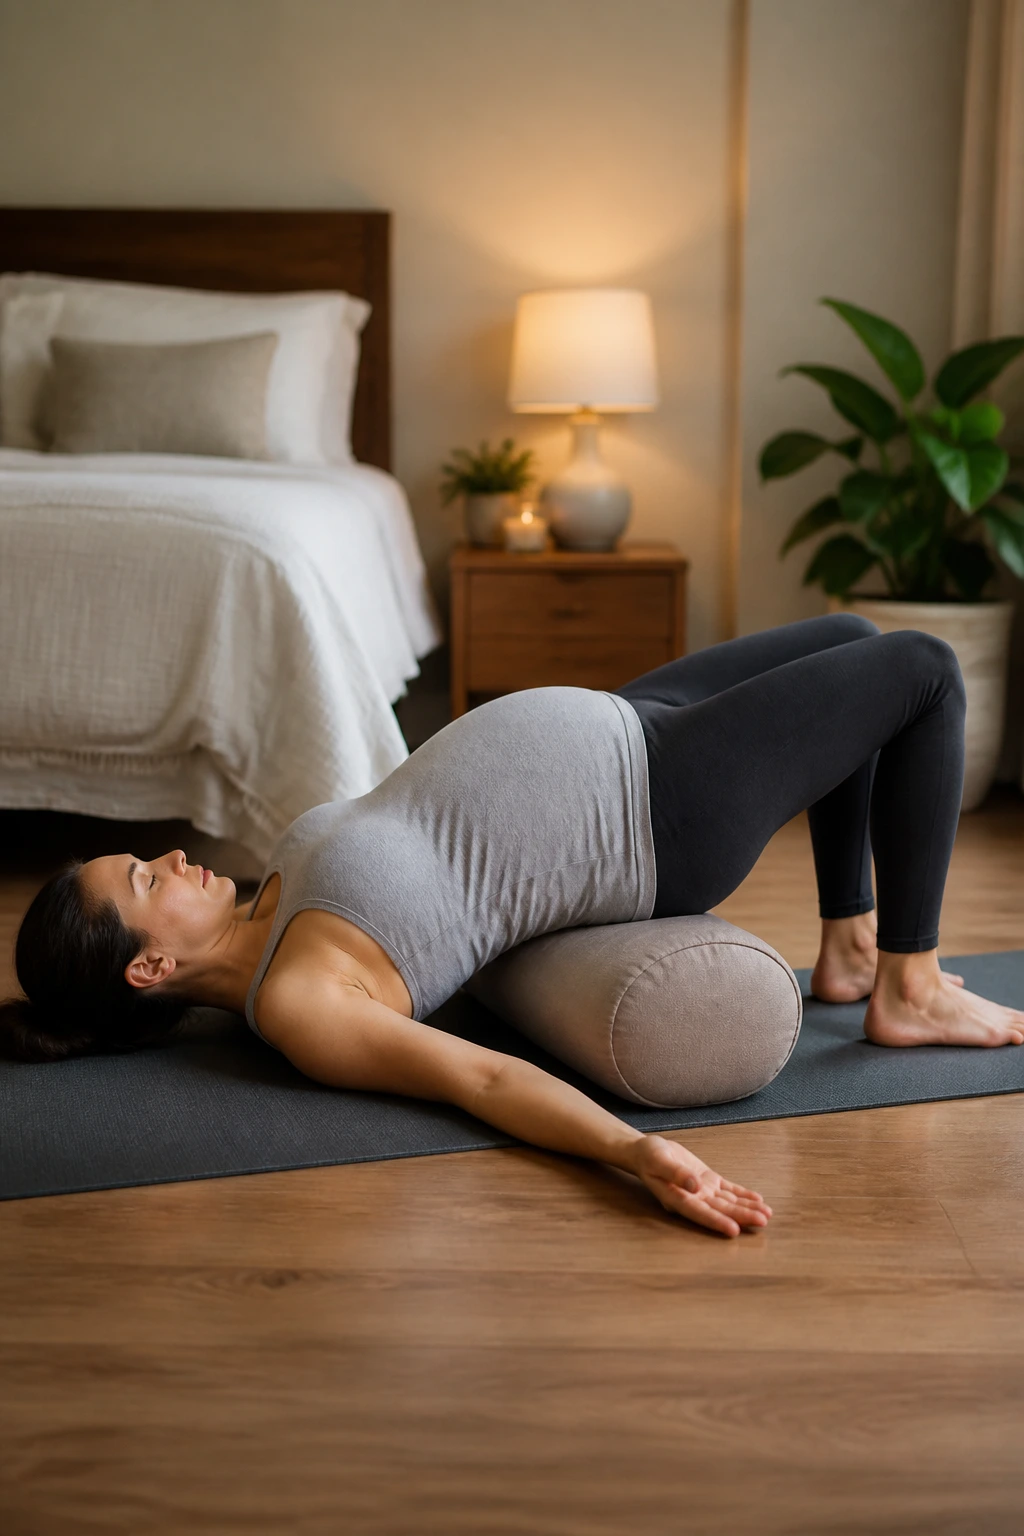
This is the ultimate restorative move. It uses gravity and props to place the body in a position that actively reverses the strain of the third-trimester posture.
The Setup
Lie on your back—only do this if you feel comfortable and are not experiencing dizziness. Place a sturdy bolster, a firm cushion, or a block under your sacrum (the flat bone at the base of your spine, not your lower back itself). Let your arms rest out to the sides.
Why It’s the Best for Back Pain
This position elevates the hips and gently tilts the pelvis into a posterior position, which is the exact opposite of the sway-back posture most people develop during pregnancy. It allows the lumbar spine to flatten and lengthen while the muscles of the lower back are essentially “unplugged” from their duty of holding you upright. It is pure, passive decompression. Spend 3 to 5 minutes here, breathing deeply, and you will understand why this is a staple for prenatal comfort.
The Bottom Line
Back pain in the third trimester is not a life sentence, nor is it something you simply have to endure in silence. It is your body asking for a shift—a change in position, a moment of release, or simply the permission to stop holding on so tightly. The movements listed here are not about working out; they are about maintenance. They are tools in your belt to help you navigate the final weeks with more comfort, more breath, and less resistance.
Do not worry about being flexible or “getting it right” in terms of form. Listen to the feedback your body gives you. If a stretch feels good, do it for longer. If a movement feels sharp or uncomfortable, pivot to a different one. Your body is doing incredible work, and these gentle practices are just a small way to support that journey until you are ready for the next chapter.
