



Most of us know the feeling. You wake up, roll out of bed, and immediately notice that “creaky” sensation in your lower back or hips. It feels like you need to oil the joints before you can actually start moving properly. This isn’t necessarily a sign of getting older; often, it’s just the result of our daily habits. We sit, we look down at screens, we stay in static positions for hours on end, and our bodies adapt to those shapes. Mobility is the antidote to that static life. It is the ability of your joints to move through their full, intended range of motion without pain or restriction.
This is different from flexibility. Flexibility is passive—think of holding a stretch while someone pushes on you. Mobility is active. It requires your muscles to control that range of motion, which is far more useful for everything from picking up a heavy box to reaching for a glass on a high shelf. You don’t need fancy gym equipment or a membership to start reclaiming your freedom of movement. You just need a bit of floor space and a willingness to move a little bit differently than you did yesterday. The twenty exercises below are chosen because they hit the most common “problem areas”—hips, spine, shoulders, and ankles—without requiring anything more than your own body weight.
1. Cat-Cow
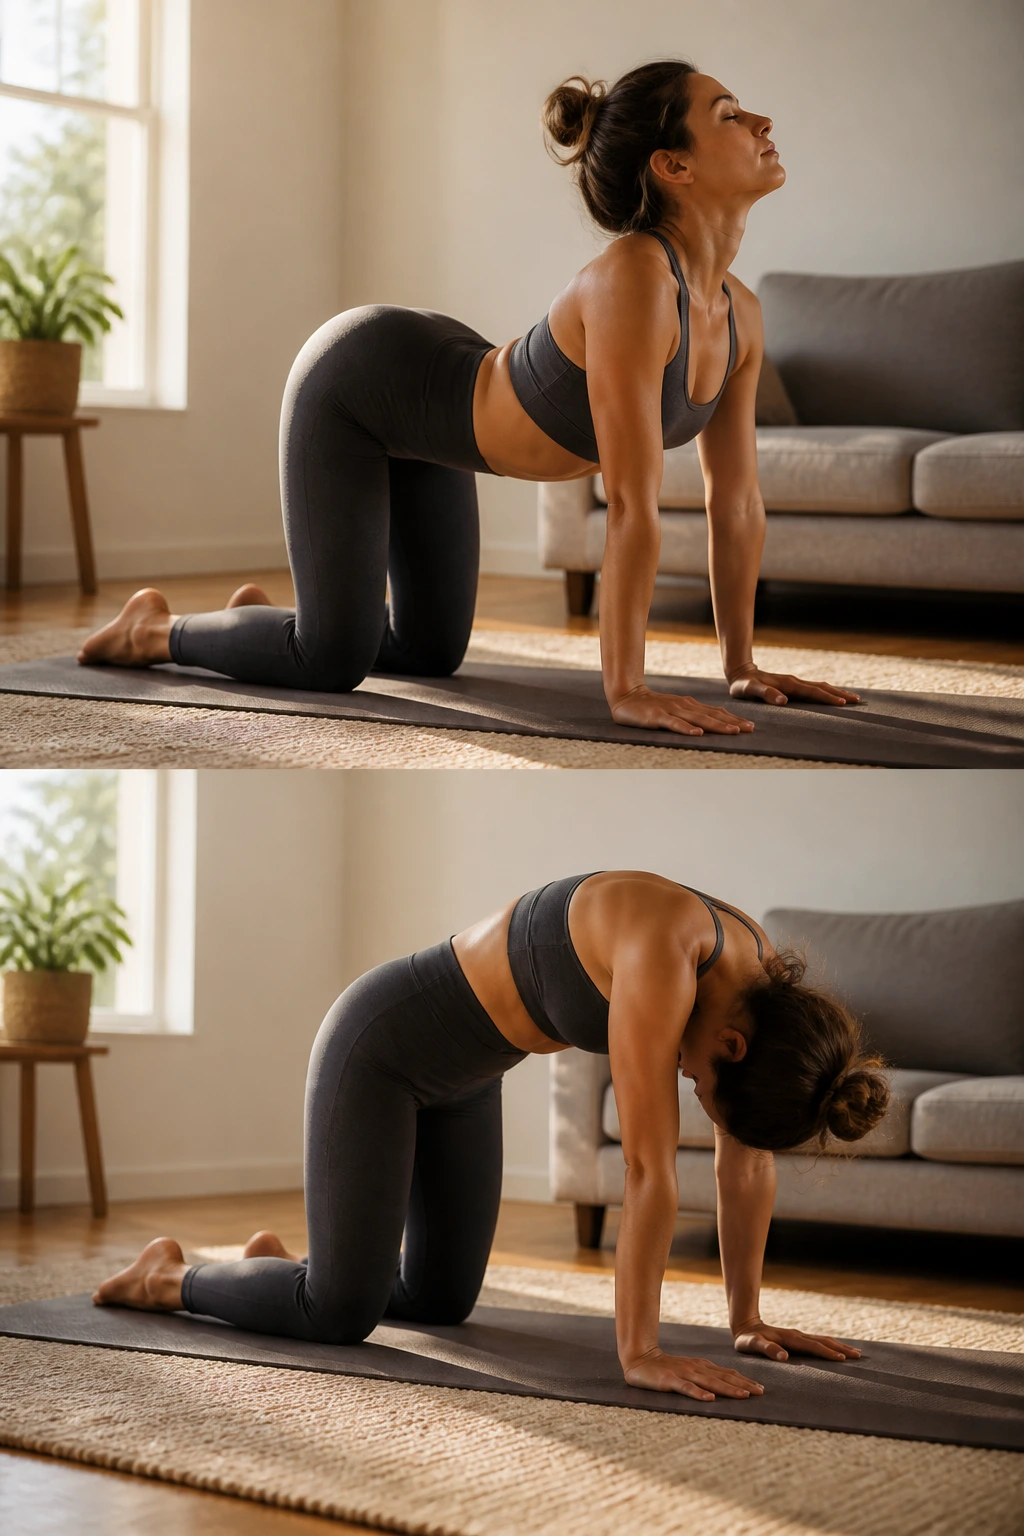
This is the classic, go-to move for waking up the spine. It is simple, but its effectiveness is unmatched because it forces you to articulate each vertebra individually. If you spend your day hunched over a laptop, your mid-back likely feels fused. This move helps break that up.
How to do it
- Start on your hands and knees in a tabletop position.
- Ensure your wrists are directly under your shoulders and your knees are directly under your hips.
- Inhale and drop your belly toward the floor, lifting your chin and chest toward the ceiling—this is the “cow” phase.
- Exhale and tuck your chin to your chest, arching your upper back toward the ceiling like a cat stretching.
Pro tip: Do not just move your neck and lower back. Imagine a string pulling your spine toward the ceiling, one vertebra at a time. The more you focus on the middle of your back, the more relief you will find.
2. Bird-Dog
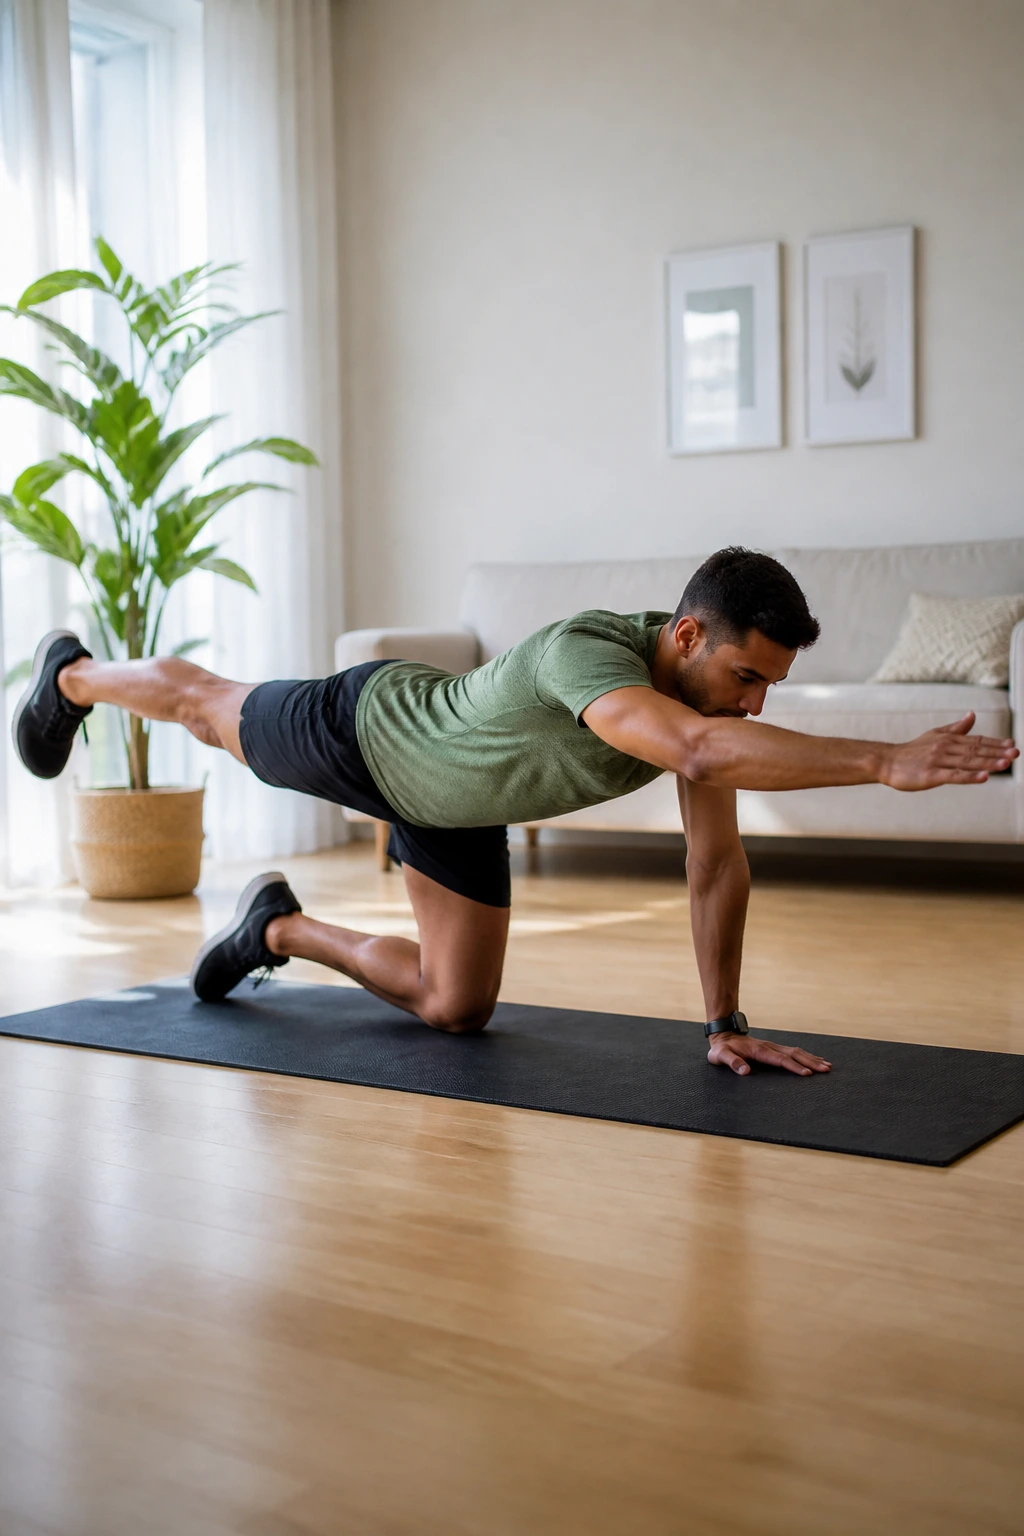
Stability is just as important as range of motion. You can have all the mobility in the world, but if your core doesn’t know how to protect your spine while you move, you are setting yourself up for aches. The bird-dog teaches you to move your limbs while keeping your torso perfectly still.
The execution
Get back into that tabletop position from the cat-cow. Keep your neck neutral—look down at the floor between your hands. Slowly extend your right arm forward and your left leg backward simultaneously. Do not let your back arch or sag. Hold that reach for a second, feeling a long line of tension from your fingers to your toes, then return to center. Switch sides.
If you struggle with balance, start by sliding your hand and foot along the floor instead of lifting them. As you get more comfortable, increase the lift height. The goal is to avoid any wobbling in your hips. If your hip tips sideways, shrink your range of motion until you can control the movement perfectly.
3. Neck Tilts and Rotations
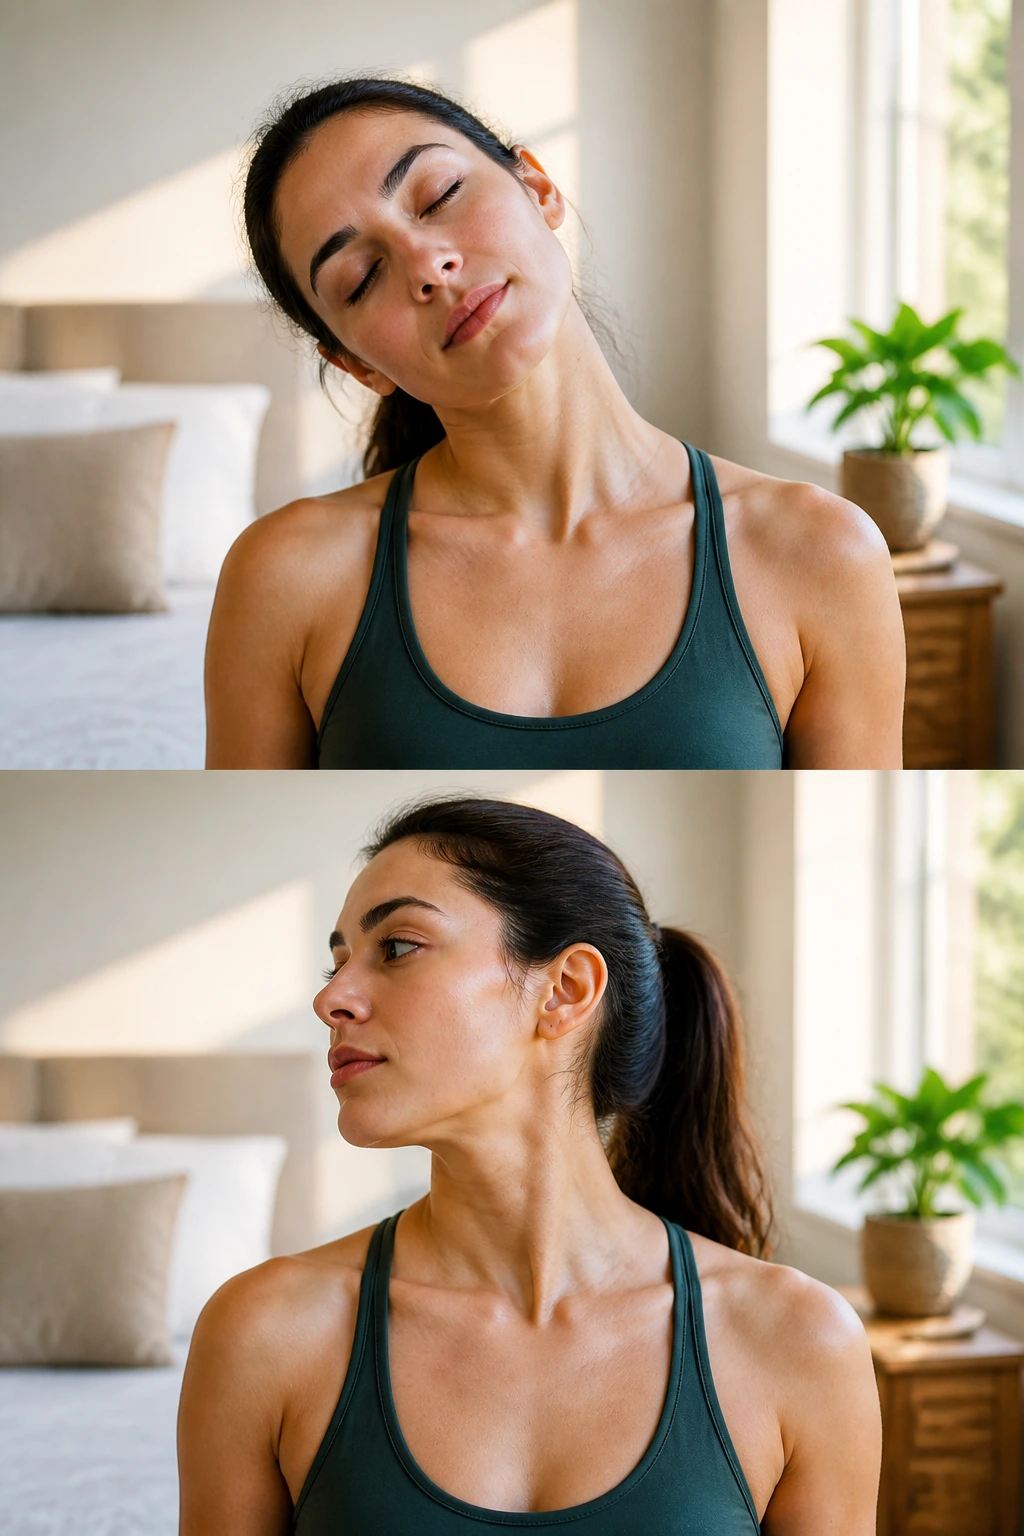
We carry a staggering amount of tension in our necks, especially if you drive often or stare at a screen for work. Most people treat neck pain by rubbing the sore spots, but the real issue is often a lack of active mobility. You need to tell those muscles to relax by taking them through their full range of motion.
Sit or stand tall. Gently drop your right ear toward your right shoulder. Don’t pull your head; let gravity do the work. You should feel a gentle stretch along the left side of your neck. Hold for five seconds, then return to center and switch to the left.
After the tilts, try rotations. Turn your head to look over your right shoulder, trying to see as far behind you as possible. Keep your shoulders down and back—don’t let them shrug up toward your ears. Return to center and look left. Repeat this ten times in each direction. If you feel any sharp or pinching pain, stop immediately and reduce your range of motion.
4. Broomstick Shoulder Pass-Throughs
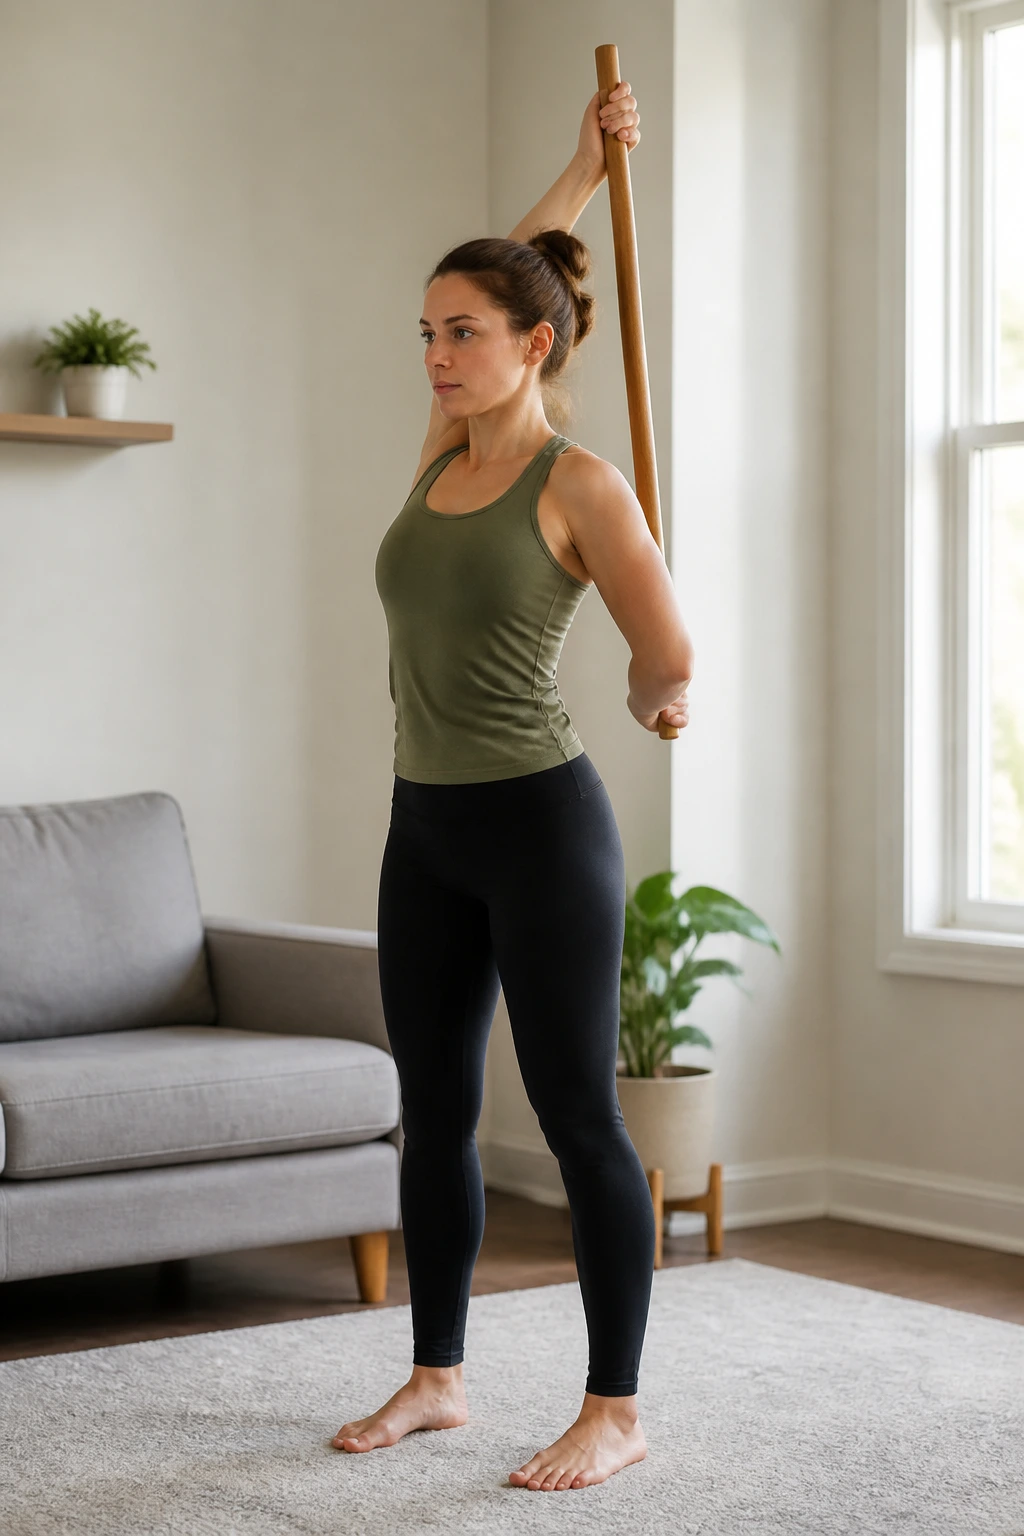
You do not need a specialized gym bar for this. Grab a broomstick, a mop handle, or even a long towel. This exercise is one of the single best ways to improve shoulder health and posture. It opens up the chest and stretches the tight tissues in the front of your shoulders that get locked up from “computer posture.”
Hold the bar with a very wide grip. Keep your arms straight. Slowly rotate the bar up and over your head, aiming to touch it to your lower back, then bring it back over to the front.
If you cannot get the bar over without bending your elbows, your grip is too narrow. Widen your hands until you can complete the movement with straight arms. If you still can’t do it, stop halfway and just work on the movement from your thighs to your forehead. Over time, as your shoulders open up, you can slowly move your hands closer together.
5. Arm Circles
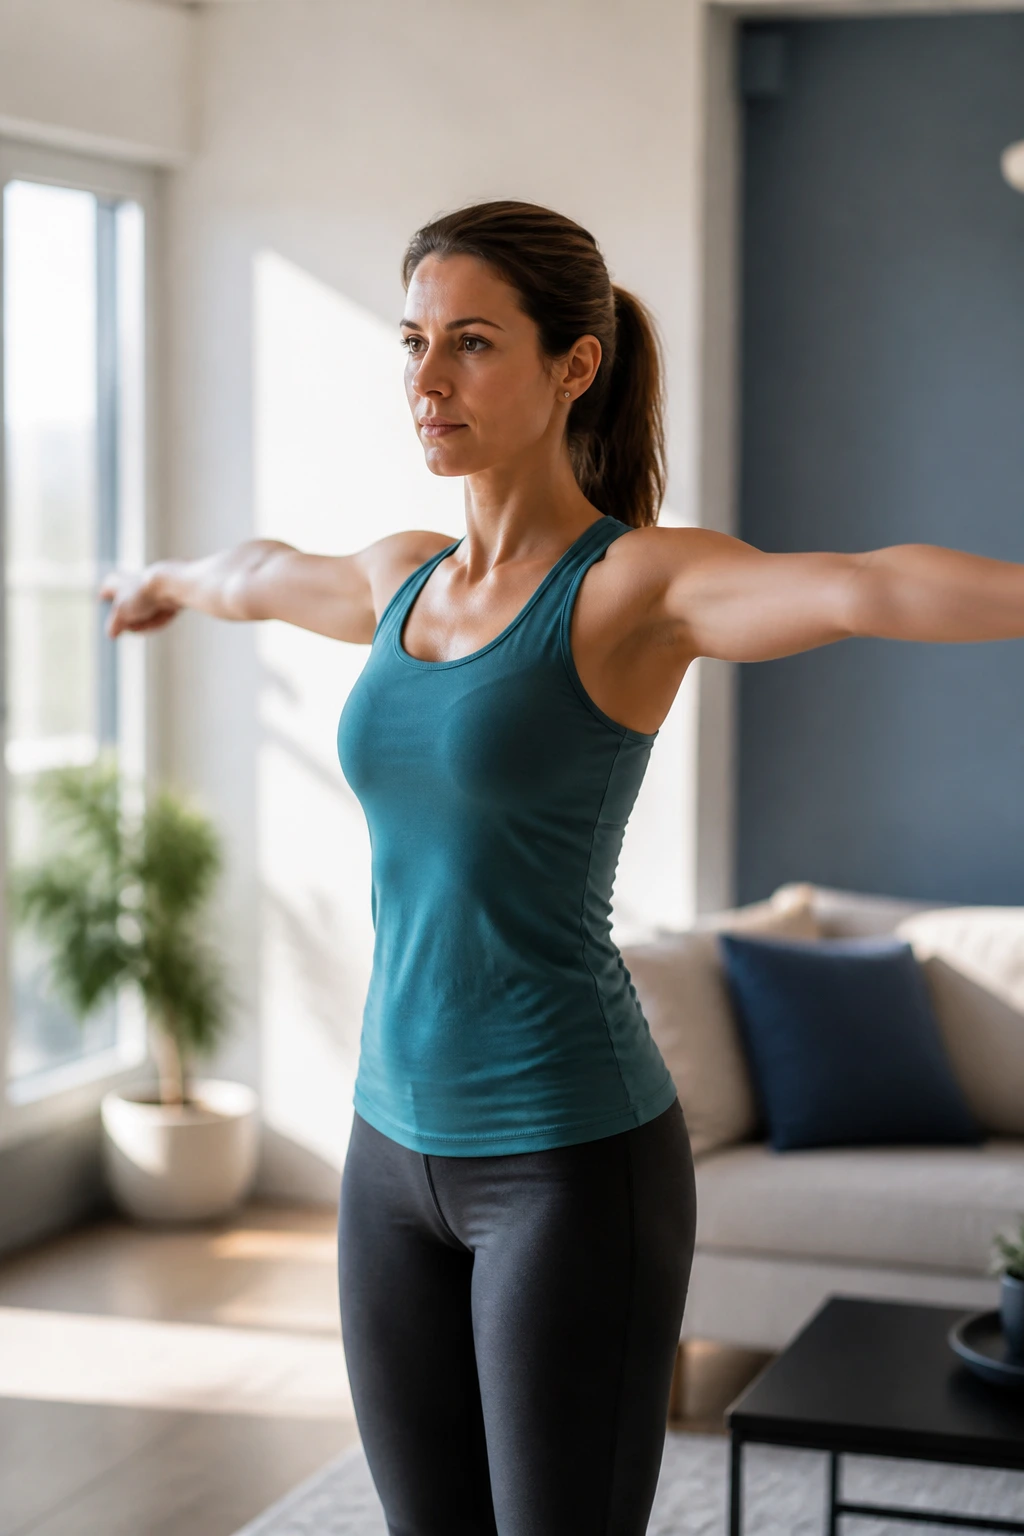
This is so simple that many people skip it, thinking it is too easy to be effective. However, the shoulder joint is the most mobile joint in the body, which also makes it the most unstable. Arm circles, done with intention, help lubricate that joint and build endurance in the small stabilizer muscles.
Stand with your feet hip-width apart. Extend your arms out to your sides, parallel to the floor, like you are making a T-shape. Make small circles with your hands, rotating forward. Do twenty small circles, then twenty backwards.
Here is the secret: don’t let your arms droop. Keep them perfectly straight and actively reach toward the walls. You should feel a slight burn in your shoulders by the end. That burn is exactly what you want. It means you are engaging the muscles that keep your shoulder blades glued to your back, rather than letting them wing out.
6. Thoracic Spine Rotations
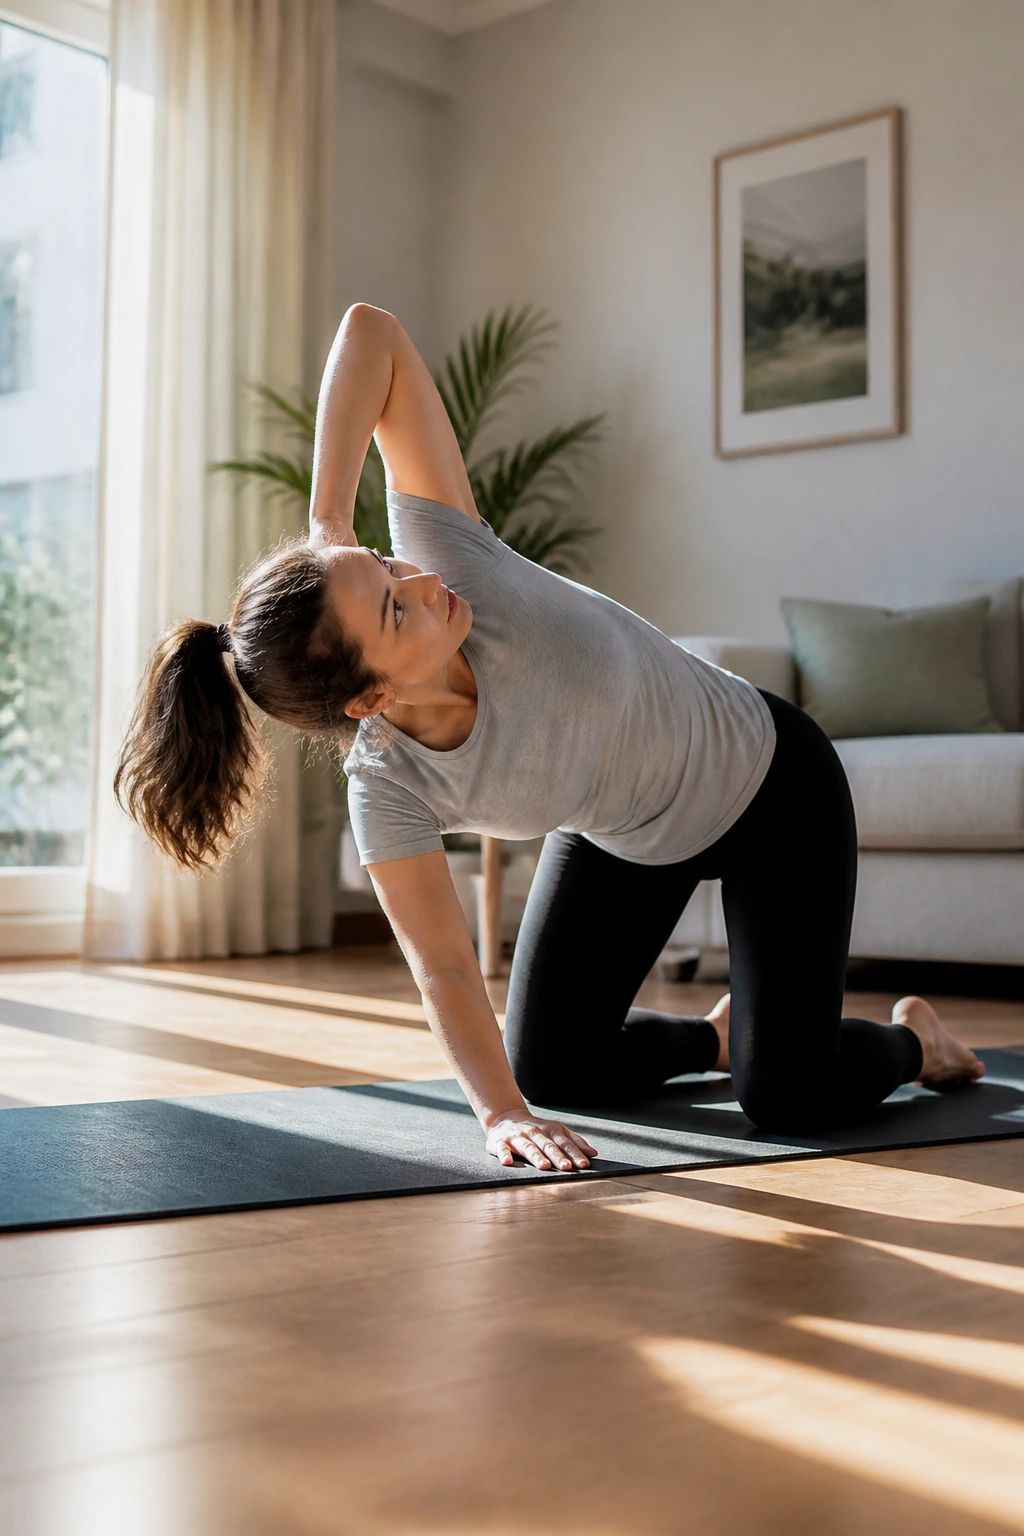
Your thoracic spine—the mid-back portion—is meant to be mobile. When it gets stiff, your lower back and neck have to work overtime to compensate, which usually leads to pain in those areas. You need to rotate from the middle to save your lower back.
Start on your hands and knees. Place your right hand behind your head, elbow pointing out. Take that right elbow and try to touch it to your left wrist beneath you. Then, reverse the movement and rotate your right elbow up toward the ceiling, opening your chest to the right.
Follow your elbow with your eyes. This helps you get more rotation. Repeat ten times on the right side, then switch to the left. Keep your hips square to the floor. If your knees start shifting around, you are rotating from your hips, not your spine. Keep those knees firmly planted.
7. Hip Circles
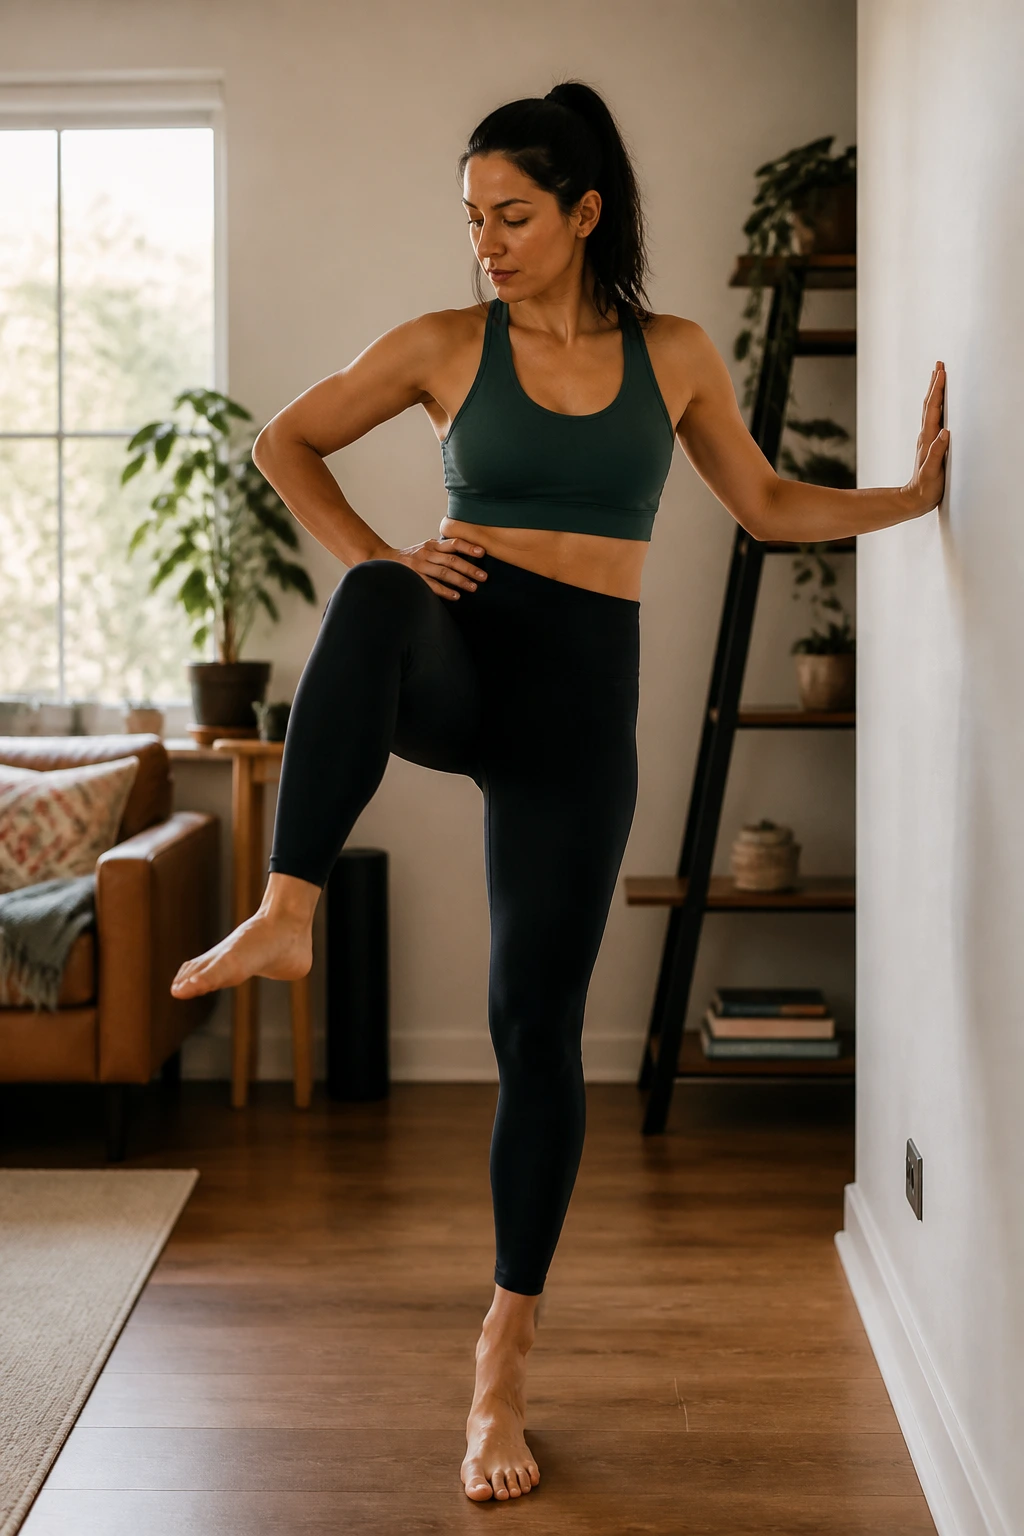
We spend most of our waking hours in a seated position, which means our hip flexors are shortened and our glutes are effectively turned off. Hip circles are a great way to “grease the gears” of the hip joint, helping to restore some fluidity to the entire pelvic region.
Stand on one leg—hold onto a wall or chair if you need balance. Lift your other knee up toward your chest, then rotate it out to the side, and then back behind you, making a large circle with your knee. Imagine you are drawing a circle on the wall with your kneecap.
Do ten circles moving forward (out to the side) and ten moving backward (in toward the middle). Switch legs. You will likely notice one hip feels smoother than the other. That is perfectly normal. Spend a little extra time on the “sticky” side.
8. 90/90 Hip Switches
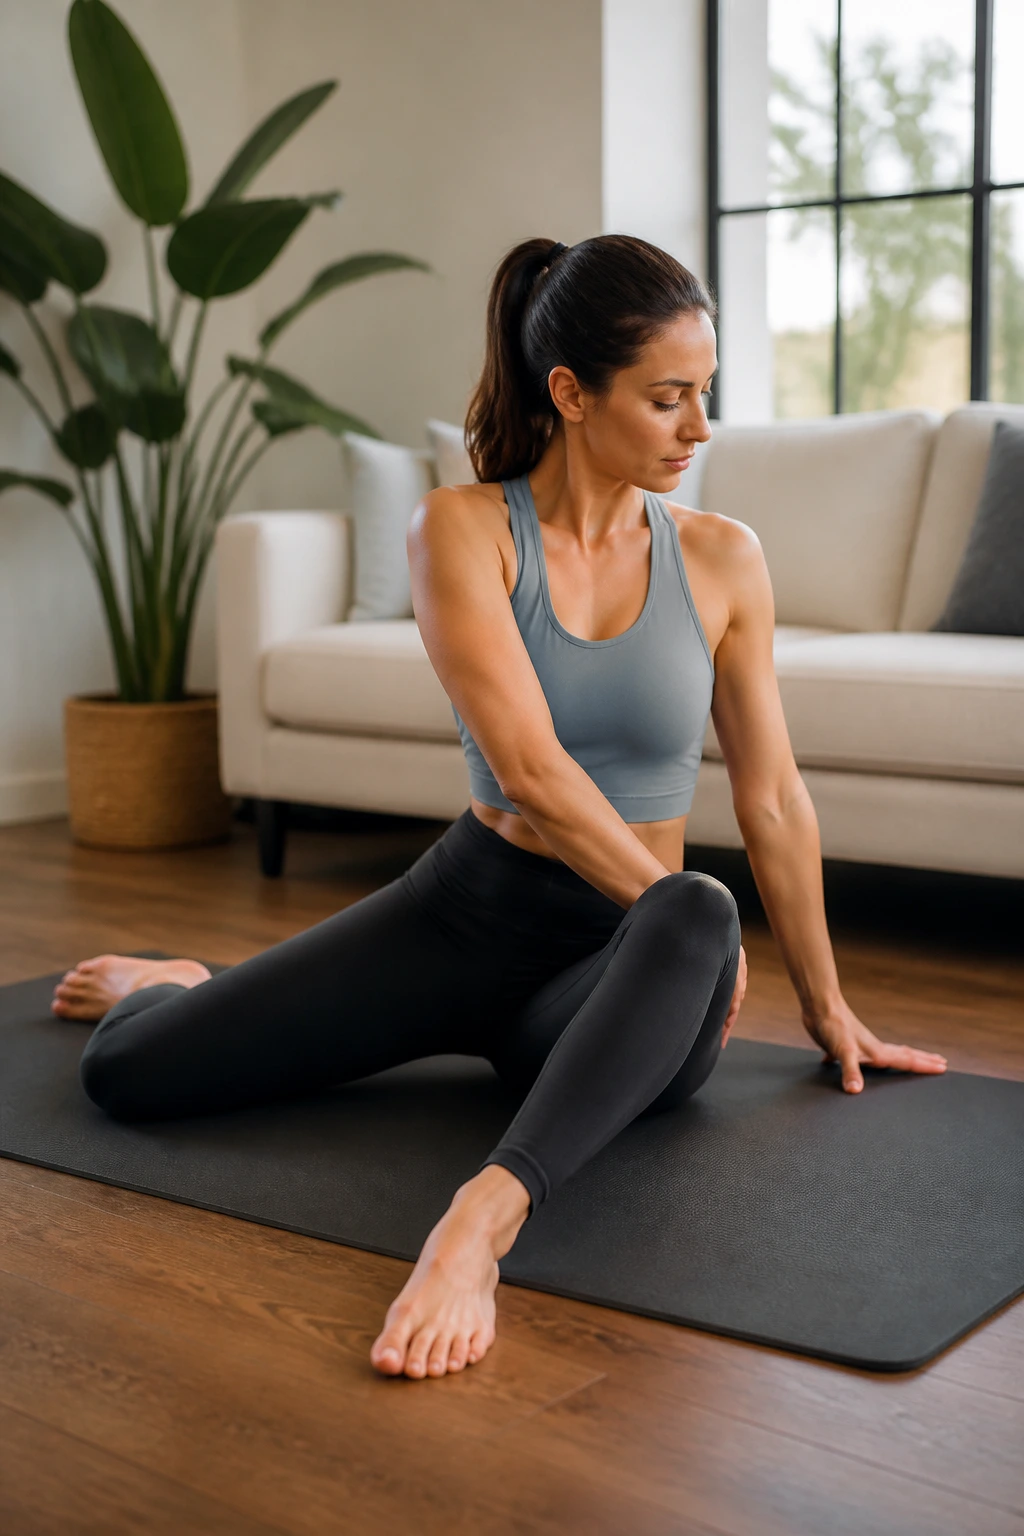
This is a staple for anyone who wants healthy hips. It targets the external and internal rotation of the hip joint simultaneously. It might feel awkward or even impossible the first time you try it, but stick with it—the improvement happens quickly.
Sit on the floor with your knees bent at 90 degrees. Your front leg should be bent at 90 degrees in front of you, and your back leg should be bent at 90 degrees out to the side. Both feet are flat on the floor. Now, try to rotate your torso to face the front knee.
To switch, keep your heels planted and pivot your knees so the back knee becomes the front knee and vice-versa. It is a slow, controlled movement. Do not use your hands on the floor if you can help it—use your core to rotate your legs. If you find your hips lifting off the ground, that is okay for now. Just focus on the rotation.
9. Kneeling Hip Flexor Stretch
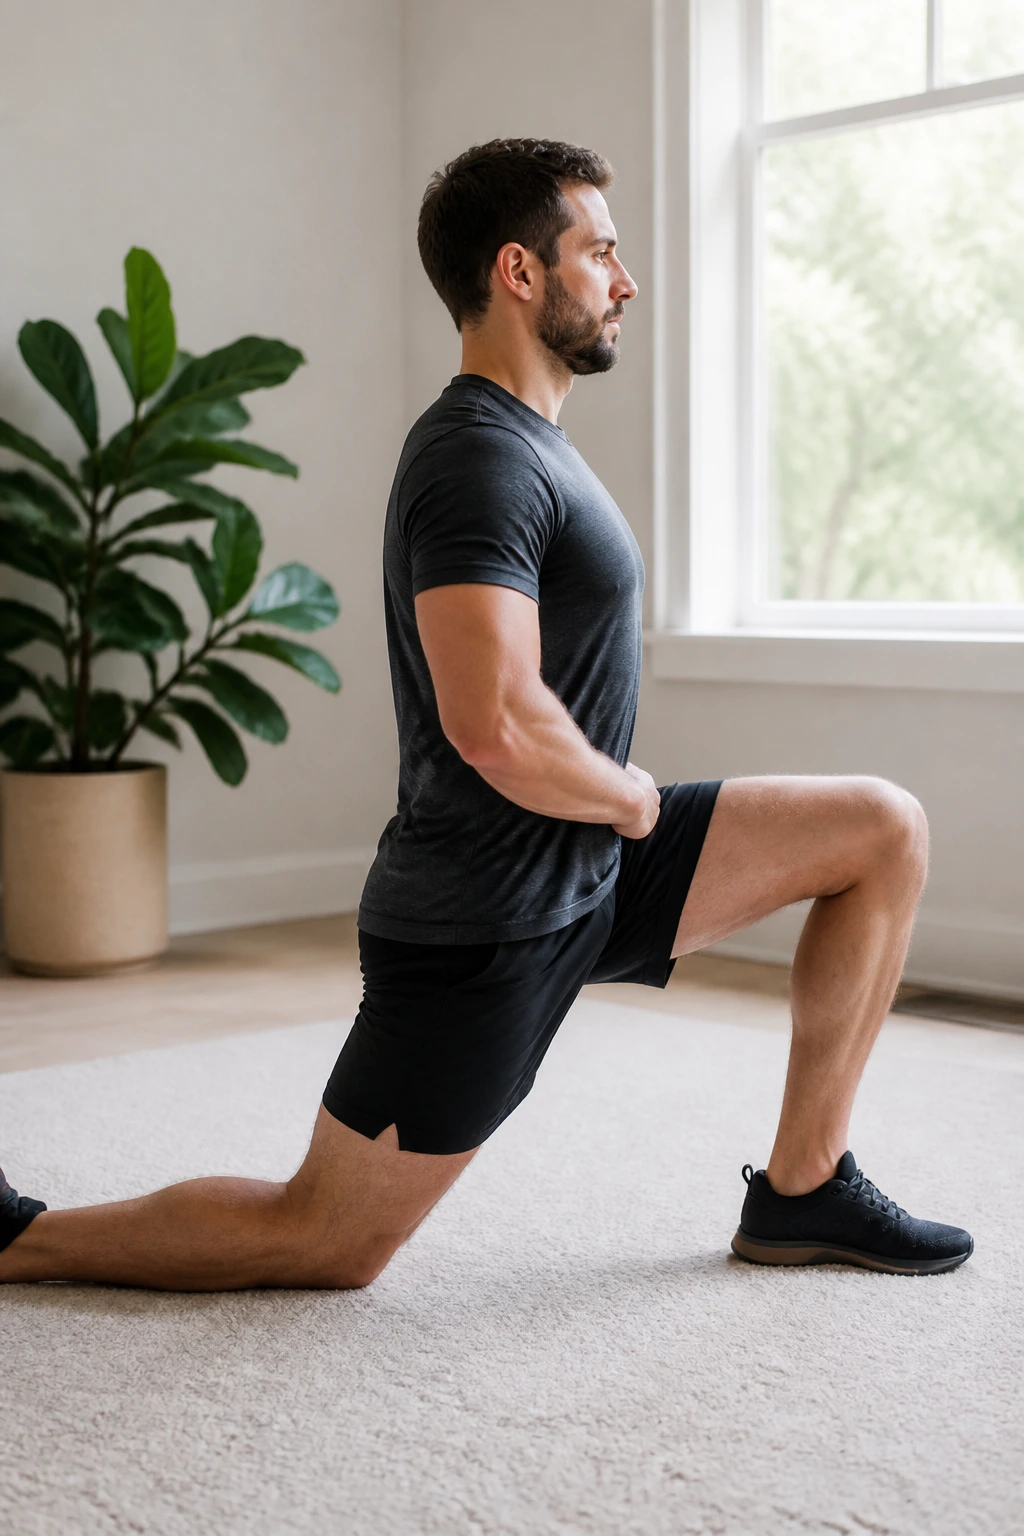
This is the ultimate counter-move to sitting. If you spend eight hours a day in a chair, your hip flexors are chronically tight. This tightness pulls on your pelvis, which creates that arch in your lower back that causes so much pain.
Kneel on one knee, with the other foot flat in front of you (like a lunge). Squeeze the glute of your kneeling leg. This is the magic cue—squeezing the glute pushes the pelvis forward and deepens the stretch in the front of the hip. Keep your torso upright. Do not lean forward.
If you lean forward, you are just bending at the waist. Stay tall, squeeze that glute, and breathe. You should feel a stretch deep in the front of the hip on the kneeling leg. Hold for thirty seconds per side.
10. Glute Bridges
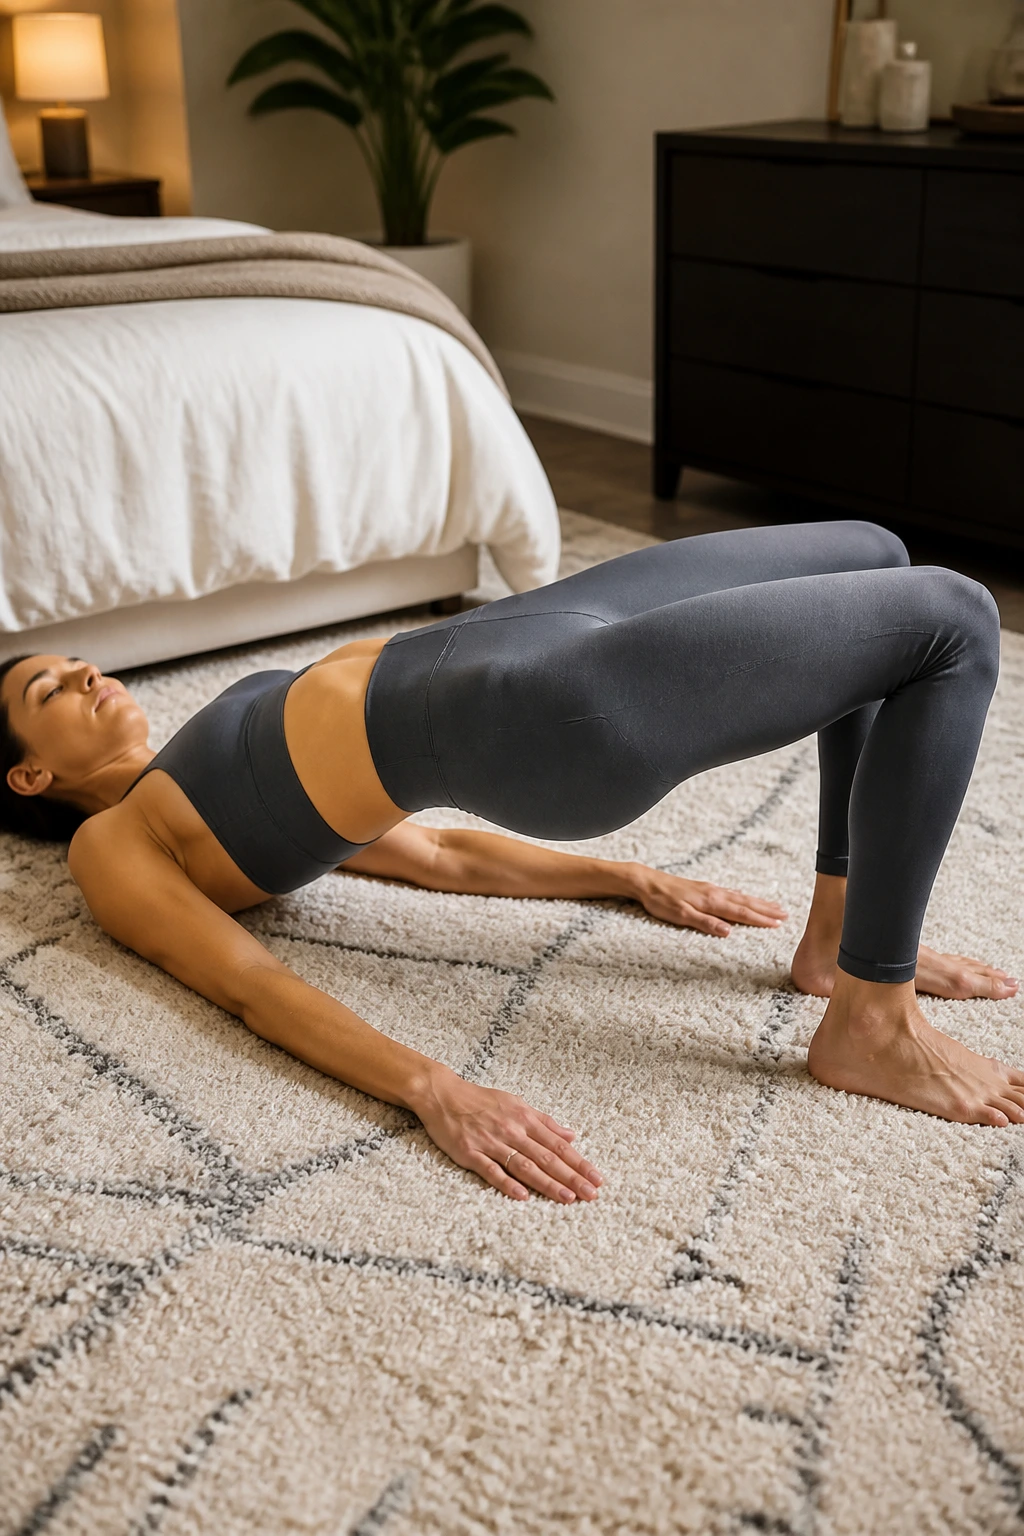
Mobility is not just about stretching; it is about activation. You cannot have good hip mobility if your glutes are “asleep.” Glute bridges help wake up your posterior chain and stabilize your pelvis.
Lie on your back with your knees bent and feet flat on the floor, about hip-width apart. Your heels should be close enough to your glutes that you can almost touch them with your fingers. Push through your heels to lift your hips toward the ceiling.
At the top, squeeze your glutes hard. Do not use your lower back to lift. If you feel this in your lower back, you are likely over-extending your spine. Keep your ribs tucked down. Lower your hips back down with control, letting your tailbone touch the floor last. Perform fifteen repetitions.
11. Ankle Circles
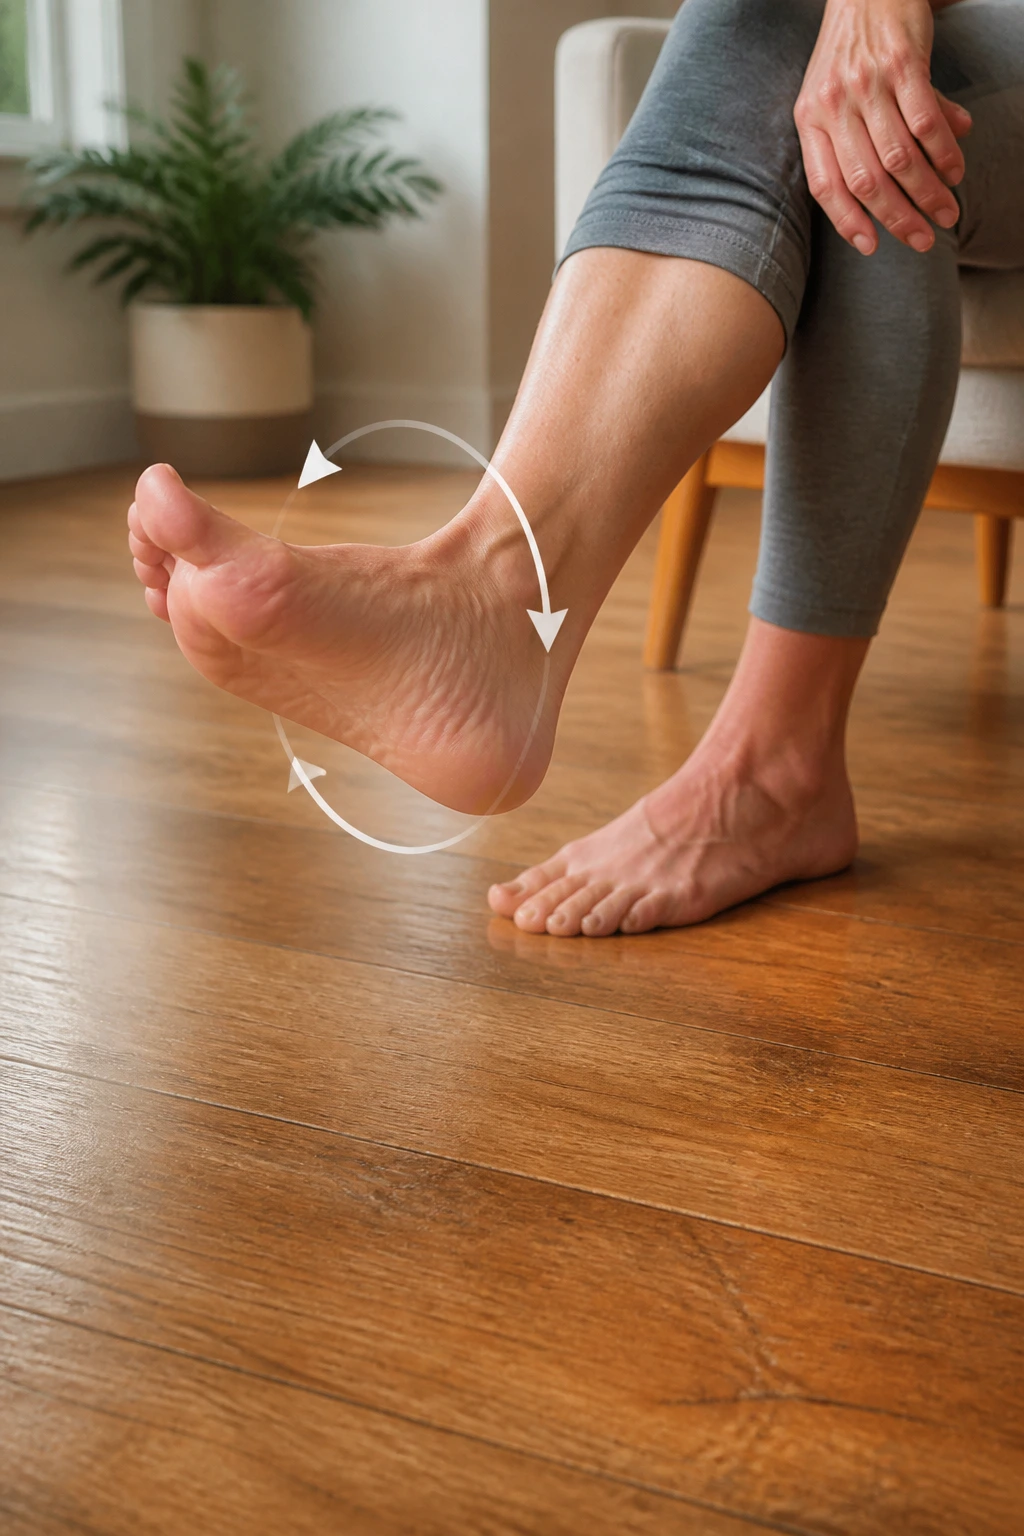
When was the last time you thought about your ankles? If they are stiff, your squat will be limited, your gait will be off, and you will have trouble with balance. We often neglect them because they are so far away, but they are the foundation of everything else.
Sit in a chair or on the floor. Lift one leg and hold your shin for support. Slowly rotate your ankle in a large circle. Pretend you are drawing a circle with your big toe. Make sure the movement is coming from the ankle, not the foot.
Go for ten rotations clockwise and ten counter-clockwise. Switch feet. If you hear popping or clicking, don’t be alarmed—as long as there is no pain, it is just gas bubbles in the joint fluid. It’s normal.
12. Calf Raises
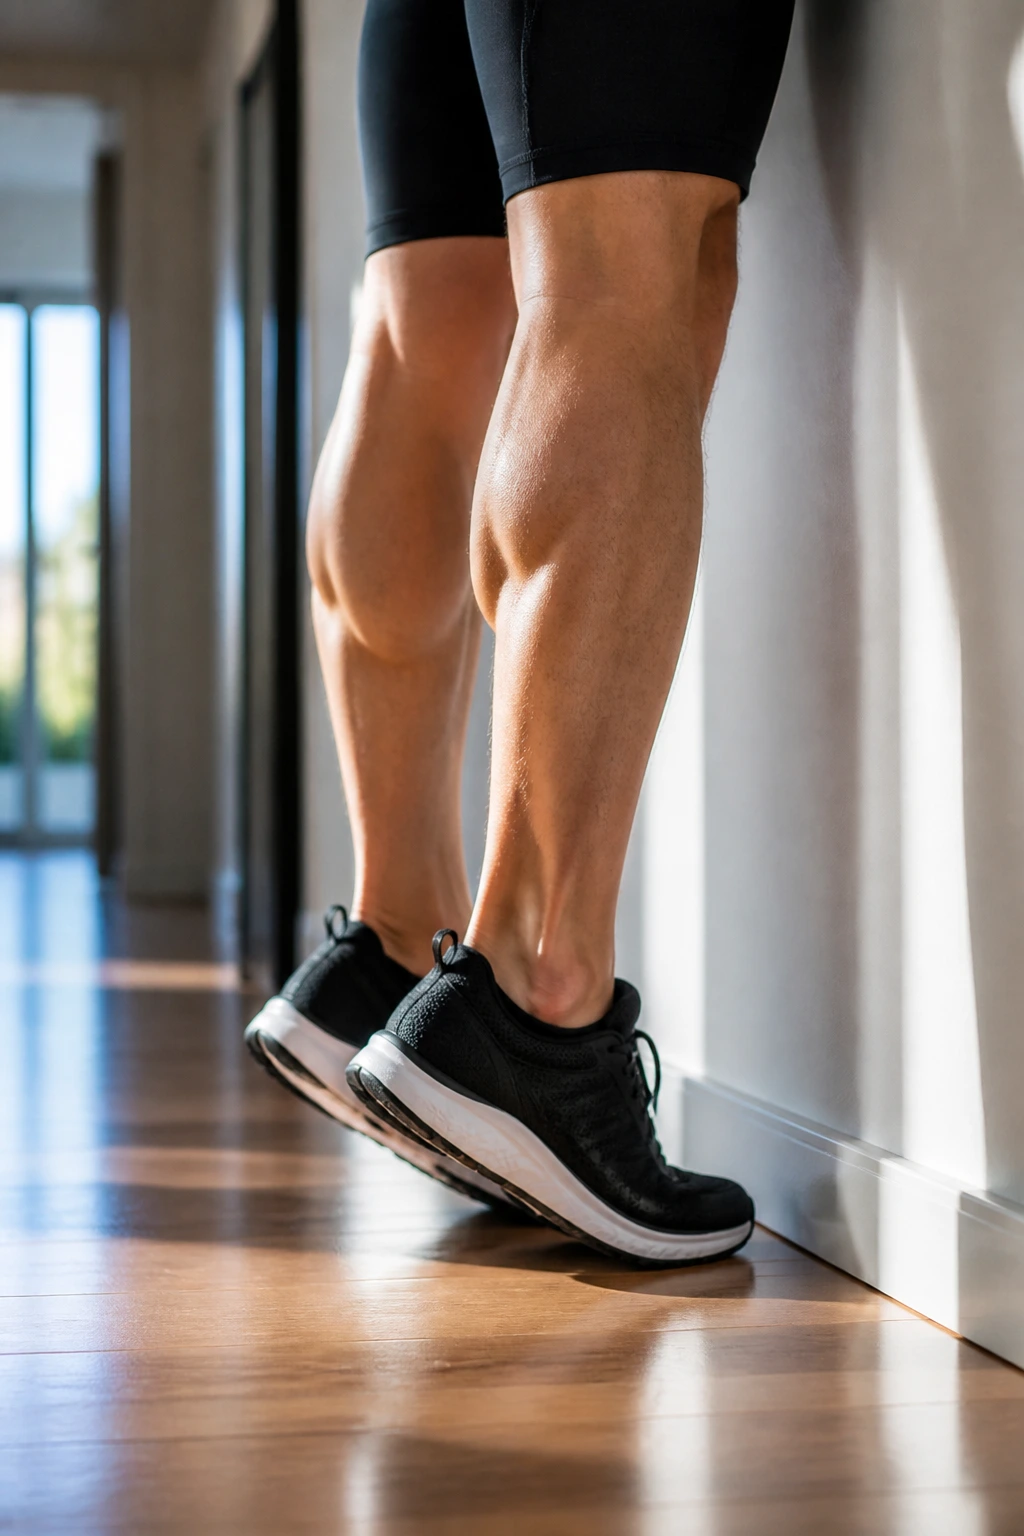
Your calves act as a pump for your circulatory system. When they are tight, they restrict the ankle joint’s ability to bend, which forces your knee to overcompensate. Regular calf raises help maintain range of motion and keep the lower leg muscles supple.
Stand near a wall for balance. Keep your feet hip-width apart. Rise up onto your toes as high as you can, squeezing the calves at the top. Hold for a second, then slowly lower your heels back to the floor.
Do not bounce. The lowering phase is just as important as the lifting phase. Aim for slow, controlled movement. If you want to make it harder, do this on a step—let your heels hang off the edge so you get a deeper stretch at the bottom of the movement.
13. Inchworms
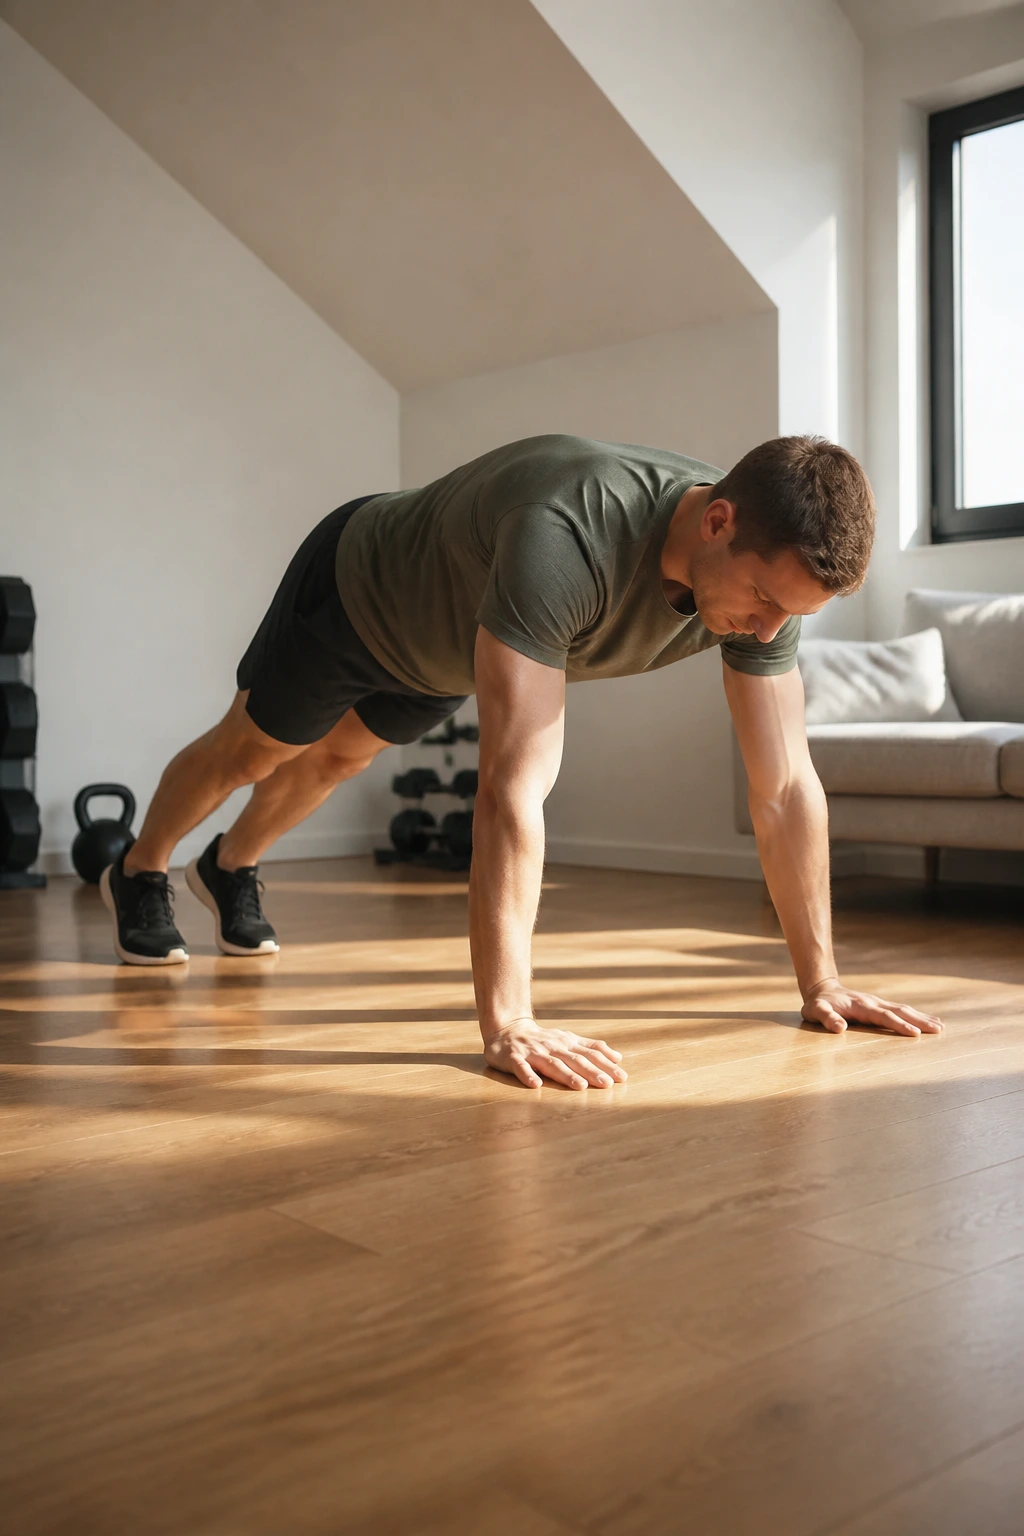
This is a full-body movement that stretches the hamstrings, mobilizes the shoulders, and engages the core. It feels a bit strange at first, but it is one of the most effective ways to warm up your entire posterior chain.
Stand tall with your feet hip-width apart. Hinge at your hips and reach your hands down to the floor—bend your knees as much as you need to. Once your hands are on the floor, walk them forward until you are in a high plank position.
Keep your core tight. Pause for a second in the plank, then walk your hands back toward your feet, keeping your legs as straight as you can manage. Roll up to standing slowly. Repeat five times. This move wakes up your hamstrings and shoulders simultaneously.
14. The World’s Greatest Stretch
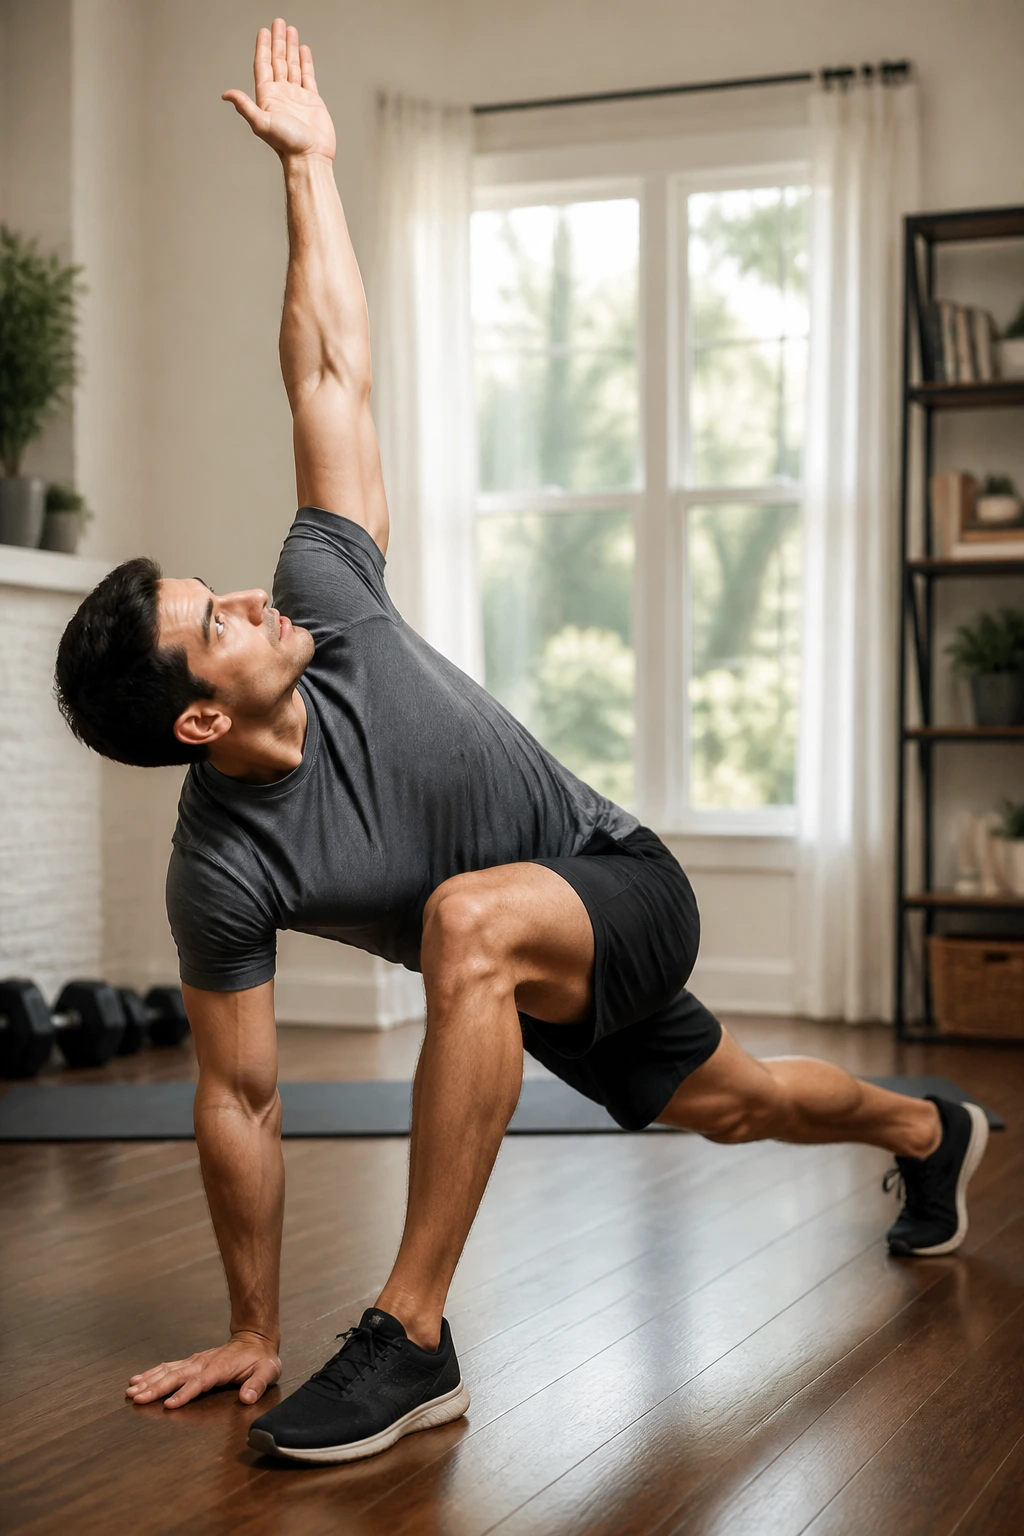
There is a reason this stretch has such an arrogant name—it effectively targets almost every major muscle group in the body. It is a lunge, a spinal twist, and a hamstring stretch all rolled into one fluid motion.
Take a long lunge forward with your left leg. Place your right hand on the floor inside your left foot. Now, reach your left hand toward the ceiling, twisting your torso to the left. Follow your hand with your eyes.
Hold that twist for a breath, then bring your left hand back down to the floor. Now, shift your weight backward, straightening your front left leg and lifting your toes to stretch your hamstring. That is one repetition. Do five reps on the left side, then switch to the right. It’s a complex move, so take your time with the transitions.
15. Child’s Pose
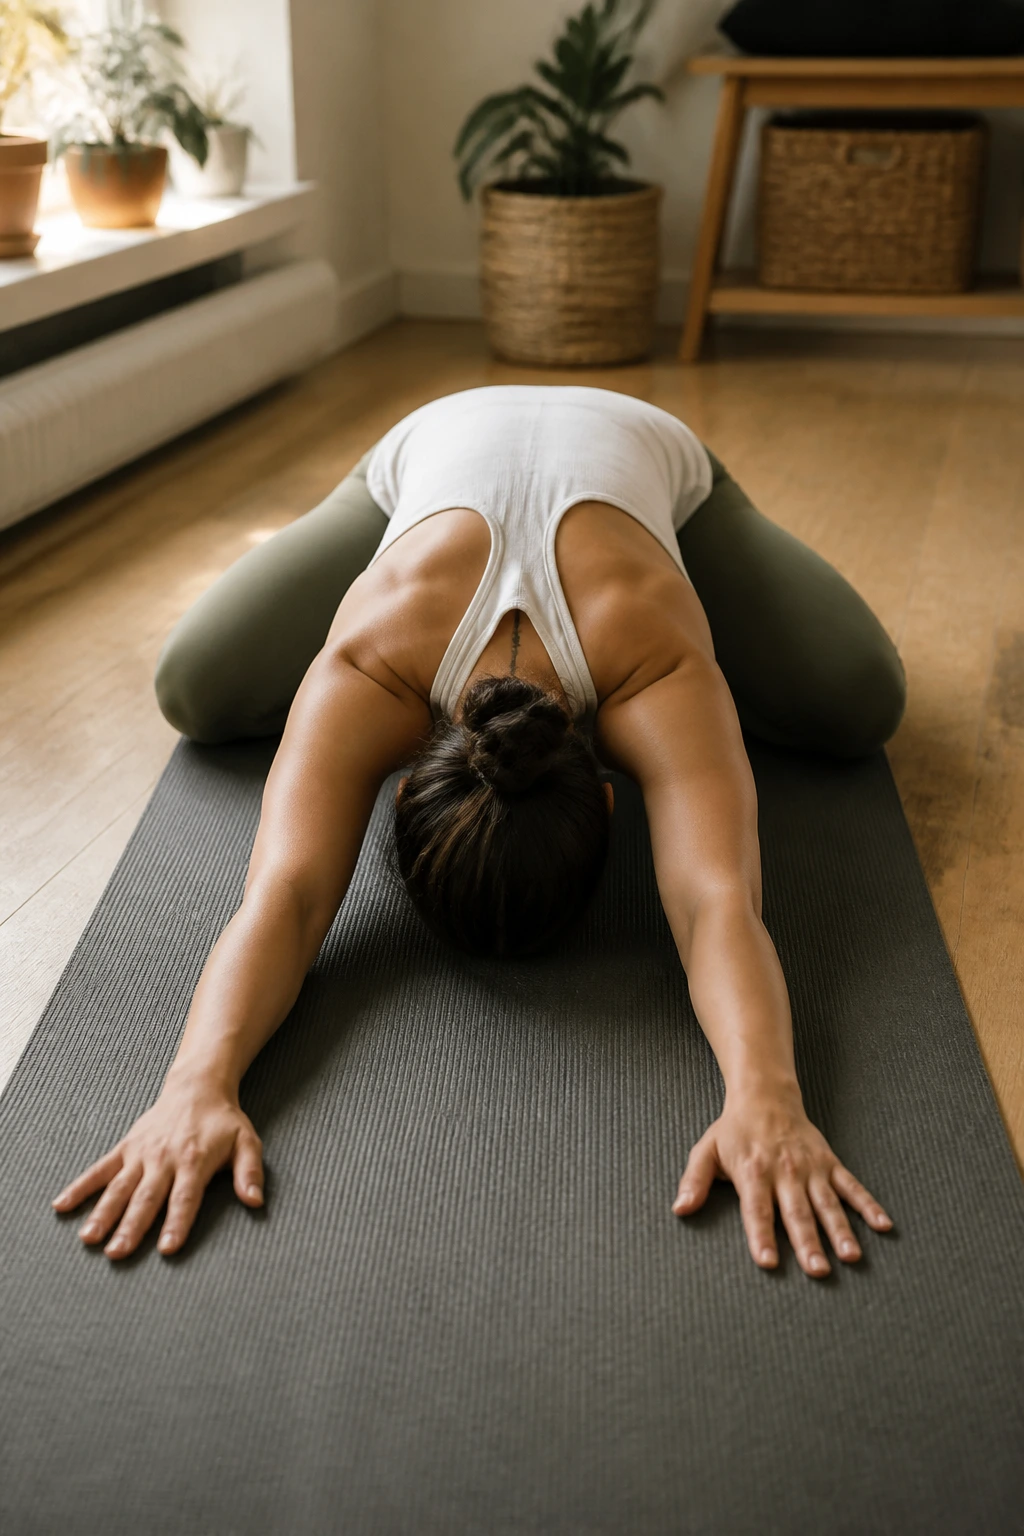
Sometimes, the best mobility work is simply decompressing the spine. Child’s pose is a restorative position that helps stretch the hips, thighs, and ankles while allowing the entire back to release tension.
Kneel on the floor. Sit back on your heels. Spread your knees wide, but keep your big toes touching. Reach your arms forward along the floor as far as you can, and rest your forehead on the mat.
Relax your shoulders. Imagine your spine lengthening with every exhale. This isn’t a position to fight against; it’s a position to surrender into. Stay here for a full minute, breathing deeply into your back. If you feel tension in your neck, you can bring your arms alongside your body instead of reaching forward.
16. Wrist Rolls and Extensions
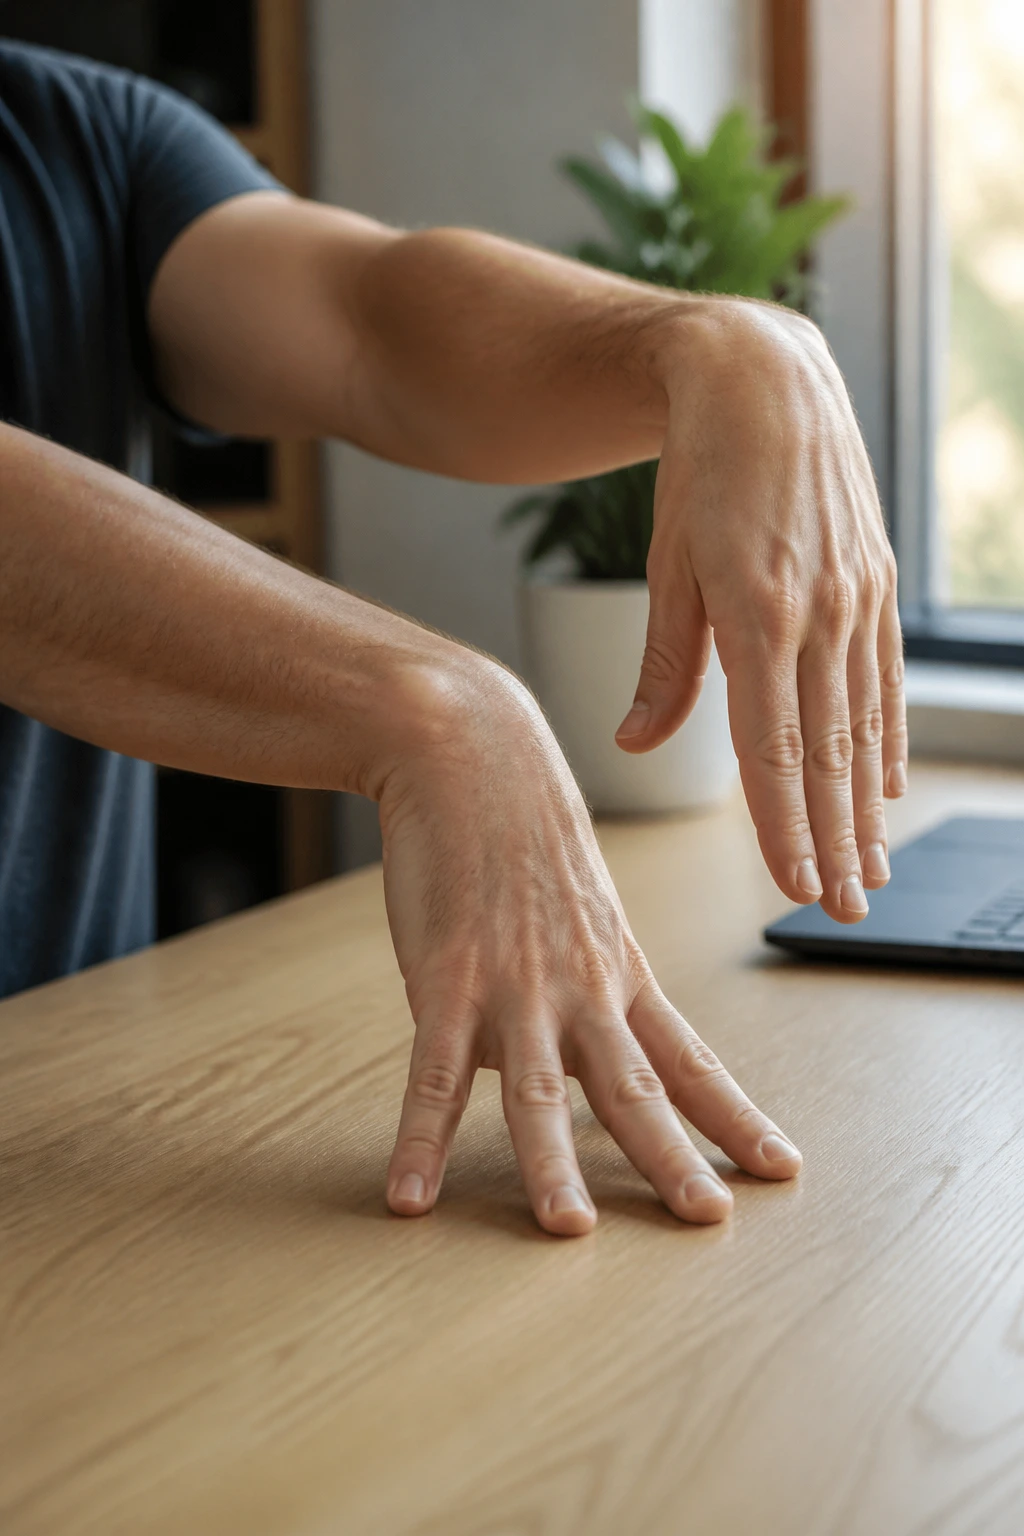
We live in an era where we type and text constantly. Our wrists are almost always in a flexed, shortened position. Regularly working on wrist mobility can help prevent the repetitive strain issues that often plague office workers.
Hold your arms out in front of you. Make a fist and slowly rotate your wrists in a circle. Ten times each way. Then, open your hands and gently pull back on your fingers with your other hand to stretch the forearm flexors. Hold that for fifteen seconds.
Then, flip your hand and stretch the top of your forearm by gently pressing on the back of your hand. Don’t be aggressive here. The tendons in the wrist are small and delicate—gentle, consistent pressure is always better than a hard, forced stretch.
17. Scapular Wall Slides
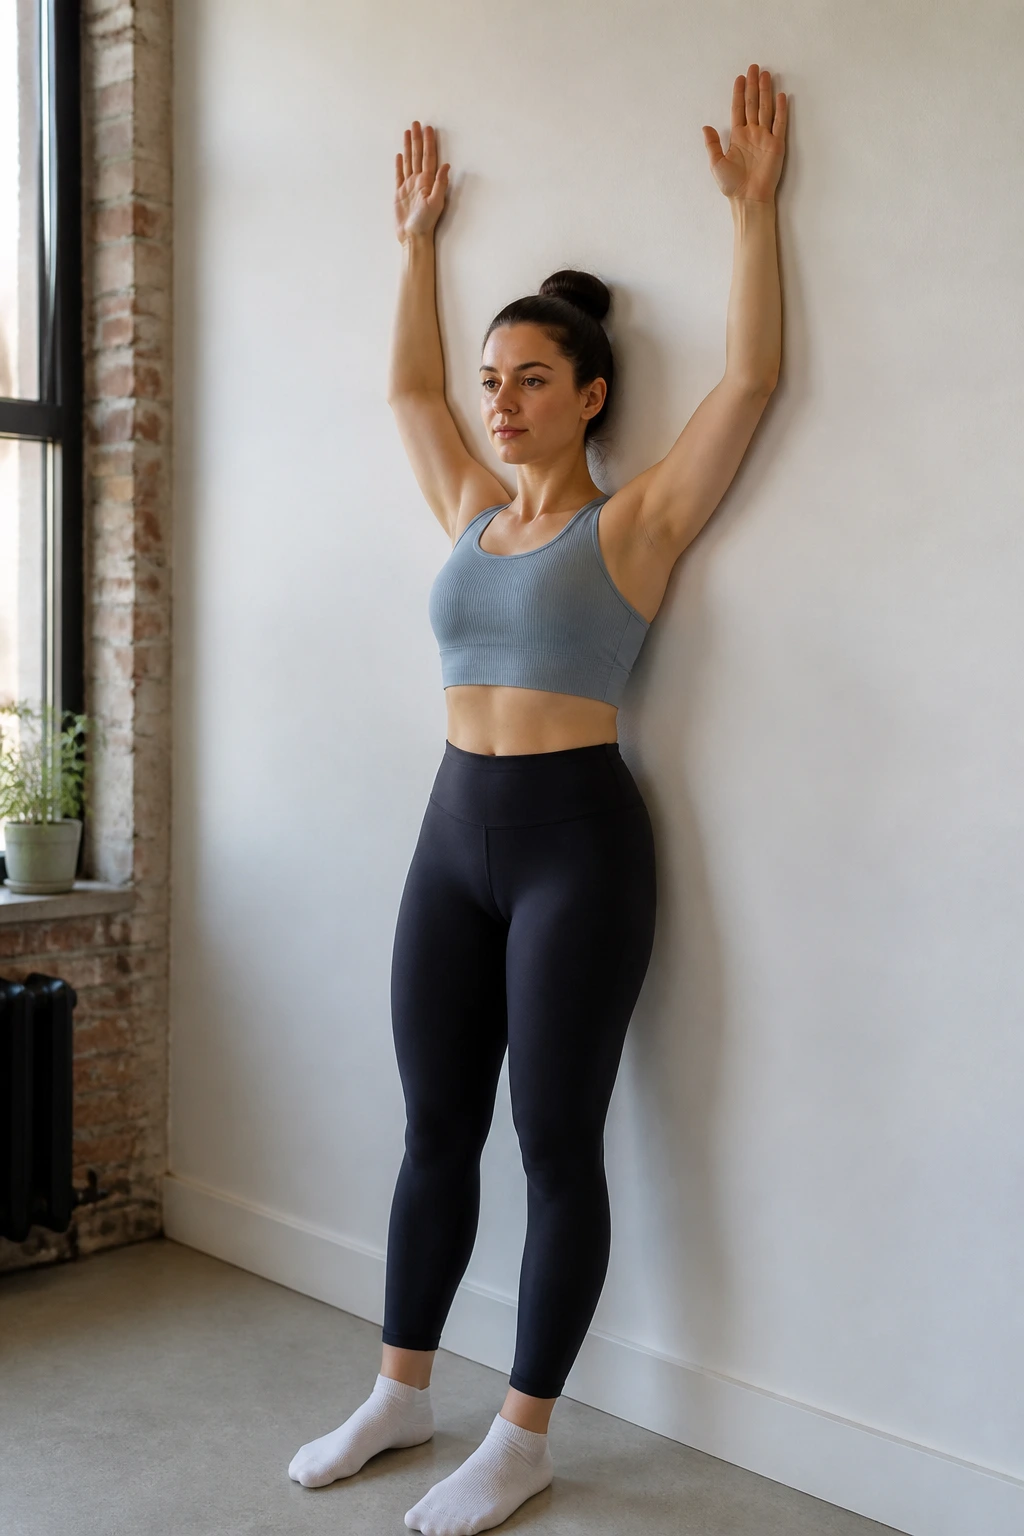
Rounded shoulders are a visual hallmark of modern posture. Scapular wall slides help you relearn how to retract your shoulder blades and open up your chest, reversing that “hunched over” position.
Stand with your back against a wall. Your feet can be a few inches away. Try to get your heels, butt, upper back, and the back of your head touching the wall. Raise your arms so your elbows and wrists are touching the wall, forming a “W” shape.
Slowly slide your arms up the wall until they are straight above you, all while keeping your elbows and wrists in contact with the wall. Do not let your back arch away from the wall. Slide them back down. If you can’t keep your arms touching the wall, that’s fine—just get as close as you can.
18. Lateral Lunges
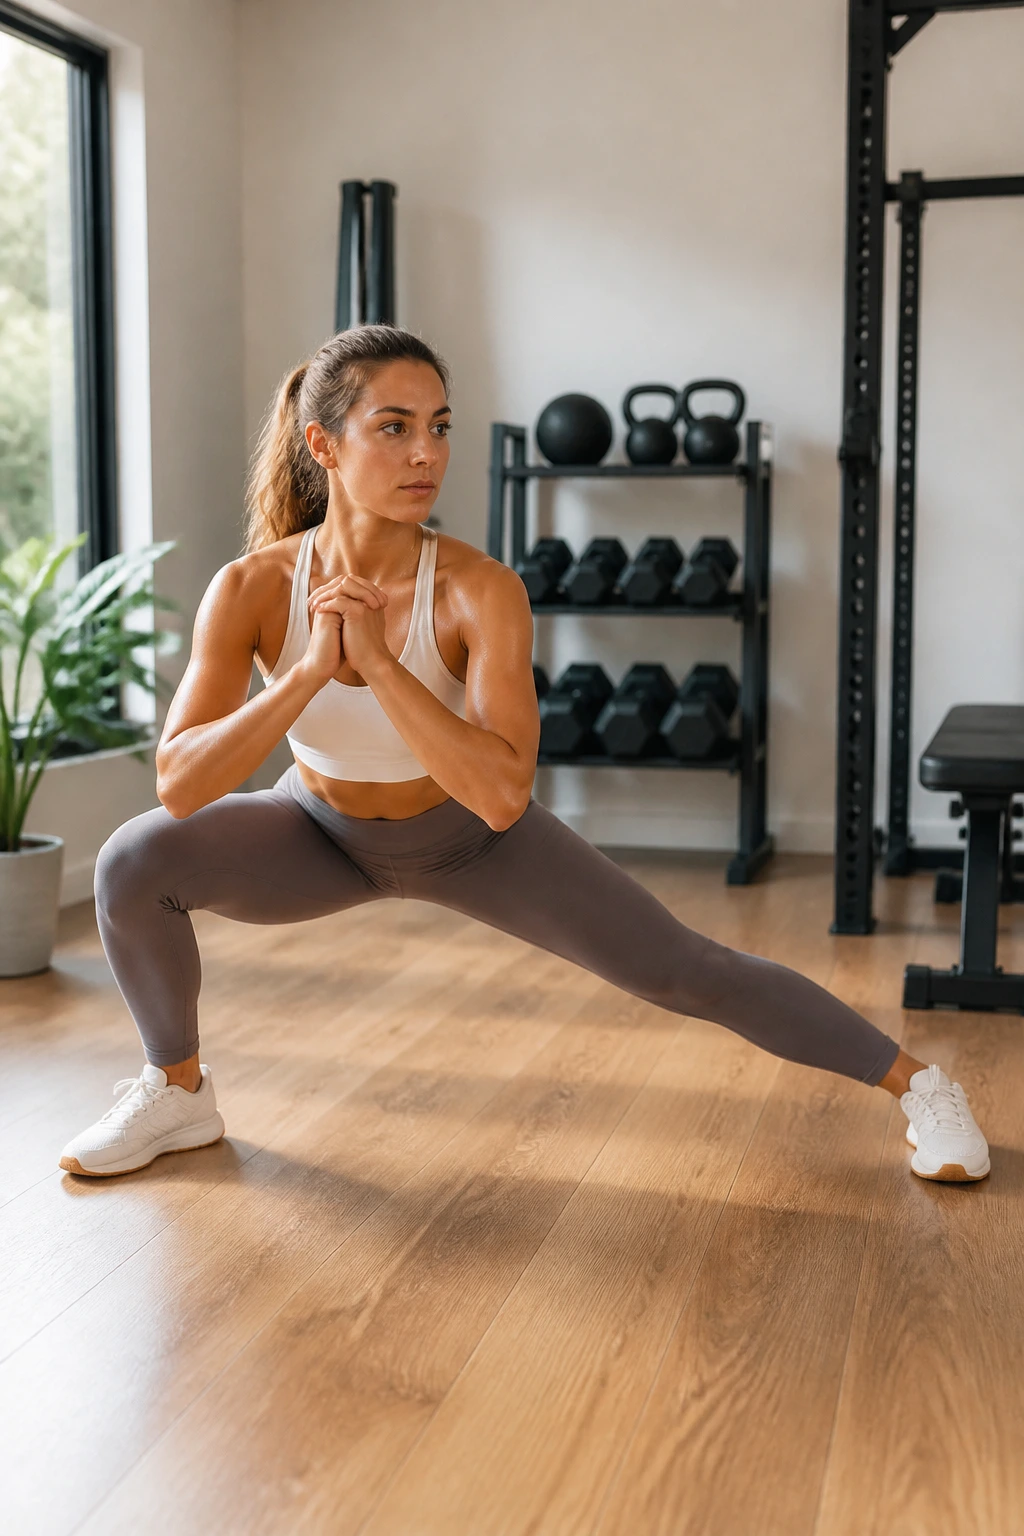
Most of our movement happens in the “sagittal plane”—moving forward and backward. But life happens in all directions. Lateral lunges build mobility in the hips and inner thighs (adductors), which are often neglected in standard workouts.
Stand with your feet very wide apart. Shift your weight to your right side, bending your right knee while keeping your left leg straight. Push your hips back as if you are sitting into a chair on your right side. Keep your chest up.
Return to center and shift to the left. The goal is to keep your heels flat on the floor. If you find your heel lifting, you might need to stay in a shallower range of motion until your ankle mobility improves. Aim for ten repetitions on each side.
19. Deep Squat Hold
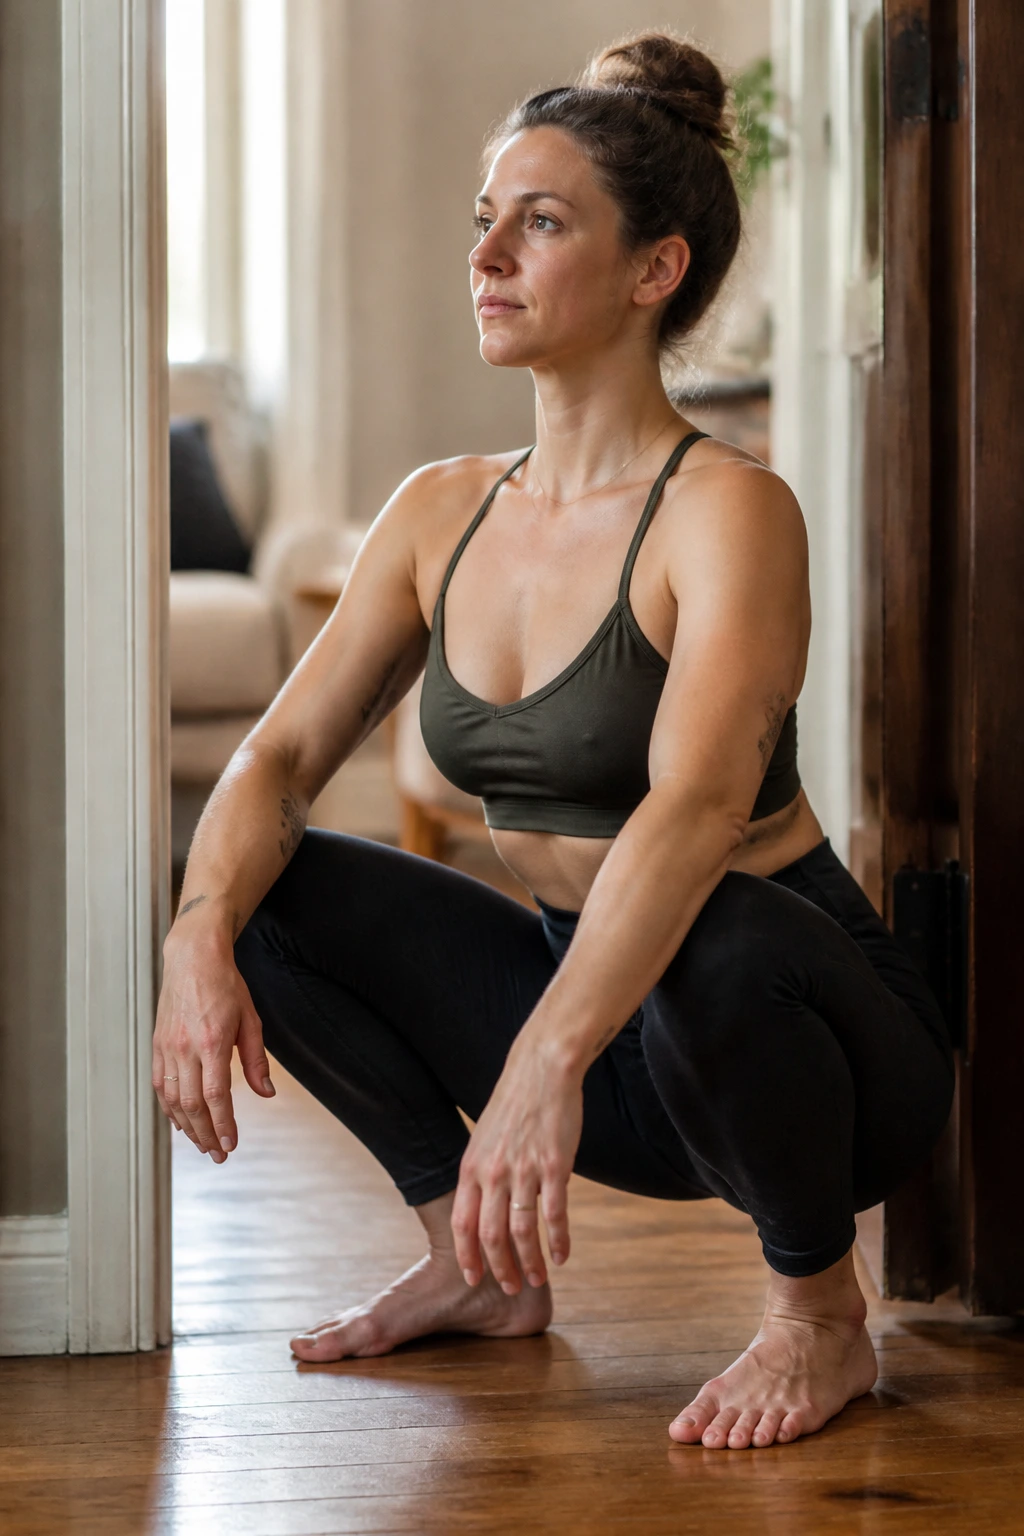
The squat is a fundamental human movement. If you watch a toddler, they squat perfectly with flat feet and a straight back. Somewhere along the line, we lose that ability. Holding a deep squat is one of the most effective ways to regain ankle and hip mobility.
Stand with your feet shoulder-width apart, toes slightly turned out. Lower yourself into a squat as deep as you can go, keeping your heels on the ground. If you fall backward, hold onto a doorframe or a heavy piece of furniture for support.
Once you are at the bottom, try to keep your chest up. Hang out there. You don’t need to do anything else. Just let your hips open up. Even thirty seconds a day makes a difference. Over time, your body will get comfortable in that position again.
20. Thoracic Extension Over Foam Roller
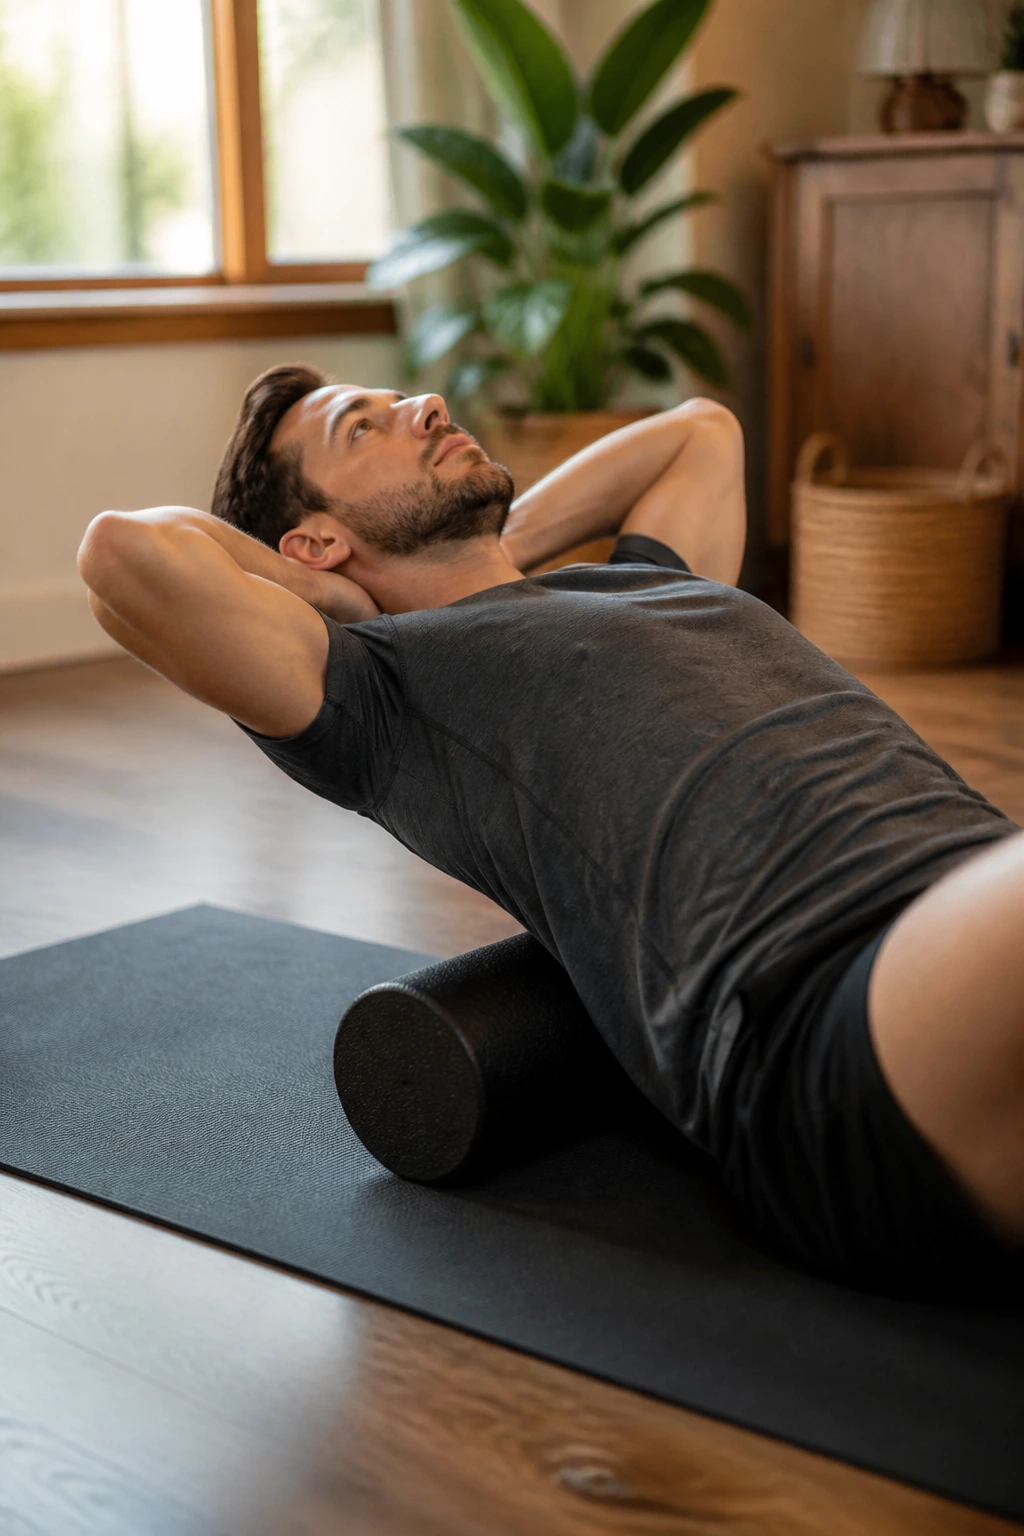
If you have a foam roller, this is the best exercise to end your day. If you don’t, you can use a firm pillow or a rolled-up towel. This helps counteract the forward-slumping posture of sitting at a desk.
Place the roller horizontally behind your mid-back (the thoracic spine). Support your head with your hands to avoid straining your neck. Lean back over the roller. You aren’t trying to bend your lower back—keep your core braced.
The goal is to get your upper back to arch over the roller. Breathe into the stretch. Move the roller slightly higher or lower on your back and repeat. It provides an immediate release for anyone who has been hunched over a screen all day.
Final Thoughts
Mobility is not a destination. It is a maintenance practice, much like brushing your teeth. You will not “finish” these exercises and be mobile forever. Your body changes based on how you use it every single day. If you spend time sitting, you need to spend time moving in the opposite directions.
Consistency beats intensity every single time. Doing five minutes of these exercises every day is infinitely better than doing an hour-long session once a week. Pick a few of these that feel the best—or the “stickiest”—and make them a part of your daily routine. Your joints will thank you for it in the long run.
